
Basic Cart Transactional Capsule
About This Capsule
This sample capsule uses transactional features to create a shirt store. Users can search for shirts (FindShirt), which they can then add to and update in a cart using CreateOrder and UpdateOrder, respectively.
Users can then complete the transaction, by committing the order (CommitOrder) or canceling the order entirely (CancelOrder). Once users complete the transaction, they can check the status (CheckStatus) of the order, view a receipt (FindLastReceipt) that summarizes the details of the transaction, or cancel the order (CancelCommittedOrder).
You should read the Simple Search Sample Capsule prior to reading this document, as this walkthrough builds off of that sample capsule.
These are some of the training entries included in this capsule:
- "Check on my shirt order": No annotations.
- "Buy a T-Shirt for me!": Annotation for shirt style.
- "I'm Extra Large!": Annotation for shirt size.
- "Buy a Men's Ralph Lauren Shirt": Annotation for shirt gender and brand.
Download this Capsule on GitHub
Because you cannot submit a capsule with the example namespace, in order to test a sample capsule on a device, you must change the id in the capsule.bxb file from example to your organization's namespace before making a private submission.
For example, if your namespace is acme, change example.shirt to acme.shirt.
Files Included
The following folders and files are included in the sample capsule. More information about what these files do and how they interact with each other will be explained further in the walkthrough.
README.md- File that includes the latest updates to the sample capsule files.assets- Folder of images used in the capsule. Theimagesfolder has a single icon of a t-shirt in theiconssubfolder and images of all shirts available in the fictional shirt store.capsule.bxb- File that contains the metadata Bixby needs to interpret capsule source code.code- Folder of JavaScript files that actually execute the modeled actions.lib- Additional files needed for the fictional shirt store.shirts.js- JSON file of shirt objects available for purchase.utils.js- Utility functions that help the core JavaScript actions.
models- Folder holdingactionsandconceptsfolders for the different model types. Theconceptsfolder is divided intoprimitivesandstructuresconcepts.resources- Folder of resources, which are organized by locale. In this case, only US-English is supported.base- Folder of resources that cover all aspects of this capsule, regardless of locale.capsule.properties- File that contains test configuration information for the shirt store.*.view.bxb- Files that determine the UI for inputting and outputting information.endpoints.bxb- File that specifies which JavaScript functions map to each of the action models.
en-USFolder of resource files related specifically to the US-English locale.capsule-info.bxb- File that contains the capsule's general information that a user would see.dialog- Folder of Dialog files that determine what Bixby tells the user.layout- Folder of Layout files that determine what the user sees.transactions- Folder of support files that determine transaction states.training- Folder of training files that enable you to teach Bixby how to understand your users. You do not edit these files directly but instead interact with training via Bixby Developer Studio.vocab- Folder ofVocabularyfiles that help Bixby understand variations in utterances.
stories- Folder containing stories, which test if Bixby is acting as expected. You normally interact with these files in Bixby Developer Studio and do not edit them directly.
Sample Capsule Goals
The example.shirt sample capsule and this guide explains the implementation of the following platform features:
- Adding, removing, or updating item properties in a cart
- Confirming a transaction
- Printing a receipt
- Checking the status of the order after confirmation
- Canceling an order, both before and after the commitment
Sample Capsule Walkthrough
This capsule creates a fictional shirt store. This is the usual user flow:
First, users search for a shirt they can buy by asking Bixby to find them shirts, and optionally adding parameters to what kind of shirt they want. Users can add or remove a shirt they want to buy. They can also choose to change the size or quantity of their shirt by updating their cart. When satisfied with their choices, they can confirm their order on a confirmation page.
At any time prior to committing their order, users can choose to cancel their order instead.
Once the order is confirmed, Bixby makes the order. When the order is completed, Bixby creates and displays a receipt with the order information. After the order goes through, the user might want to check the status of their order or cancel it altogether.
There are three distinct phases in this transaction workflow:
- The
transactionstate, where the user prepares the cart by adding, removing, and updating items. - The
commitstate, where the user confirms the transaction and Bixby places the order. - The
activitystate, where the user interacts with the order after it has been committed, such as checking the order status or canceling the order.
Not all transactions require three distinct phases. For more information, see transactional workflows.
Initializing the Order
Users start interacting with this capsule by asking for a shirt to buy. For example, users might say "Find shirts I can buy!" or "Buy a medium Men's Ralph Lauren shirt for me". Bixby starts the transaction with the goal CommitOrder, which calls CreateOrder, an action model of the type BeginTransaction. This set-up is similar to the bank sample capsule's Initialization of Transaction step, but with the purpose of creating a shirt order instead of a bank transaction.
The CreateOrder model is of type BeginTransaction, which indicates to the platform that this workflow is transactional. If this action, the subsequent actions, and associated structures aren't tagged appropriately, the platform can't continue the workflow.
During the creation of this order, the order requires an item to be created and thus calls CreateItem. CreateItem, in turn, looks for a shirt with the FindShirt. After this first item is created, the order is initialized and the initial order is displayed in a confirmation-view.
Creating an Order
The output for the CreateOrder action is an Order structure concept, with the structure tagged with the features key in transaction. This is so Bixby can keep track of this Order throughout the transactional workflow and update it as necessary.
The Order structure has four properties:
items, a set ofItemmodels. It gets them from the input process described below.orderNumber, an integer to keep track of different orders. Since this is a fictional store, it is artificially set by theCreateOrder.jsfile:
orderNumber: 23343,
totalPrice, the total price of the order, which is calculated by a function within theCreateOrder.jsfile:
function calculateTotalPrice(items) {
    var totalPrice = 0
    for (var i=0; i<items.length; i++) {
      totalPrice += items[i].shirt.price.value * items[i].quantity
    }
    return {
      value: totalPrice,
      currencyType: {
        prefixSymbol: '$',
        currencyCode: 'USD'
      }
    }
holdTime, the amount of time the cart can hold the items in the cart before the transaction times out. The JavaScript handles the amount of time:
holdTime: dates.ZonedDateTime.now("UTC").plusSeconds(parseInt(config.get("hold_time"))).getMillisFromEpoch()
The actual hold_time is set in the capsule.properties file:
## Set the config mode of this capsule
capsule.config.mode=test

# hold time in seconds
config.test.hold_time=600
config.test.status_refresh_time=600Use the capsule.properties file to set properties in your capsule that aren't expected to change. For more sensitive information that needs to be stored or for properties that change frequently, you should use the Config and Secrets tab on the Bixby Developer Center.
Most of the Order properties are set by the JavaScript files. However, to get the items property, CreateOrder has a single input (items) that consists of one or more Item structure concepts.
For example, if a user says "Buy me a polo shirt", here is the full execution graph during this stage:
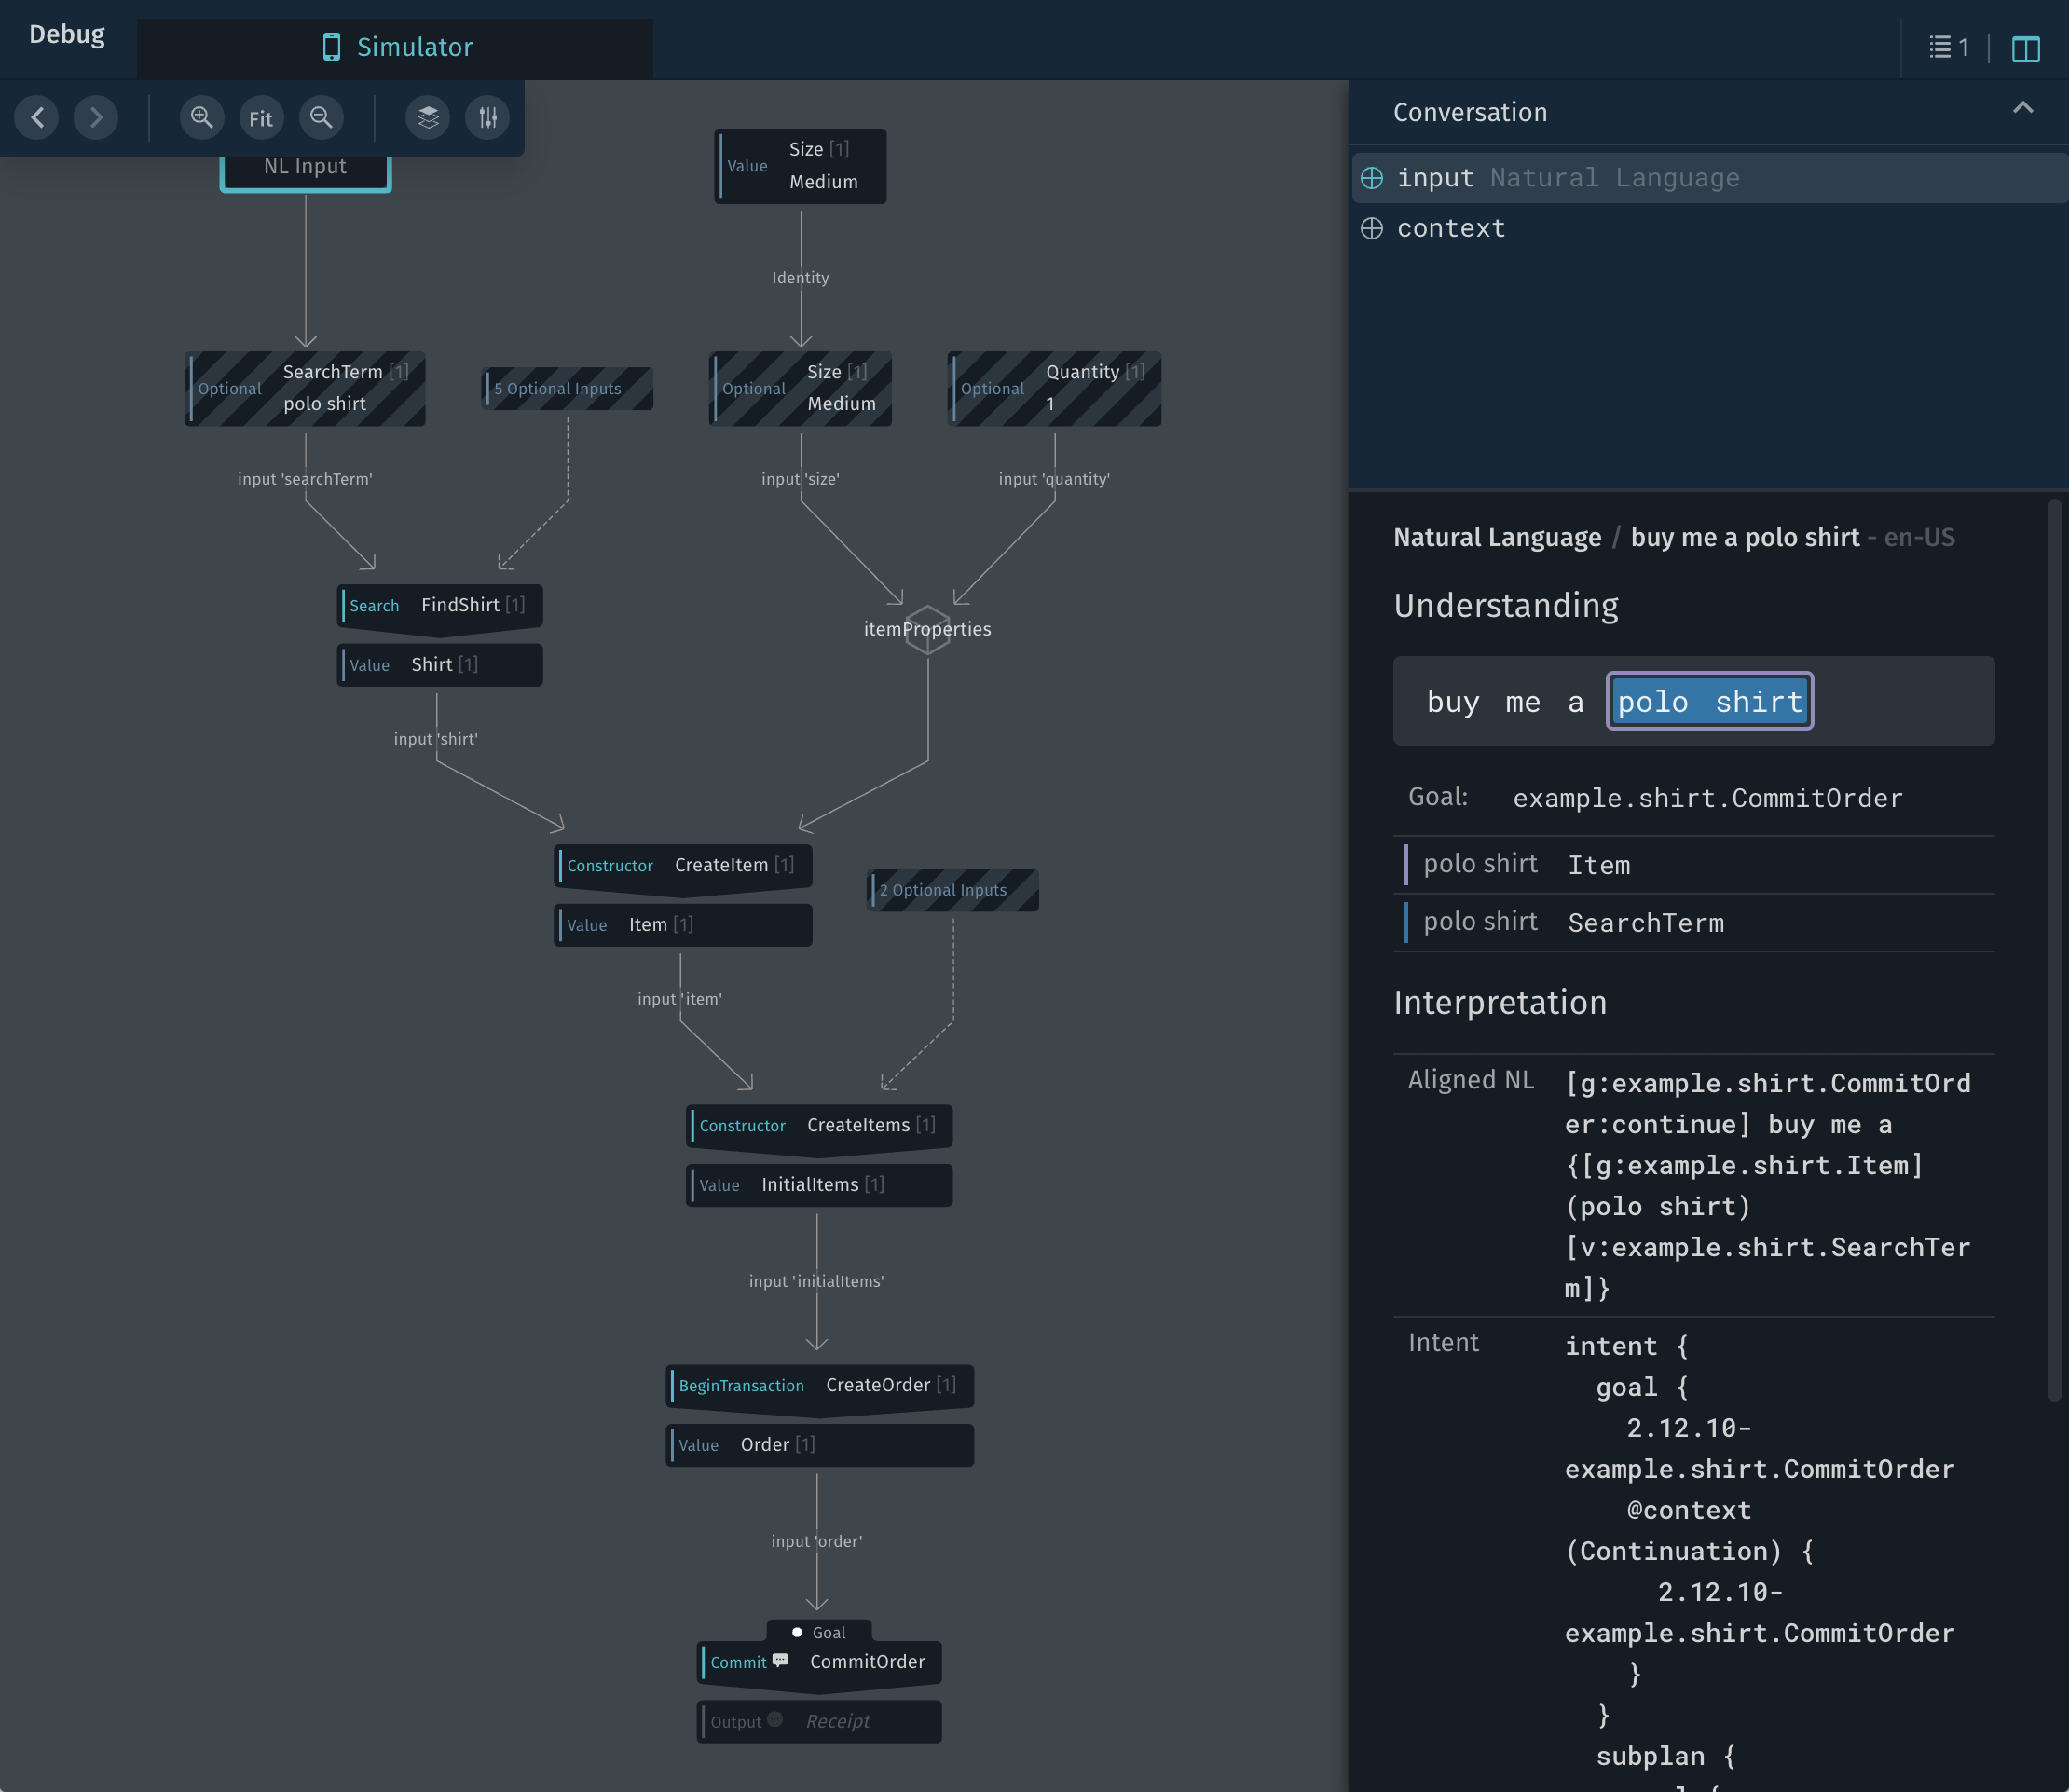
Notice that the execution graph calls FindShirt and then CreateItem in order to actually create the order.
If a specific enough shirt isn't specified (for example, "Buy me a shirt!"), the plan is unfulfilled and the user will need to provide more information.
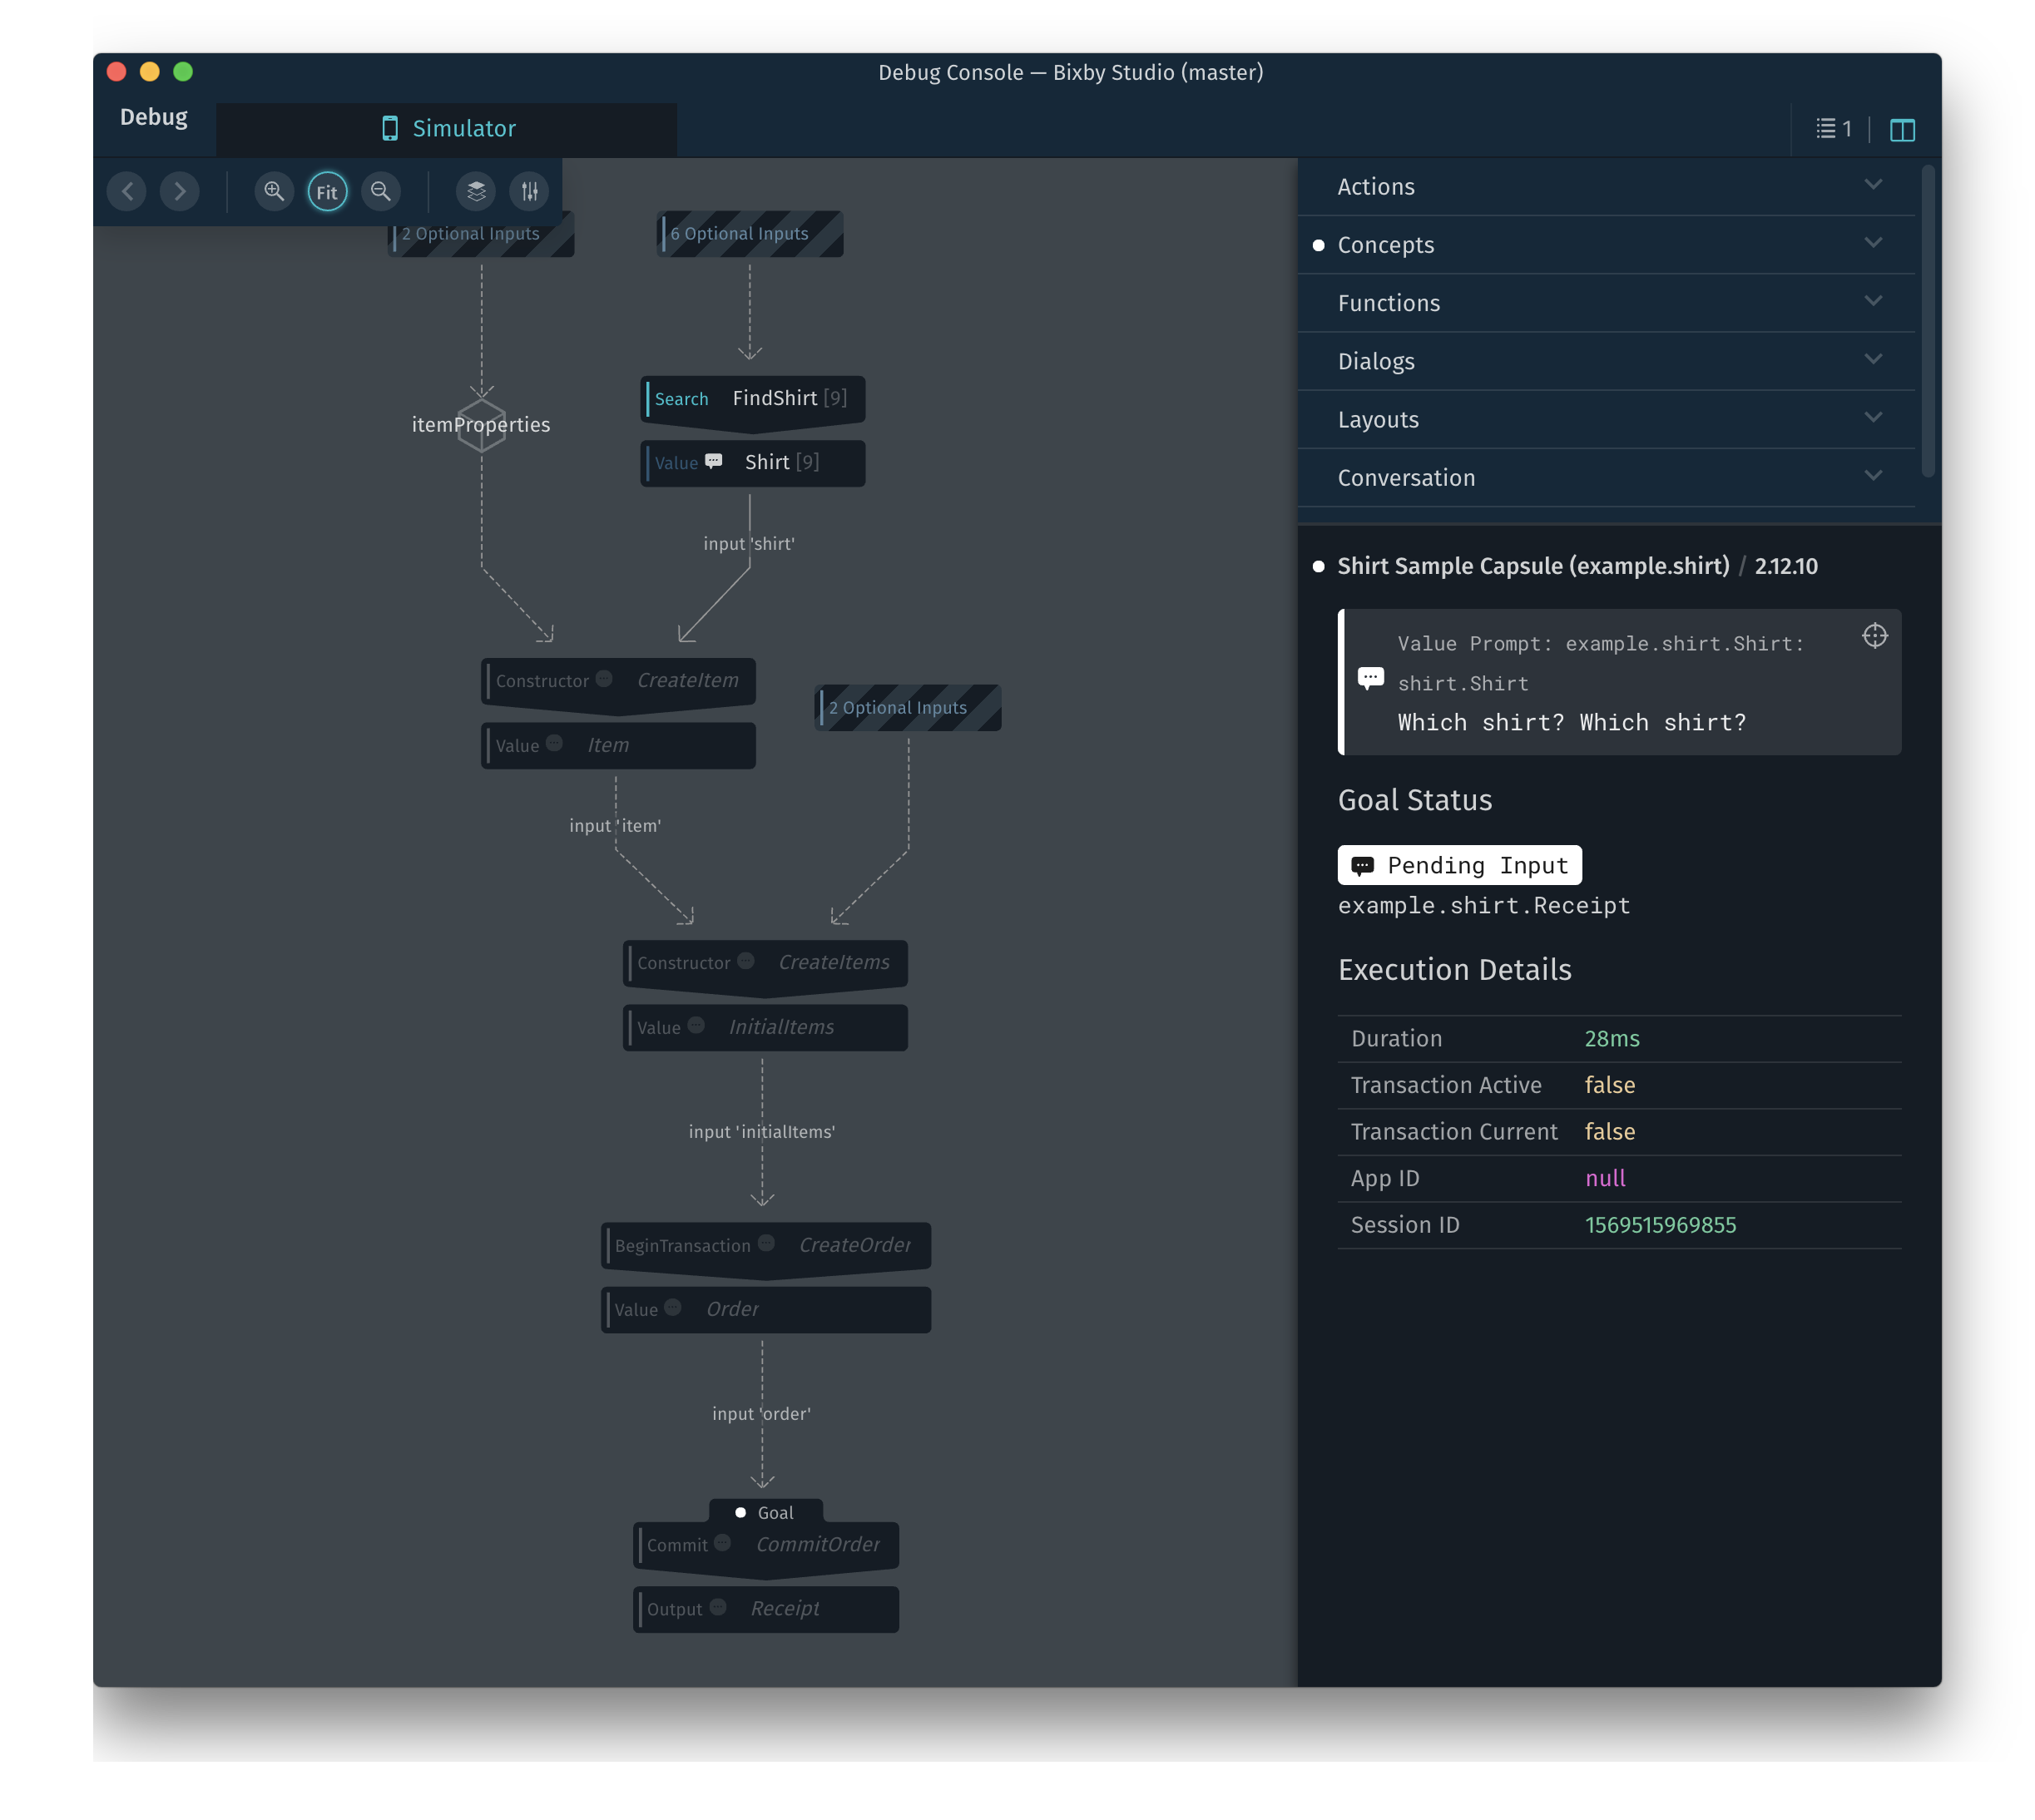
Creating an Item in an Order
When CreateOrder can't fulfill the goal, Bixby generates a prompt with all the shirts available for purchase and users can select a shirt from the generated results.
![]()
This prompt is created by the Shirt_Input.view.bxb file.
input-view {
  match: Size (sizes)
  render {

    selection-of (sizes) {
      where-each (size) {
        macro (shirt-size) {
          param (size) {
            expression (size)
          }
        }
      }
    }
  }
}From this input-view file, you can determine what information is shown to the user in the selection prompt. The where-each key is used to loop through the results, calling the shirt-image-card macro to display an image card for each shirt (as defined in the ImageCard.macro.bxb file).
The CreateItem action, which constructs the Item, collects a shirt, which is initialized by using the FindShirt action. FindShirt works similarly to the shoe sample capsule in finding a shirt that matches possibilities using various search criteria. Each Shirt structure concept has a number of properties that users can specify, which are mapped to primitive concepts in the primitives folder:
price: Thepricemodule uses the importedviv.moneylibrary capsule. InFindShirt, users can specify amaxPriceand aminPrice, which are then compared to thepriceof a given shirt.gender: Enum:MaleorFemale. This is also one of the inputs forFindShirtthat can be used.brand: Enum:RalphLaurenorTommyHilfiger. This is also one of the inputs forFindShirtthat can be used.style: Enum:Tee,Polo,Henley,SweatShirt, andDressShirt. This is also one of the inputs forFindShirtthat can be used.
In addition to these properties, each shirt has a description which gives more details about the shirt, a title which gives a short summary of the shirt, and a photo of the shirt. The FindShirt action can also use the SearchTerm input to look at the title or description of the shirt to try and find the right shirt for the user.
Additionally, an Item needs a quantity and size. This is handled by the input-group for item-properties. If the user doesn't supply these values, there are some initialization methods to get these values.
- For
size: Adefault-initspecifies anintentto get some sizes from a given value set. Thedefault-selectthen uses the rule of pickingM(medium) automatically until Bixby has learned over time what size to choose. Selection learning is turned on with thewith-learningkey. - For
quantity: Adefault-initjust chooses a quantity of1with an intent.
The corresponding CreateItem JavaScript file creates an Item object that maps to the Item model, which has the following properties:
shirt: found and created by theFindShirtsize: set by theinput-groupquantity: set by theinput-group
Each JSON shirt object also has a unique ID for each shirt, which is only used to indicate a unique item in the shopping cart.
Displaying Initial Order
Once the item is created, it is added to the cart and the Order is created.
![]()
This view is determined by the confirmation-view file, Confirmation.view.bxb, which the user ultimately uses to confirm the order. They also use this initial confirmation view to change any inputs.
This view displays different things, depending on how many items are in the cart.
- If nothing is in the cart, a
single-linetelling the user that the cart is empty displays. - Otherwise, it calls the
CommitOrder_Sectionlayout macro, which displays animage-cardwith information about the shirt is displayed. Additionally, asplit-input-cellis below the image card, with tappable cells for theQuantityof the shirt and theSize. If a user clicks on one of theseinput-cells, it updates that item in the cart, depending on which item is selected by triggering an appropriate intent.
Updating the Order
Users might not be satisfied with their order after the initial cart creation. For example, they might add different shirts to or remove items from their cart. Additionally, users can choose to change the size or the quantity of shirts that are already in the cart. In all of these situations, the goal action is CommitOrder, as a continuation of CommitOrder. Finally, they might change their mind altogether and choose to cancel their transaction, which has the goal of CancelOrder.
The UpdateOrder action takes in the existing Order as an input, as well as an input-group of updates:
addedItems: One or more new item to add to the cartchangedItems: A change insizeorquantityof one or more items in the cartremovedItems: One or more removed items from the cart
Each of these *Items concepts take in one or more Item types of that specific type. For example, addedItems takes items of type AddedItem. It can also take AddedItem2 and AddedItem3 concepts, because those have the role-of an AdddItem.
Because of the way this is modeled, users can only update the cart with three items at a time.
Notice that the model does not distinguish between how items are being updated. The UpdateOrder.js file actually does all three, in a specific order, whenever UpdateOrder is called:
//UpdateOrder
exports.function = function(order, addedItems, changedItems, removedItems) {
   //remove, change and then add
   console.log(addedItems, changedItems, removedItems)
   order = remove(order, removedItems)
   order = change(order, changedItems)
   order = add(order, addedItems)
   return order
Instead, Bixby takes the inputs that the user gives plus training to create addedItems, changedItems, and removedItems. When properly trained, a user could ask something like "Remove the polo shirt and update the v-neck tee to a Large shirt".
The UpdateOrder outputs an updated version of the Order. Note that there is a throws key, in case users try to update an empty cart. This lets the user know there are no items in the cart by calling the template macro called NoItemsInCart. Macros are useful in re-using pieces of dialog in multiple situations. For more information on using a macro for dialog, see Reusing Content WIth Macros.
Updating the Order also calls the CommitOrder_FromUpdated_Confirmation.view.bxb file, which you can see from this match pattern:
  match {
    core.Confirmation {
      confirming {
        CommitOrder (action) {
          from-input {
            Order {
              from-output {
                UpdateOrder (update)
              }
            }
          }
        }
      }
    }
  }
Bixby also informs users that the the cart was updated in this confirmation view by telling the user exactly what was updated using the joinAs Expression Language function in the message key:
message ("[#{title(joinAs('input', update.changedItems.items, update.addedItems.items, update.removedItems.items))}. ]Are you sure you want to buy this?")
This confirmation view uses the same layout macro (CommitOrder_Section) as the original confirmation view, so it displays the same content with the updated cart.
Depending on the updates that are provided, the corresponding actions are called. The following sections describe how the corresponding updated items are created.
Adding Additional Items to the Cart
Users might want to buy more than one shirt. They can choose then to invoke CreateAddedItem by using an utterance such as "Add 2 medium polo shirts to my order". This is the Aligned NL:
[g:CommitOrder:continue,r:UpdateOrder] Add {[g:AddedItem] (2)[v:Quantity] (Medium)[v:Size:Medium] (Polo Shirts)[v:SearchTerm]} to my orderCreateAddedItem takes in the existing Order from UpdateOrder and also uses CreateItem from the given inputs to output an AddedItem. This AddedItem is taken back to the UpdateOrder, which will then update the order with the new AddedItem.
![]()
Bixby will re-display the order confirmation screen, now showing the updated cart.
![]()
If users add more than one item to their cart at a time, Bixby uses AddItem2 and AddItem3 to update the AddedItems structure.
Removing Items from the Cart
If users change their mind and don't want a certain item in their cart, they can choose to remove it, either by using an utterance, such as "Remove the Polo Shirt from my order", or with the user interface. Here is the Aligned NL for the utterance:
[g:UpdateOrder:continue:Order] Remove {[g:RemovedItem] (Polo Shirt)[v:SearchTerm]} from my orderWhen users request to remove something from their cart, Bixby calls UpdateOrder and then executes the CreateRemovedItem action. This action takes in the chosen Item and the existing Order to get a RemovedItem.
Optionally, a user can specify how many of the given item they want removed and if a quantity cannot be determined, then all of that shirt type is removed:
    //how many should be removed
    //all will be removed if not specified
    input (quantity) {
      type (Quantity)
      min (Optional)
    }
This is one situation where vocabulary is particularly useful. If "a" wasn't listed in the quantity enum, Bixby could erroneously remove all the shirts instead of a single one.
Once that RemovedItem is created, it can be passed back to UpdateOrder and the helper remove() function in UpdateOrder.js can correctly remove the given item and update the existing order.
Bixby will, as before, present the updated cart view, with the removed item(s) no longer displayed.
![]()
They could also remove an item by selecting the quantity in the UI and inputting 0 as the quantity. If this happens, Bixby treats it as an update to the quantity.
Updating Items in the Cart
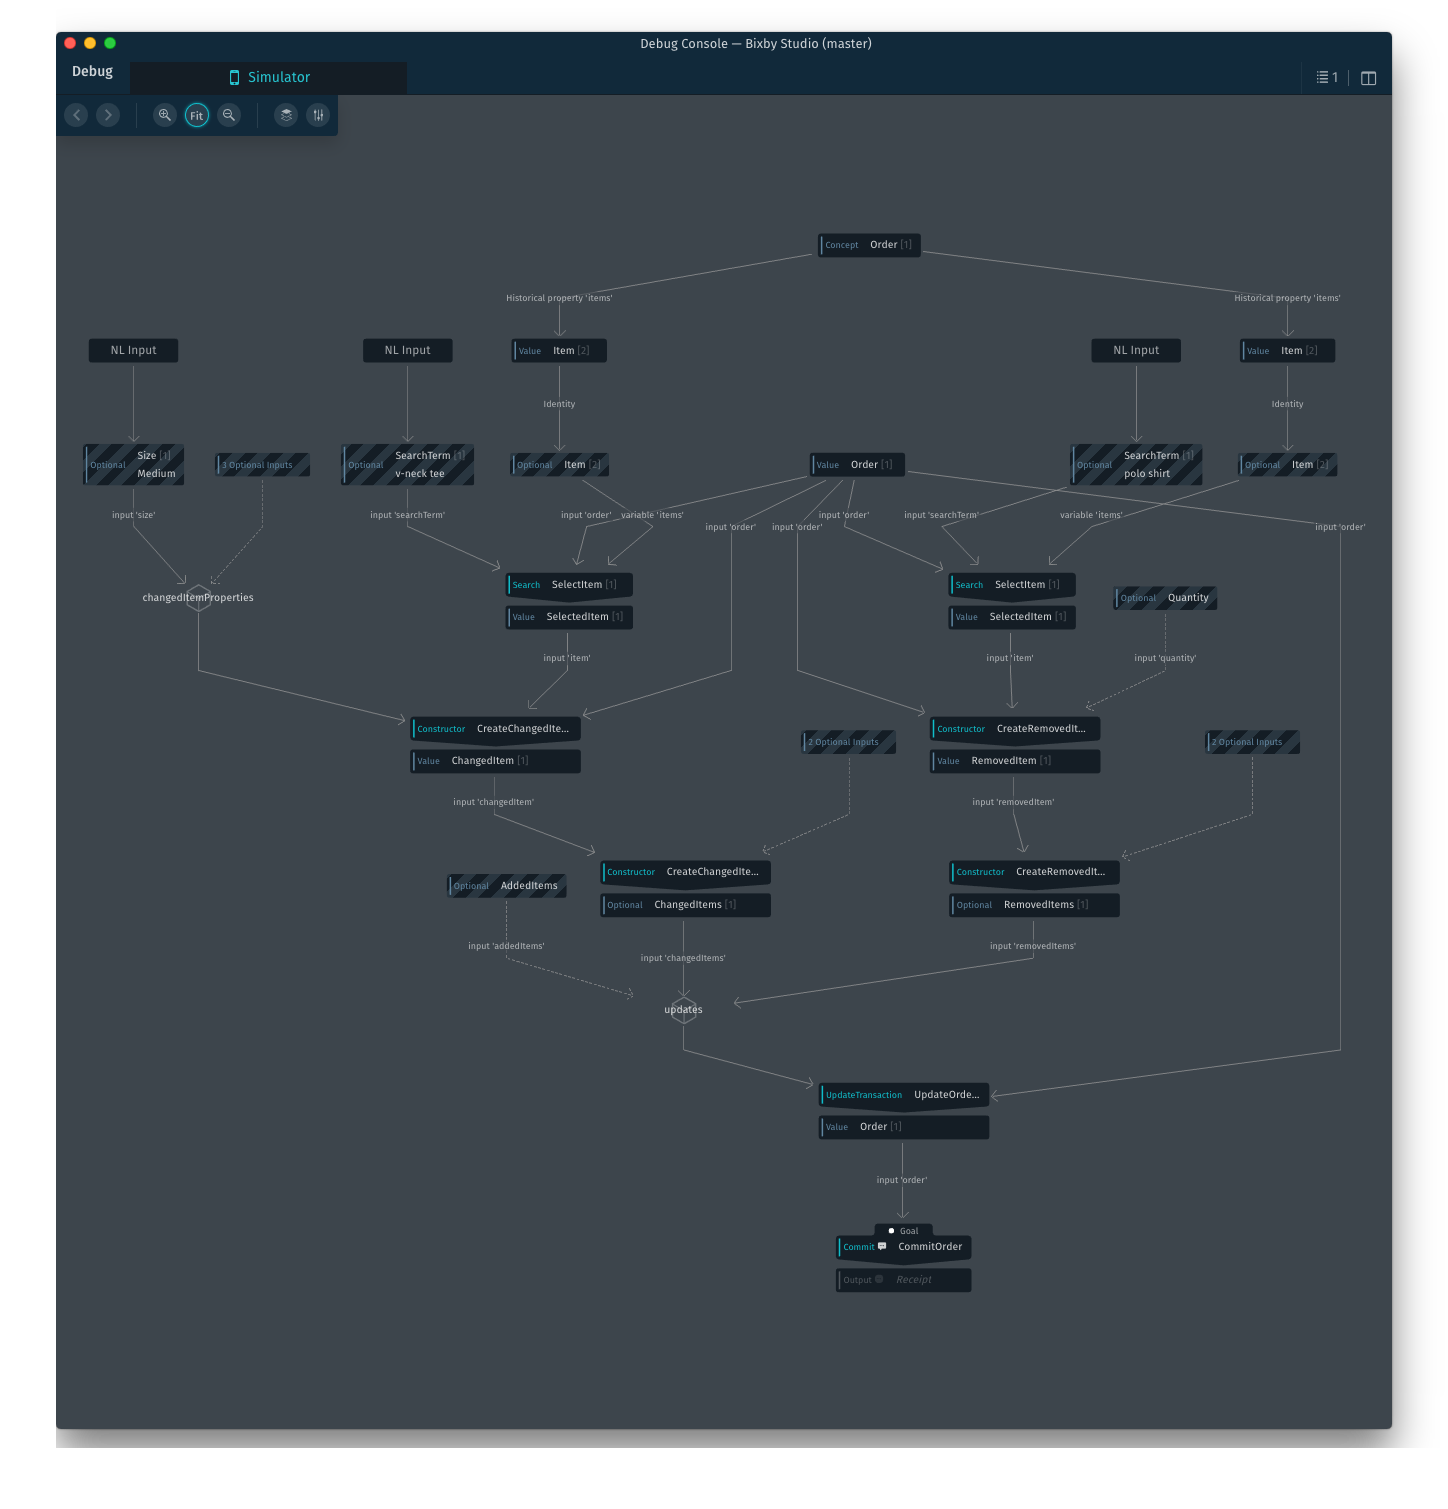
Sometimes, users might want to change a detail about an item in their cart. For example, a user can ask Bixby to "Change the size to Large" for the shirt that is currently a Medium. The goal of that utterance is the UpdateOrder action, which will then call CreateChangedItem in order to pass a ChangedItem back to UpdateOrder. If Bixby is unsure of which shirt that you want changed, it will prompt you to choose one, which is explained further below.
Here is a plan graph to help illustrate what is happening:

Here is the Aligned NL:
For a
sizechange:[g:CommitOrder:continue,r:UpdateOrder]
Change the size to {[g:ChangedItem]
(Large)[v:Size:Large]}For a
quantitychange:[[g:CommitOrder:continue,r:UpdateOrder]
Change it to {[g:ChangedItem]
(2)[v:example.shirt.Quantity:2]}
Alternatively, the user can click on the size or quantity in the UI. For example, if they want to change the quantity, they would click on the Quantity button in the cart.
![]()
This will cause a prompt to pop up for the user. The prompts will differ depending on which Item property users want to update.
The size prompt is created by the
Size_Input.view.bxbfile.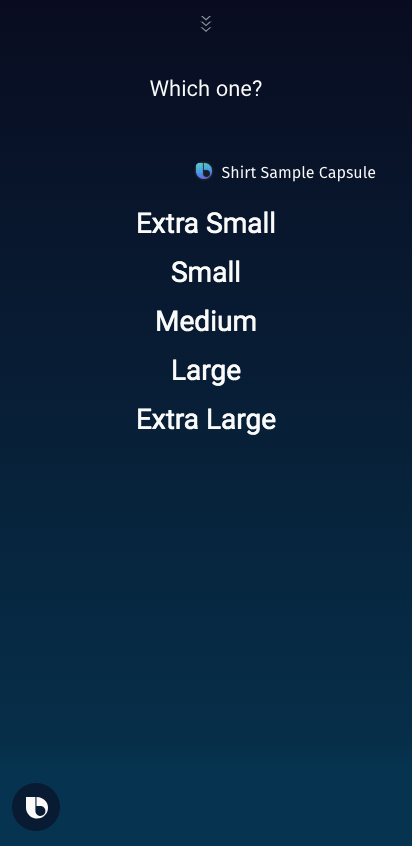
The view renders a
selection-of, which displays all the available sizes for that shirt and upon selection, passes the choice back to theQuantityfor the updated item.The quantity prompt is created by the
Quantity_Input.view.bxbfile.
The view renders a
formwith anumber-input, so that users can input a number of shirts they want.
Bixby knows how to handle the incoming properties and creates these prompts because of CreateChangedItem.
The CreateChangedItem action takes in the existing Order, the SelectedItem, and the group of changed-item-properties.
The SelectedItem structure also has the concept features key set to transient. This is because we don't want the system to remember these choices in the future, especially if the user decides to change the size or quantity of a different shirt in the cart.
Bixby knows which item is selected in CreateChangedItem either directly from the UI choice or from the utterance itself.
    //the item to be updated, resolved by searching the order items
    input (item) {
      type (SelectedItem)
      min (Required)
      default-init {
        intent {
          goal: SelectItem
          value: $expr(order.items)
        }
      }
    }
The SelectItem action takes in the existing Order, any search terms used, and computes the selectable items from the Order to output a SelectedItem to pass back to CreateChangedItem. It matches a search term (for example, "v-neck") to the list of items in the order. There are three possible outcomes for the SelectItem action:
A single
itemfrom theOrdermatches the search terms and is returned bySelectItem.Multiple
itemsmatch, in which case aMultipleMatchesexception is thrown:
      error(MultipleMatches) {
        property (matches) {
          type (Item)
          max (Many)
        }
        on-catch {
          //prompt for matched items, clear searchTerm
          prompt (items) {
            required-value (true)
            single-value (true)
            candidates (matches)
          }
        }
In this case, Bixby creates a prompt for users to choose one of the matched items.
![]()
Bixby knows to use the Shirt_Input.view.bxb file to create a selection prompt of shirts, since a shirt needs to be specified in this situation.
- Nothing matches, in which case an
on-emptyexception is thrown:
    on-empty {
      //prompt for items, clear searchTerm
      ordered-effects {
        drop (searchTerm)
        prompt (items) {
          required-value (true)
          single-value (true)
          candidates (items)
        }
      }
    }
In this case, a prompt is created with all the items in the cart, if there is anything in the cart. Otherwise, Bixby informs the user that the cart is empty using a dialog macro: No items in shopping cart!
As for getting the changed-item-properties, CreateChangedItems is looking for a promptedSize from the prompt, a size directly from the utterance, a promptedQuantity from the prompt, or a quantity directly from the utterance. Notice that the size and quantity inputs have the plan-behavior key set to Direct, to indicate to the planner that the value should be passed directly from the utterance to ChangedItem, which should be instantiated with this new value.
In order for the UI to be tappable so that items are editable (and consequently, have promptedSize or promptedQuantity instantiated), several files need to be in place. This capsule uses Bixby Views, as described briefly with the prompts information above.
Both PromptedSize and PromptedQuantity have a role-of set to the concepts of Size and Quantity respectively. Notice also that they have the concept features key set to transient, similar to ChangedItem.
The corresponding JavaScript file takes in that order with the new size or quantity and updates the order object property to the new properties.
This ensures that the prompt stays consistent and doesn't assume any of the users' preferences when shopping, as users might be shopping for other people.
Once CreateChangedItem has all its required inputs, it evaluates the given inputs and outputs a ChangedItem.
Canceling the Transaction
If users decide that they don't want to order anymore, they can tell Bixby to cancel their order. This is the Aligned NL:
[g:CancelOrder:continue:Order] Cancel this orderBixby then recognizes the goal to be the action model CancelOrder, which is of the type CancelTransaction. The JavaScript file then takes the existing Order structure to create a Receipt, with the orderState set to Cancelled, while the platform aborts the current transaction. Bixby then lets the user know that the order is canceled.
![]()
The utterance "Cancel" is one of the reserved utterances and does not create the same response as "Cancel this order".
Confirming the Transaction
When users are satisfied with their choices, the transaction can move to the Commit state. Since the ultimate goal is the CommitOrder action model, the CommitOrder takes in the order from CreateOrder and uses the confirm key to call the confirmation view for users, and returns a receipt.
The confirmation view displays the order and any options that the user can edit in the view, which is discussed in the Updating the Order section. The confirm-options block ensures that a true confirmation value is passed back to the system and renders the Yes button at the bottom of the screen.
![]()
If the user clicks Yes, CommitOrder moves the transaction into the Commit phase.
In a real transaction that requires payment from the user, you can choose to punch out the user to the app or website to complete the transaction.
Placing the Order
After the order is created and confirmed, the order is automatically created and placed.
In a real scenario, the JavaScript file would use an API call to contact the store server with payment information to process the transaction and to let the user know if it's completed. In this sample capsule, all orders automatically go through, without any validation.
This transaction outputs a Receipt, with the properties order (which references the order created), orderState (which tells users the current state of the order), and statusRefreshTime (which is of the type time.DateTime and lets users know when the status of the order was last updated).
The statusRefreshTime property has visibility(Private) set, so other parts of the capsule and the platform cannot call it. This property is also set by the capsule.properties file:
config.test.status_refresh_time=600Unlike the simpler transaction capsule however, the example.shirt capsule's Receipt has a features key defined:
features {activity}
This features key ensures that once the Receipt is created, the entire transaction is moved to the last phase of activity. This state needs to be defined in any case where you plan to do something with the transaction after it was committed. Otherwise, it's not necessary, like in the bank capsule.
![]()
Interacting After Committing
All actions after committing are in the activity state. After users commit and send their order, they might choose to do something with this order, such as checking the status of their order or canceling the order. For more information on giving updates in the activity state, see the Updates with Activity Cards section.
Here are some examples of interactions after committing:
"Check on my shirt order" in various stages:


"Cancel my latest order":

In order to do either of those things, Bixby has to find the last order. Then it can either query the order's status or cancel it.
Any actions in the activity state are partly handled by activity-support in the Receipt.activity.bxb file. The orderState determines the state of the activity transaction's life:
Orderedhas stateScheduled. This means that the transaction has been received and processed, but the activity hasn't happened yet. In this case, the shirt package is scheduled but not yet shipped.Shippedhas stateRelevant. This means that the order has moved to a new state that the user probably wants to know. In this case, users want to know if their package has been shipped and is on the way to them.DeliveredandCanceledhave stateRecent. This means that the activity is over, either because the shirts have reached the user or because the user canceled the order. TheRecentstate also indicates to Bixby that the entire transactional workflow is over, so no other actions can or should be taken.
The point of the states is to help keep track of the different stages during the activity and enables you to continue interacting with the user after the transaction was committed.
In all three instances, Bixby reacts in the same way: it displays the order information and its current state to the user through the summary-view and the details-view . There is also an expires key, which dictates how often the status of the activity should be checked and refreshed. The statusRefreshTime is set by the Order's statusRefreshTime property, which is determined in the capsule.properties file, as mentioned earlier.
In other transactions however, you might want to do different things at each stage. Consider the example of booking a hotel. When you're booking a hotel, during the Scheduled stage, you might want to have a "days-until" countdown until the start of the reservation. When the transaction gets to the Relevant stage after they've checked in, Bixby could send an Enjoy your stay! message. And when the user has finished their stay at the hotel and the transaction has moved to the Recent stage, Bixby could ask the user to rate their stay at the hotel.
Finding the Last Receipt
Bixby stores each transaction (and the corresponding receipt) created after a Commit is made in a platform-maintained archive. If the transaction does not reach the Commit phase (for example if a user decides to check the weather and exits out of the example.shirt capsule before buying a shirt), then the transaction is not stored.
In order for Bixby to retrieve this last receipt, this capsule has a FindLastReceipt action, of type ArchiveLookup:
action (FindLastReceipt) {
  output (Receipt)
  type (ArchiveLookup)
}The corresponding JavaScript file simply retrieves the last receipt, using the transaction.retrieve() JS API method:
import transaction from 'transaction';
// FindLastReceipt
export default function () {
  //look up last receipt from viv cloud
  return transaction.retrieve('example.shirt.Receipt', 'ALL', 1);
}
The FindLastReceipt action is triggered when an activity action is called because those actions require a receipt, for example when cancelling the order or checking its status. If a receipt is not provided, the default-init key finds the last receipt:
      default-init {
        intent {
          goal: FindLastReceipt
        }
      }
Checking Status of the Order
If the user asks Bixby "Check on my shirt order", the goal is example.shirt.CheckStatus. The action model CheckStatus has the type RefreshActivity, meaning the action refreshes a concept that is in the activity and returns that refreshed concept. In this case, it refreshes the Receipt to get its latest status and then returns that Receipt for the user.
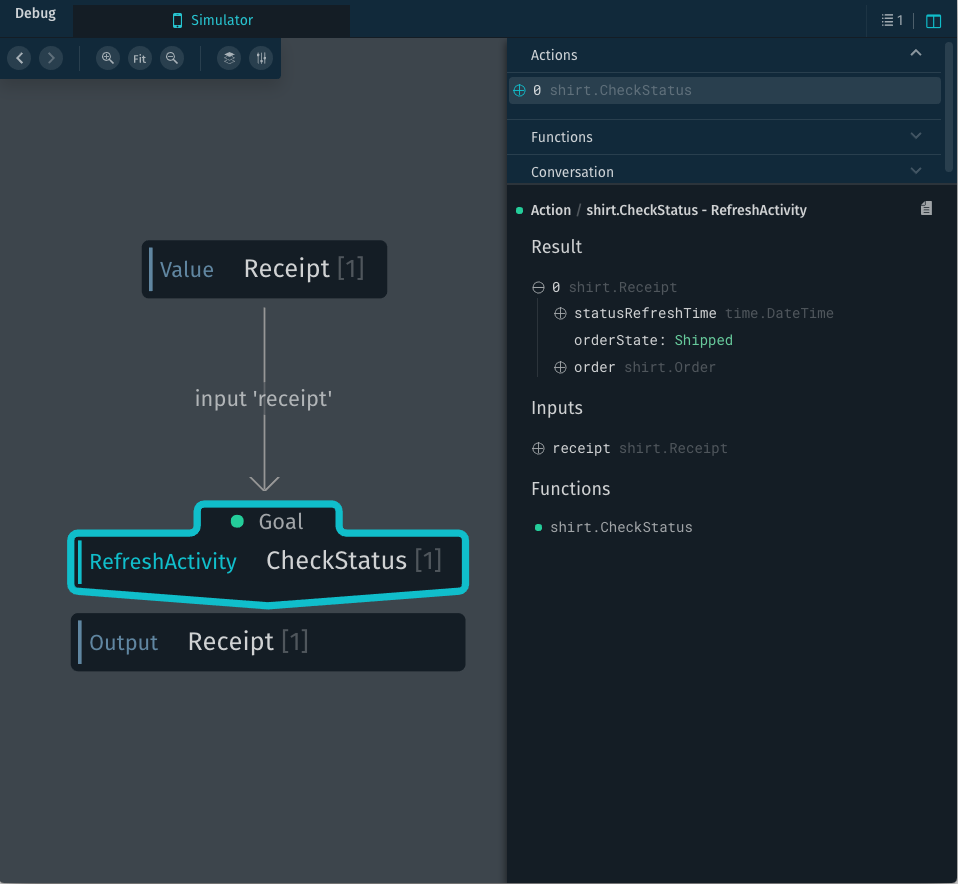

All orders start with their orderState as Ordered. The CheckStatus JavaScript file artificially increases the status of the order every time the order is checked. So if the user checks the order status twice in a row, then the second time, the order goes from Ordered to Shipped then Shipped to Delivered.
In a real transaction, you would need to call the last externally stored transaction. You would use a GET call on a remote server, where the external state of the order is stored, to refresh and get the status of the shirt package.
Canceling the Committed Order
If the order is not in shipped status, then users can cancel their order. When Bixby gets the utterance like "Cancel my last order", it first finds the last receipt, as the required input for the CancelCommittedOrder.
CancelCommittedOrder is of type CancelActivity, meaning the action will attempt to cancel a transaction. However, note that this action model has several validate statements before it can cancel the order:
      validate {
        if (!exists(receipt)) {
          halt {
            dialog {
              template("Not sure what to cancel. I didn't find any recent shirt orders.")
            }
          }
        }
        if (exists(receipt) && receipt.orderState != 'Ordered') {
          halt {
            dialog{
              template("This order is already #{value (receipt.orderState)}!")
            }
          }
        }
      }
The first if statement checks if a receipt exists. If it doesn't, it tells the user.
The next if statement checks if the orderState is in Shipped, Delivered, or Cancelled. In those cases, it can't cancel the shipment and tells the user the current status.
![]()
The execution graph is paused at the Goal Action because it is awaiting a response from the user through a prompt. In addition to the validation statements, Bixby ensures that you really want to cancel the order by making users confirm their cancellation with a prompt.
![]()
This prompt is created by the CancelCommittedOrderConfirmation view file, which is called by the confirm key in the CancelCommittedOrder action. This confirmation view's mode uses PositiveEmphasis when asking the user if they want to cancel their order. The view gives a summary of the existing order, as well as options on what to do if a user confirms or aborts the cancel.
![]()
However, if the user aborts the cancellation, the capsule runs CheckStatus, as defined by the on-abort key:
  abort-options {
    on-abort {
      intent { //The intent to execute when user aborts the confirmation
        goal {CheckStatus}
      }
    }
    label {
      template ("No")
    }
  }
As noted before, checking the status (even when attempting to cancel the order) artificially moves the status of the order up.
Training This Capsule
This section discusses how to train the capsule, which in turn teaches Bixby typical queries for the example.shirt capsule.
Training Entries Explained
The following training entries are not necessarily in the order found in the example.shirt capsule, but they are referred to in the rest of this section as listed. You can test these utterances in the simulator using Aligned NL.
Training Entry 1: "Check on my shirt order"
[g:CheckStatus] Check on my shirt orderThis training example has the goal
CheckStatus. It returns the currentorderStateof an open transaction. The example helps Bixby learn a typical utterance a user would say after completing an order.Training Entry 2: "Buy a T-Shirt for me!"
[g:CommitOrder, r:CreateOrder, r:CreateItem] Buy (a)[v:Quantity:1] (T-Shirt)[v:Style:Tee] for me!This training entry has the goal
CommitOrderand a route ofCreateOrderandCreateItem, with the "T-Shirt" tagged with the valueTeeto indicate what style the user wants. Bixby brings up two options: the Tommy Hilfiger Men's Core Flag V-Neck Tee or the Ralph Lauren Men's Pony Logo T-Shirt. This entry helps Bixby learn how to initiate an order, as well as helping Bixby learn the different shirt styles that can be asked for by users.Training Entry 3: "I'm Extra Large!"
[g:Size:prompt] I'm (Extra Large)[v:Size:ExtraLarge]!This training entry goal is
Size:prompt. This goal is specifically for the selection prompt, where the user is being asked what size shirt to choose. The entry teaches Bixby a typical utterance in response to this prompt. It also teaches Bixby an example of a shirtSize, in this case the value forSize:ExtraLargeis "Extra Large".Training Entry 4: "Buy a Men's Ralph Lauren Shirt"
[g:CommitOrder,r:CreateOrder,r:CreateItem] Buy (a)[v:Quantity:1] (Men's)[v:Gender:Male] (Ralph Lauren)[v:Brand:RalphLauren] ShirtThis training example is similar to Training Entry 2 in that the goal is
CommitOrderand teaches Bixby an example of initializing a transaction within theshirtcapsule. However, this utterance specifies aGenderand aBrandvalue for filtering as well as a quantity (1). The training example returns Ralph Lauren shirts.
Vocabulary
In addition to training, shirt utilizes vocabulary to help Bixby understand utterances further. The vocab folder contains these vocabulary files:
BrandGenderQuantitySearchTermSizeStyle
All the vocabulary files contain variations on the key words that are being looked for by Bixby to map values with concepts, actions, and goals in the utterances.
The SearchTerm vocab file is different in that it does not expand upon predetermined values. Since enums and integer types are closed type vocabulary, they explicitly need a vocabulary file to expand possible iterations in utterances. Integers (in this case, Quantity) are normally handled by the platform, but this vocabulary file also includes a few utterances (such as "a" to indicate a Quantity of 1) that might be needed. SearchTerm, however, is open type vocabulary. This means that the terms included in this file, while not explicitly listed as possible values for SearchTerm, are examples of SearchTerm uses that Bixby might need in order to complete an order.
For more information on training and best practices, see Training Best Practices.
Caveats and Limitations
Keep the following in mind about this capsule:
- In a realistic scenario, you might have shirts (or other items being sold) in a size that is not in stock but selectable in the capsule. You should catch this corner-case and warn the user if the item they are trying to purchase isn't available.
- Also in a realistic scenario, you would probably use an API call to check a store server for items for purchase instead of having the list of items hard-coded in your JavaScript files.
- Similarly, a payment method system would need to be integrated, with OAuth authorization put in place, for users to actually buy and pay for items.