
Stories and Assertions
Stories are a way for you to create testable use cases for your capsule, with a series of steps that mirror user interactions. Instead of manually testing several scenarios using the test console, you can use your saved stories to test these use cases every time you make a change in your code. There are two ways to create stories in Bixby Developer Studio:
- Export a set of steps from the Device Simulator as a story.
- Write a story directly by creating a new story file. This also uses the Device Simulator to create the steps, running it in "Story Mode."
In order to save any story you create, you must have Deterministic Mode enabled under the Learning & Execution section of the User panel in the Simulator. You must have Deterministic Mode enabled for each step you add to the story, or you'll have to cancel and try again. If there is a step in your story that doesn't have Deterministic Mode enabled, then you'll see a warning message under the Save button, and the button will be disabled.
Write Stories
We recommend creating a new directory in your capsule for stories under the appropriate resource folder. Create a new file under this directory, and then select Story as the File Type.
For example, you can create a story for the dice capsule you developed during the Quick Start Guide called Rerolling.story:
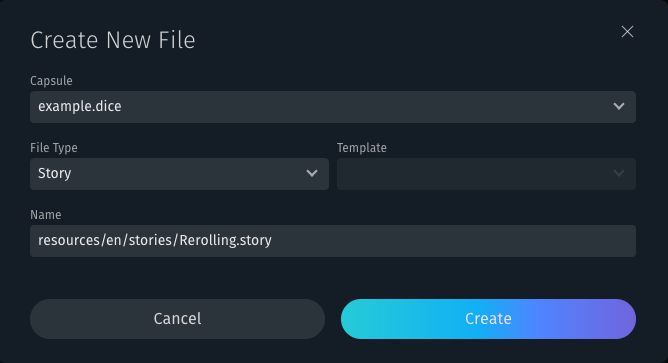
If you have more than one capsule open, ensure you have the correct capsule selected!
This will open up the story file in the main editor.
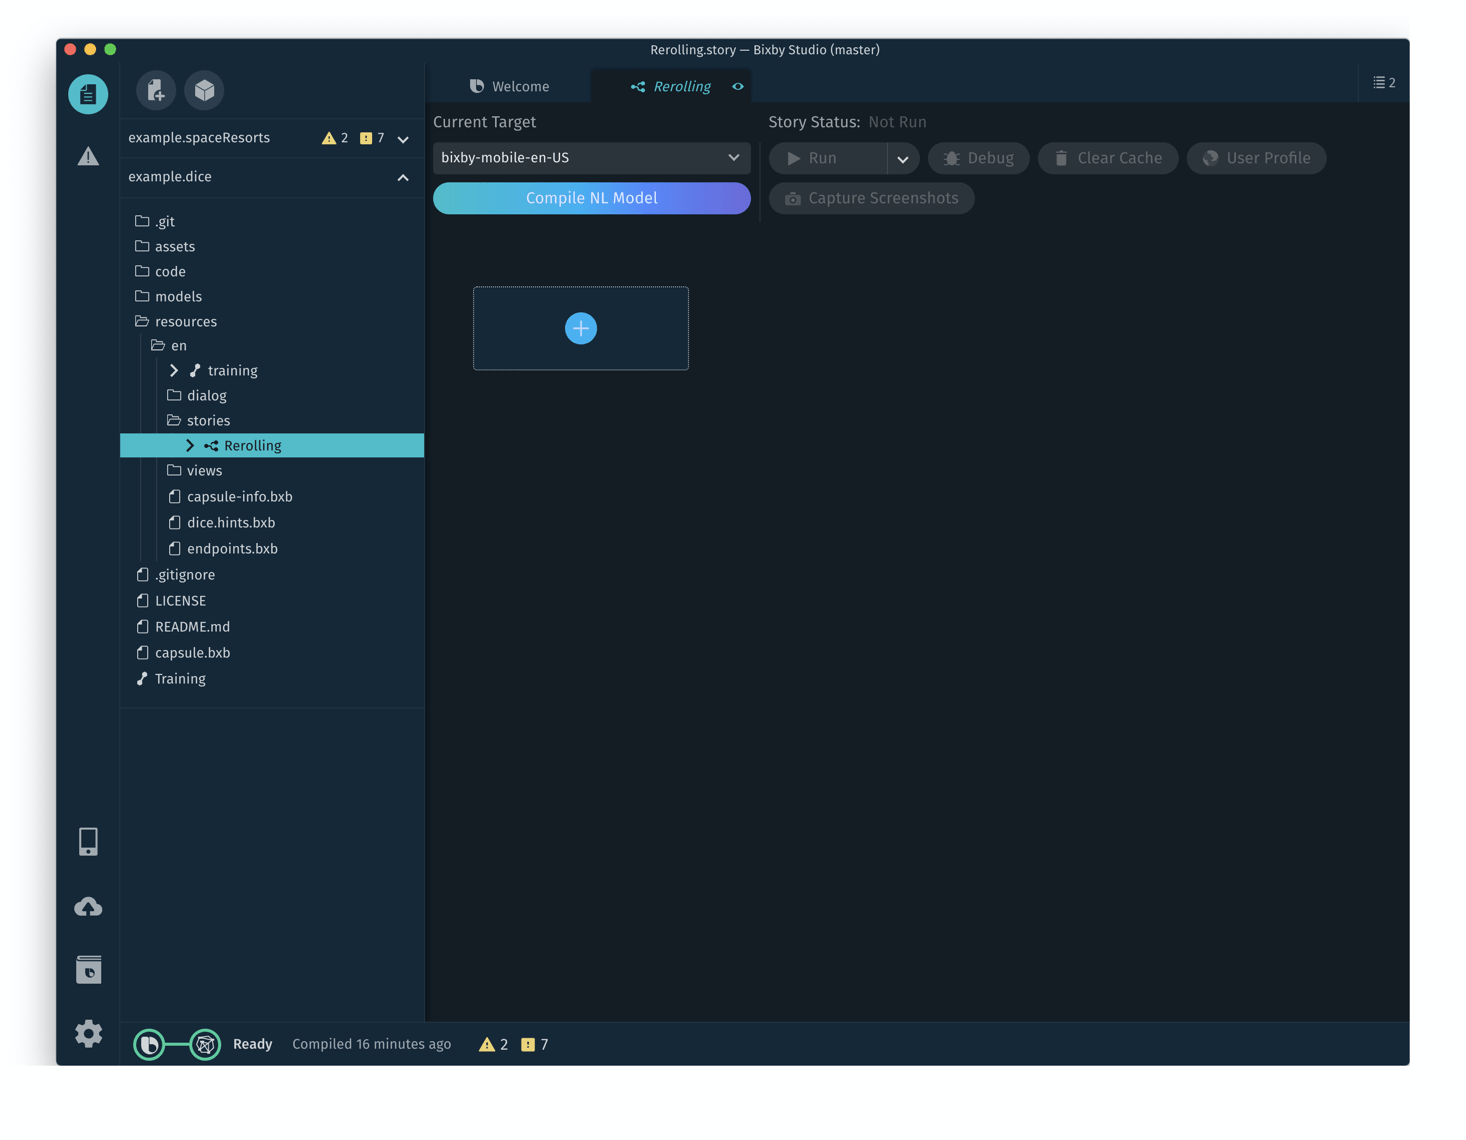
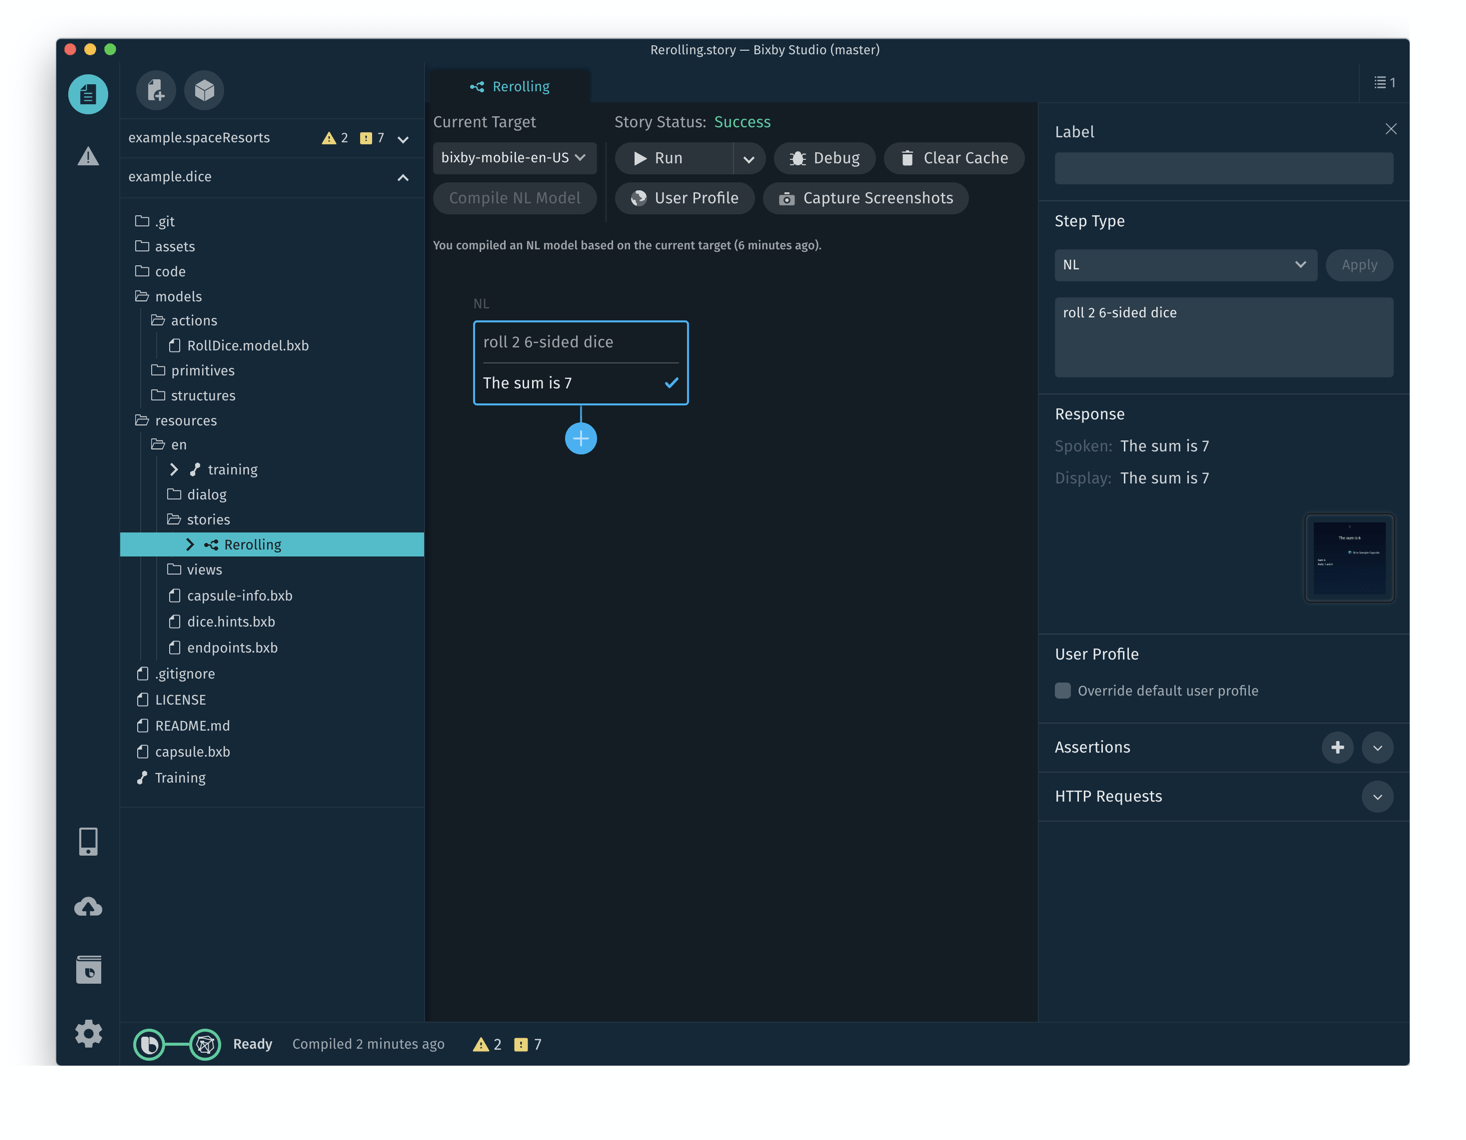
A story is a series of steps that mimic a user's interactions with Bixby. Here's how to create steps:
Click on the blue + in the
Rerollingstory window to start the first step. This will open the Device Simulator.Enter an NL or Aligned NL request for the new step, then click Run NL. (You might need to compile your NL model first.)
Keeping with the
Rerolling.storyexample, your first utterance might be "Roll 2 6-sided dice":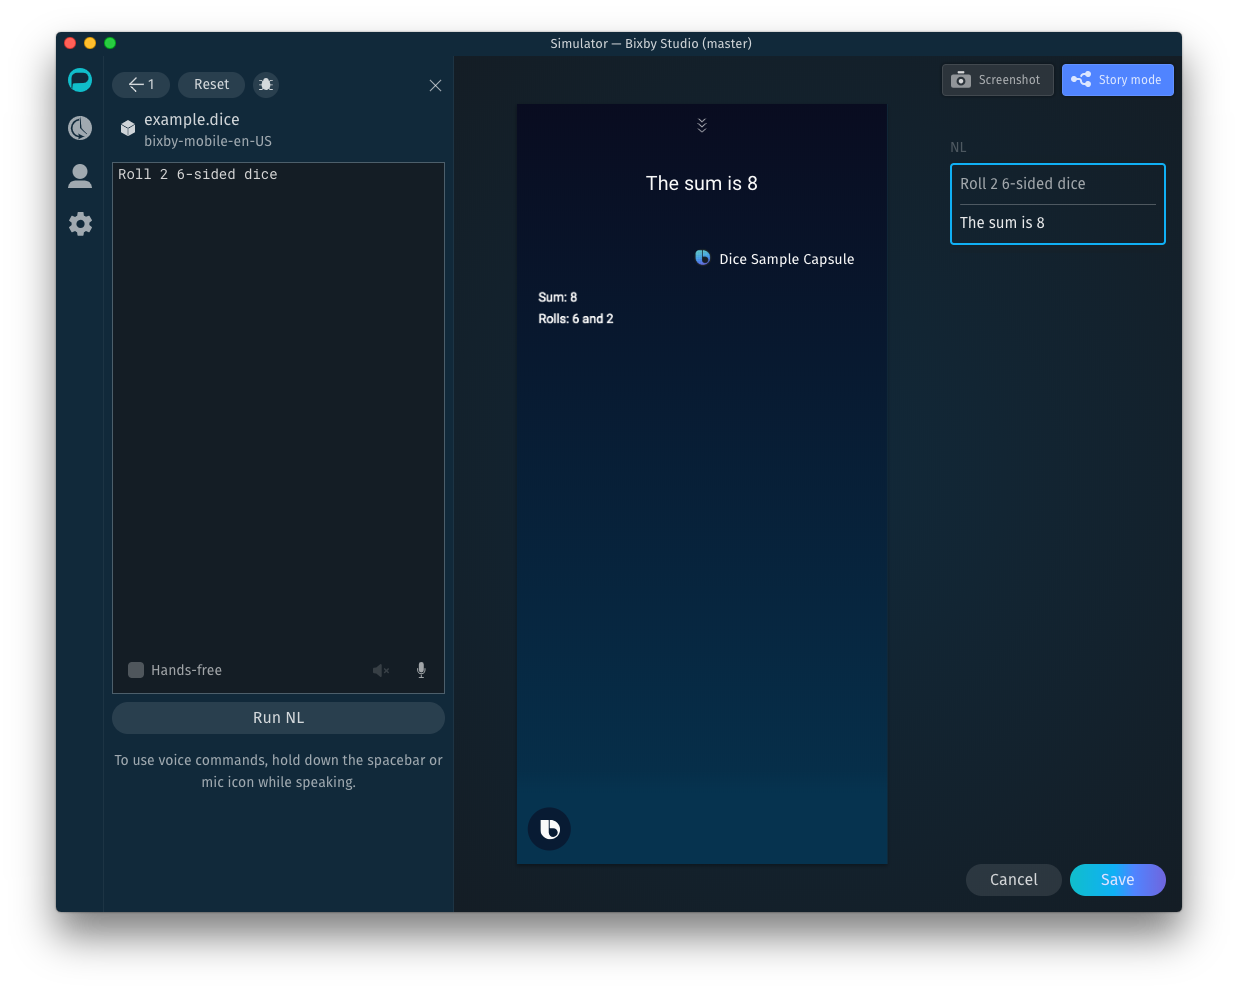
You'll see your input and response appear in the right-hand sidebar.
You can review your step's execution graph by viewing the Debug Console and confirming the steps are as expected.
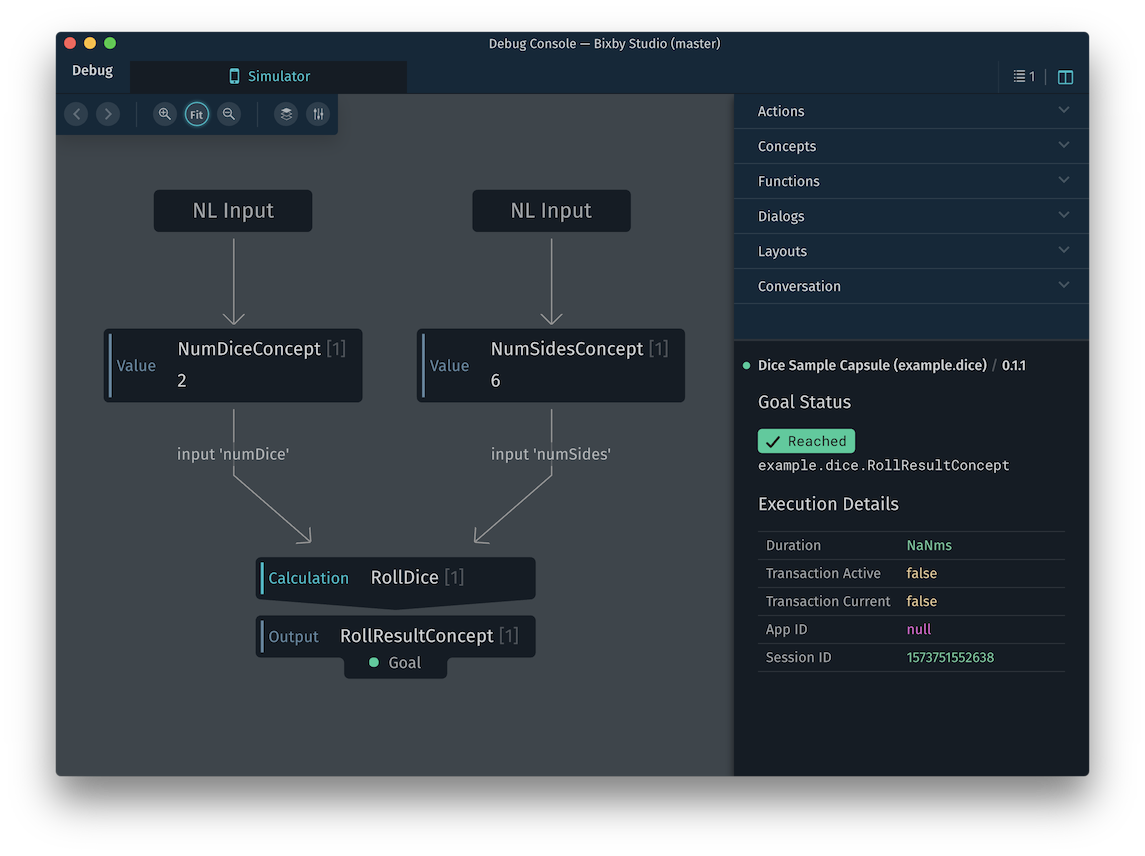
Add new steps in the Simulator as desired by entering new inputs or responding to Bixby's prompts. More complicated conversations with Bixby will display each step in the sidebar.
Click Save to export your steps back to the Stories editor.
The Save button will be disabled if Deterministic Mode is disabled.
Add more steps to your story or edit existing steps as necessary. If you need to delete a step, right-click on the step and click Delete. Additionally, you can override user profile information and specify new time and location information, as well as toggle hands-free mode, by checking Override default user profile in the right step options panel.
You can continue to add steps in your story using the Simulator:
- NL Request: Enter the utterance as a user would say or type it.
- UI Interaction: Interact and click on the UI within the Simulator.
- Intent: Add a structured intent.
Make sure to specify if there's a specialization to your request, such as a Continuation Of or At Prompt For. If your capsule is dependent on time or location, you can modify these parameters as well.
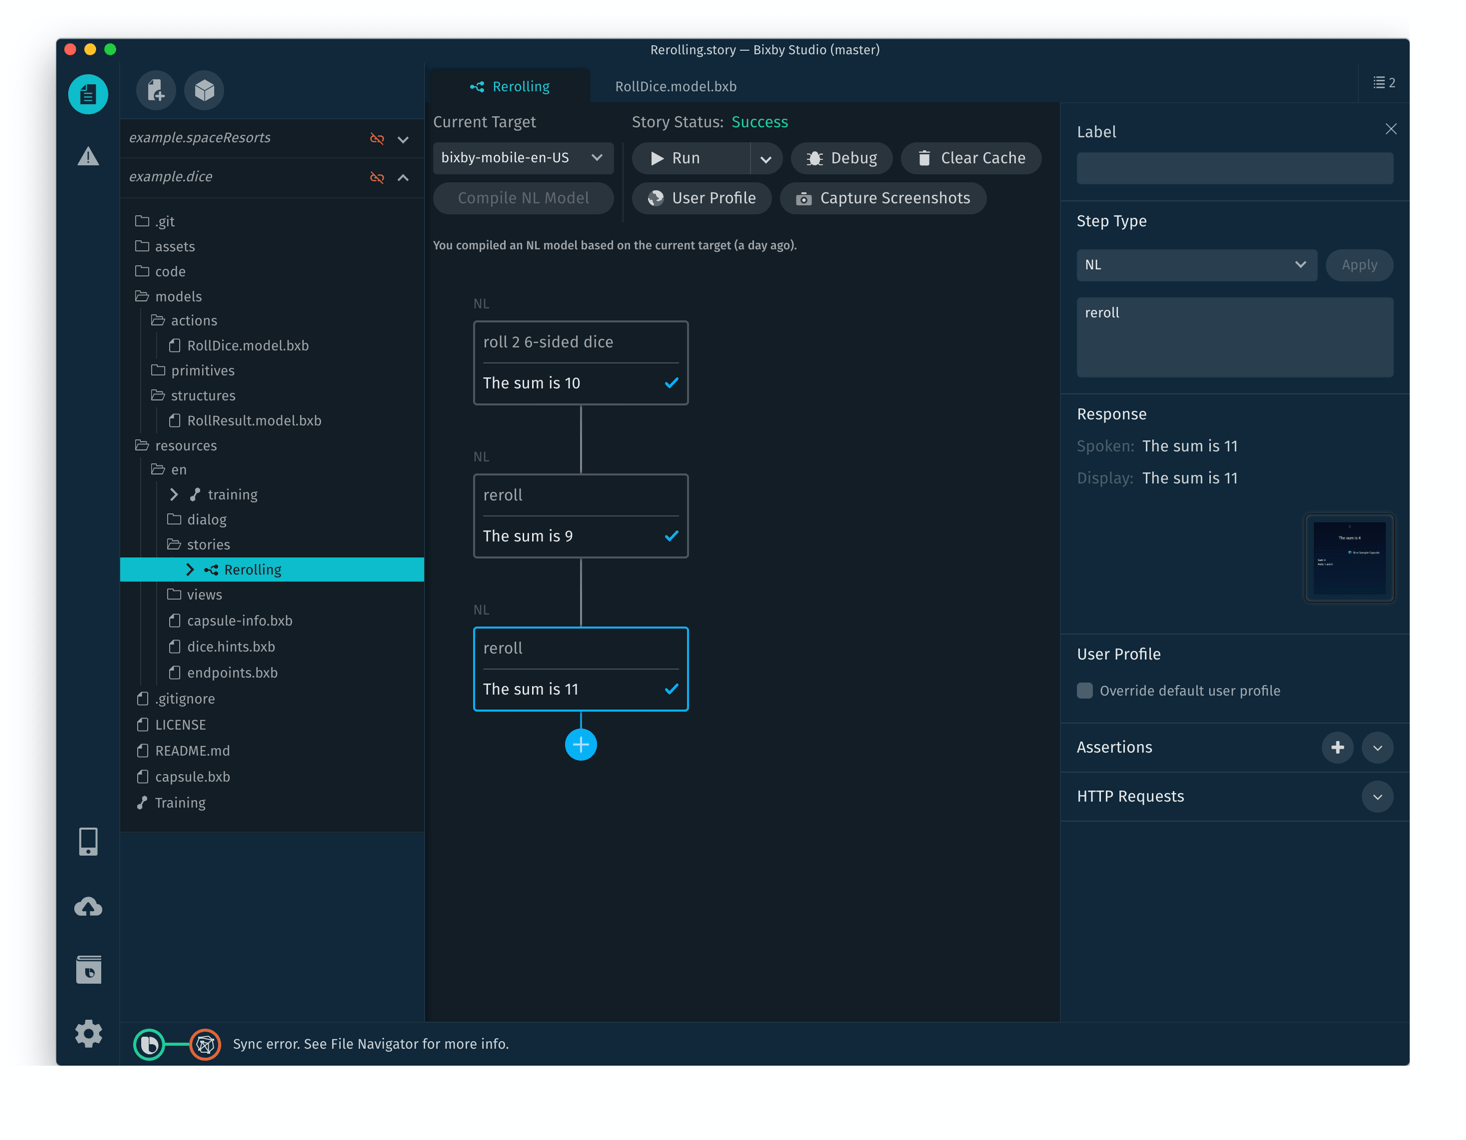
You can make your story as complicated or as simple as needed, including branches.
For example, in our Rerolling example, you might have added "Reroll" utterances to the Dice capsule's training. To test it, you could tell Bixby to reroll the dice several times:
In addition, you can insert a new branch from existing steps by selecting the step before you would like to add a new branch.
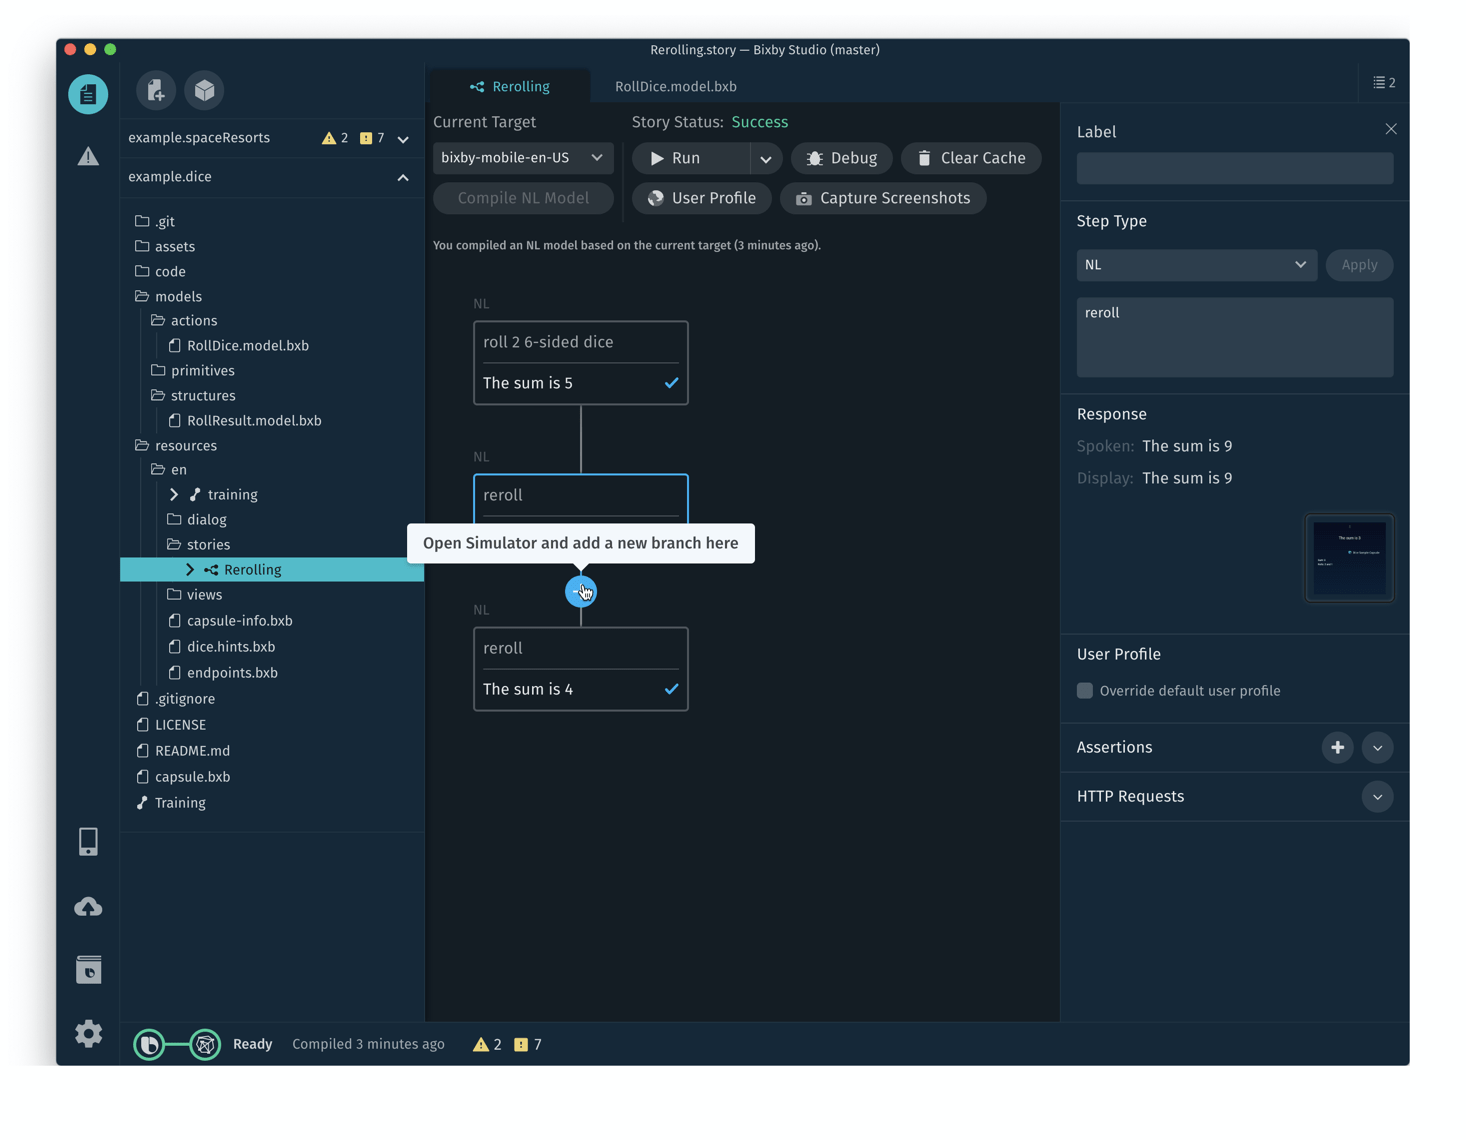
After adding a new step (or steps), a branch will be created in your story:
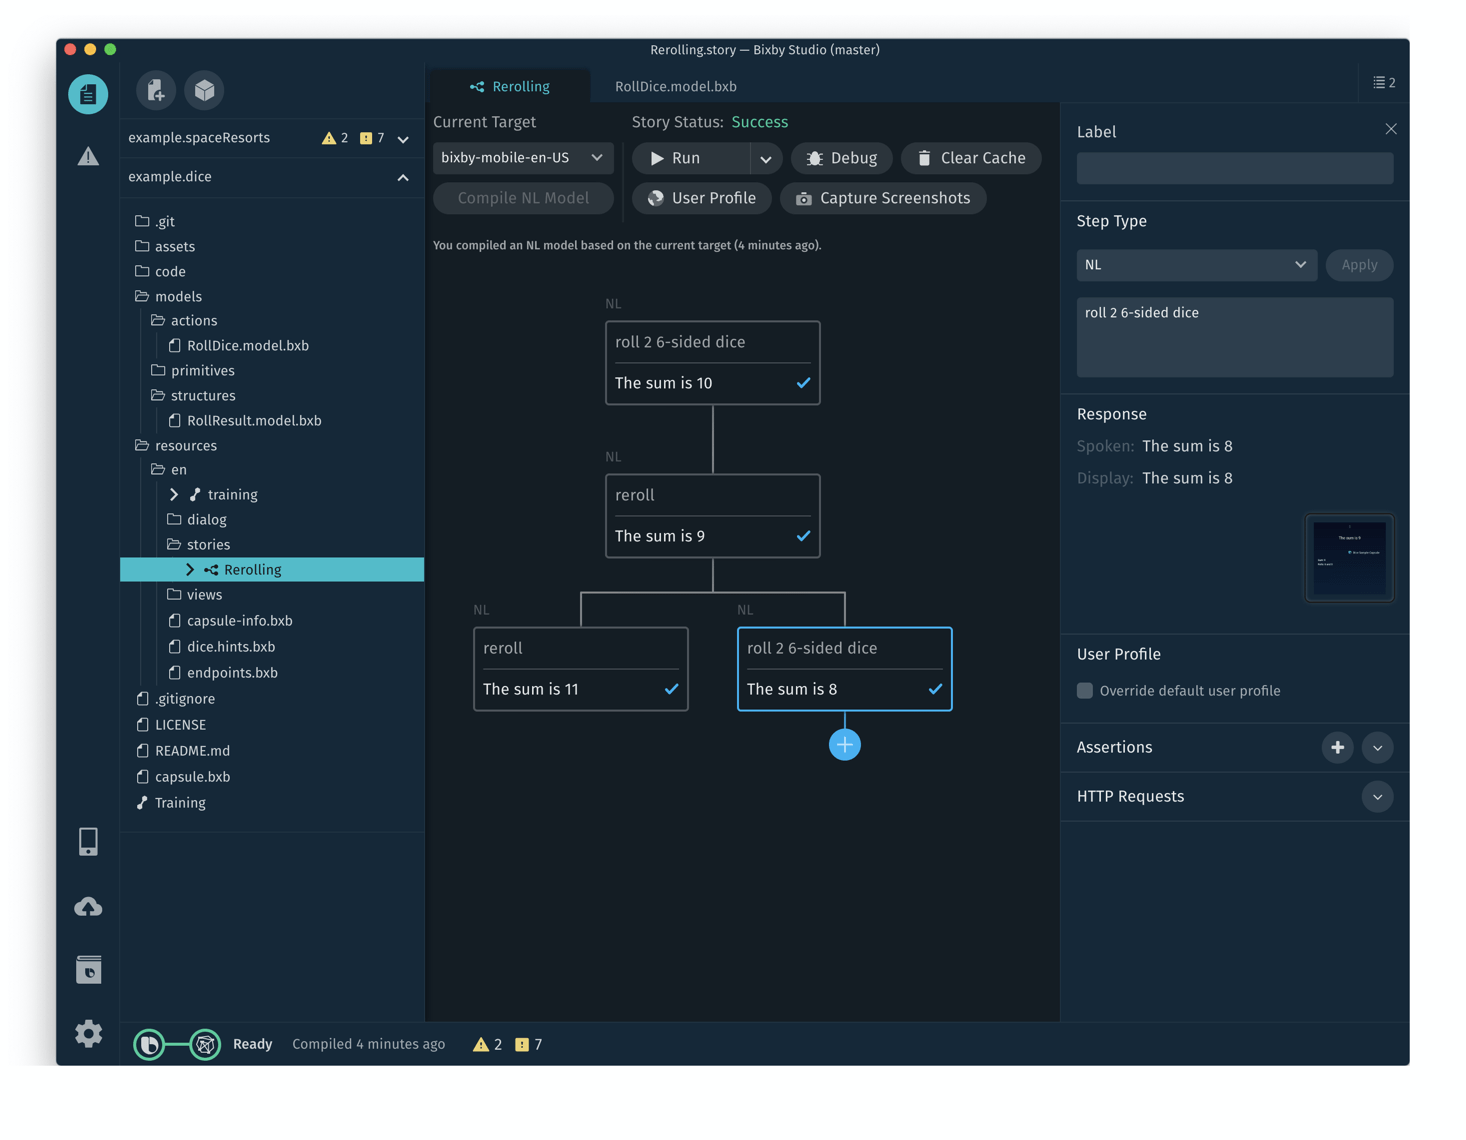
When you run the story from the start (with the Run button), all branches will be followed and tested.
If you make changes to your capsule that affect the NL model, you will need to recompile it. When recompilation is necessary, use the Compile NL Model button in the Stories window.
Export a Story from the Simulator
Instead of creating steps directly in the Story Editor, you can turn a series of queries and responses from the Device Simulator into steps in a new story. In practice, this is exactly like adding new steps in the Simulator from the Stories screen. The only thing that changes is where you start the process.
The Export story button will be disabled if Deterministic Mode is disabled for any step in the story. Also, you cannot export a story from the Simulator that was run against a specific Revision ID; you must select a synced capsule from your workspace.
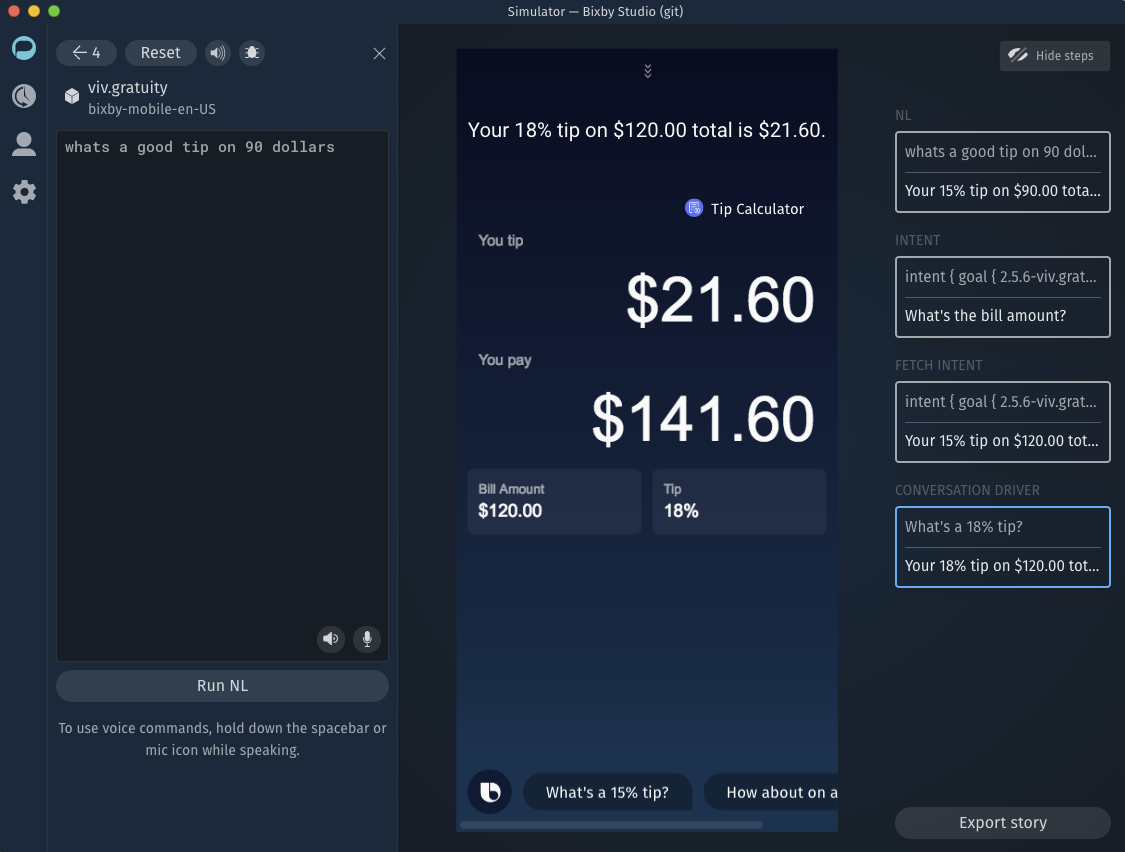
Enter a few queries in the Simulator. They can be NL, Aligned NL, or intents. The Simulator records these, as well as conversation drivers and other user-initiated actions, as steps. To turn steps recorded in the Simulator into a story, click the Export story button at the bottom of the step list along the right side of the Simulator.
At the next prompt, you can choose the resource folder for your new story file and specify a file name. You must give it a new name, not the name of an existing story file. Choose a folder based on how generalized you want the story's testing to be: bixby-mobile-en-US is specific to the en-US locale and mobile devices; just en applies to any device and any locale using the English language.
Check "Add default test assertion to all steps" to add the Default Tests Assertion Template to each exported step. When the exported story runs for the first time, you will be asked to confirm adding an assertion file to each step.
Check "Enable advanced mock support" to include mock support data for stories created in Bixby Studio. See Advanced Mock Support for more details.
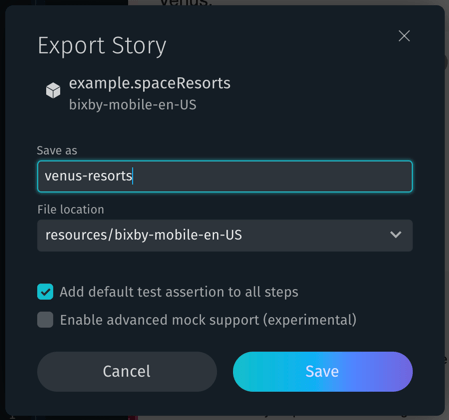
When you click Save, the story will be saved and then opened in Bixby Developer Studio's story editing view.
The story can be edited and executed in the story editor like any other story; you can delete or modify steps created in the Simulator and add new steps in the story editor.
Set a Default User Profile
When you have a story, you can click the User Profile button to configure time and location information, as well as enable hands-free mode.
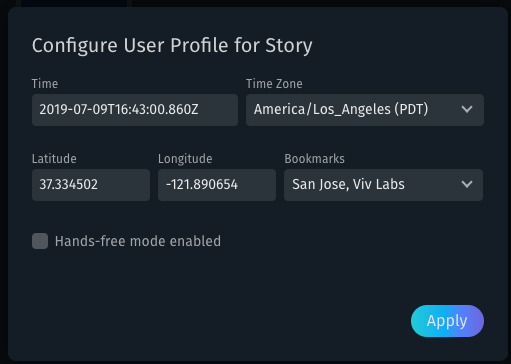
This information can be overridden for any step in your story by checking the Override default user profile box and entering new data.
Run Your Story
After you’ve added steps to your story, you can choose a Current Target in the drop-down and run the whole story by clicking the Run button. The button has three states:
- Run: run the story. Use this option when your story does not need to access external servers, or you want to use previously cached responses from Run Live. (If you are using cached mock OAuth tokens, see the cautionary note in the OAuth Mock section.)
- Run Live: run the story and cache any responses from external servers. Mocked OAuth tokens are not used if present. See Running Live for more information.
- Run Live with Mocked OAuth: similar to Run Live, but if the story requires OAuth tokens, this will use mock tokens in the
oauth-mocks.jsonfile. See OAuth Mock for more information.
You must pick a target when running stories, both when running an individual story and when running all your stories. Available targets are limited to which targets you provide in your capsule.bxb file.
Run Live
If your capsule has functions that involve web services, then the story that uses those functions will need to access an external server. Therefore, the first time you run your story, you should use Run Live to cache all the HTTP requests and responses. All subsequent runs for that story can then be tested using Run (not Run Live) without having to access those servers again.
For example, say your capsule lets users browse products from a store using a search query. The first response could be 200 items. Instead of having to reach the server for those same 200 items each time, you can just cache the server response, saving time during testing.
You could alternatively use Run Live to inject cached values in certain scenarios. For example, if you have some mock function responses you want to test, you could use Run Live to inject these responses.
To clear the cache from your live run, click the Clear Cache button on your story editor pane.
If your story's web services require OAuth tokens, the Run Live command will ignore any mock OAuth tokens in the oauth-mocks.json file. Use Run Live with Mocked OAuth to use mock tokens instead.
Run Multiple Stories (Story Dashboard)
If you have multiple stories in your capsule, you can run all your stories at once with the Story Dashboard. In the left outline pane, right-click on one of your stories or the main project node, and select Open Story Dashboard.
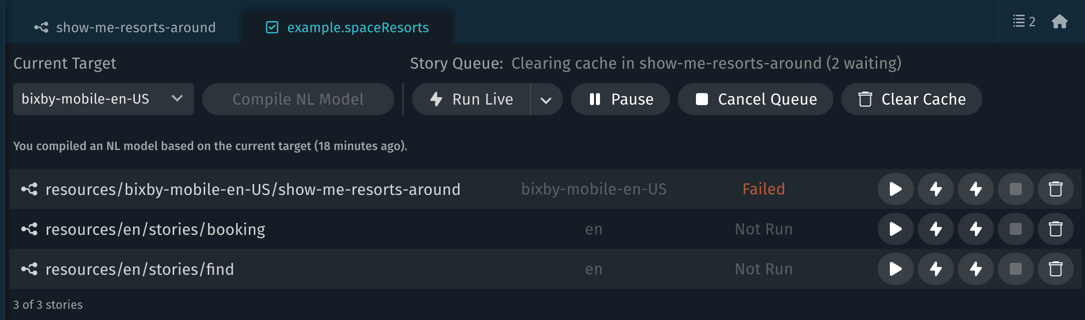
A new tab with the Story Dashboard will open in Bixby Studio, listing all your stories. Each story also tells you whether they’ve been run since you last opened the capsule, if the run was successful, and how many steps were completed. Additionally, each story includes buttons to run, clear cache, or edit your story. At the top of the panel are options for all stories in your capsule: select a Current Target and buttons for Run, Pause/Resume, Cancel Queue, and Clear Cache. The Run button can be set to three states: Run Live, Run Live with OAuth Mock, and Run with Cache.
The Current Target selected in the dashboard affects all stories run from the dashboard, regardless of what target you have selected in the individual story itself.
To check all of your stories in the target selected, simply click one of the Run buttons, depending on your capsule’s needs. It will start to run the stories in the order that they are listed. You can choose to stop running at any time by clicking the Stop button.
If you select one of the stories listed, that story will open in the editor.
Advanced Mock Support
Advanced mock support requires Bixby Studio version 8.19 or later, and requires stories to be saved as version 3 or later. If you have issues using advanced mock support with a current version of Bixby Studio, ensure the version key in the story.yaml file is set to 3, not a lower value.
You can include mock data in JSON format to be used when running stories by creating the mock data files in the root folder of the story to be executed. (This is the folder the story.yaml file is created in when a story is saved, generally named after the story itself.) The mock data files you can create are as follows:
- Configs & Secrets:
config-and-secret-mocks.json - OAuth:
oauth-mocks.json
To create the files, use the New File command in Bixby Developer Studio, choose "Story Mock" as the File Type, choose the appropriate Subtype for the mock you want to create, and select the Story you wish to create the mock file for.
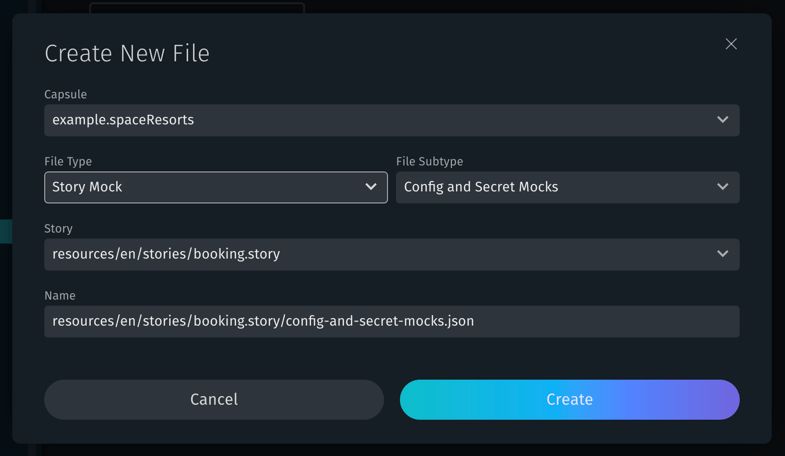
The editor will open with an appropriate template file for the mock data being created.
Configs & Secrets Mock
The JSON mock file is an array of objects with key, value, and secret keys. Fill in the config or secret name as the key and the value as the value; secret is a boolean value that should be set to true if the key is a secret, and false if it is a configuration value.
[
  {
    "key": "config-name",
    "value": "config-value",
    "secret": false
  },
  {
    "key": "secret-name",
    "value": "secret-value",
    "secret": true
  }
]
For more information, see Configs & Secrets in the Capsule Configuration Guide and the Mock Data sample capsule.
OAuth Mock
The JSON mock file is an array of objects with three keys: ownership, providerId and tokenValue. Ownership can be either USER or CLIENT.
[
  {
    "ownership": "USER",
    "providerId": "oauth-provider",
    "tokenValue": "abcd1234"
  }
]
If the oauth-mocks.json file does not exist when a story is created or run for a capsule that uses OAuth, Bixby Studio will automatically create the file based on the contents of the authorization.bxb file. The tokenValue field in this auto-generated file will be "dummy-token".
If you modify the tokens in oauth-mocks.json to be values other than "dummy-token", then the Run functionality will no longer work as expected. Use the Run Live with Mocked OAuth command to use custom token values.
For more information, see the Authorizing Access with OAuth Guide and the Mock Data sample capsule.
Story Status
You can check the status of whether the story was run successfully.

While the story is running, the Story Status reads Running.
If Bixby can run through all the steps without failure, the Story Status changes to Success in green.
If there is an issue that Bixby cannot resolve, the Story Status changes to Failed in red.
If this happens, Preview Response reports an error. You can click on the step and then click on Error Detail for the exact Code and Message that Bixby Studio reports.
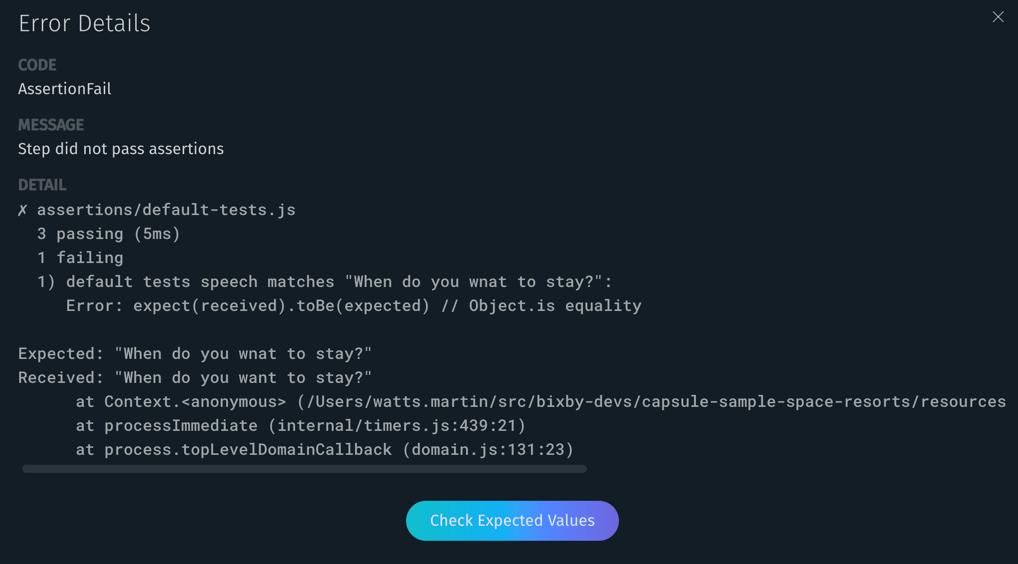
For supported assertions, such as those created with the Default Tests template, Bixby can correct a failure by updating the assertion's expected values. Click the Check Expected Values button to preview the suggested changes to your assertions. If there are no suggestions to offer, Bixby Studio will tell you no automatic updates are possible, and offer pointers on next steps.
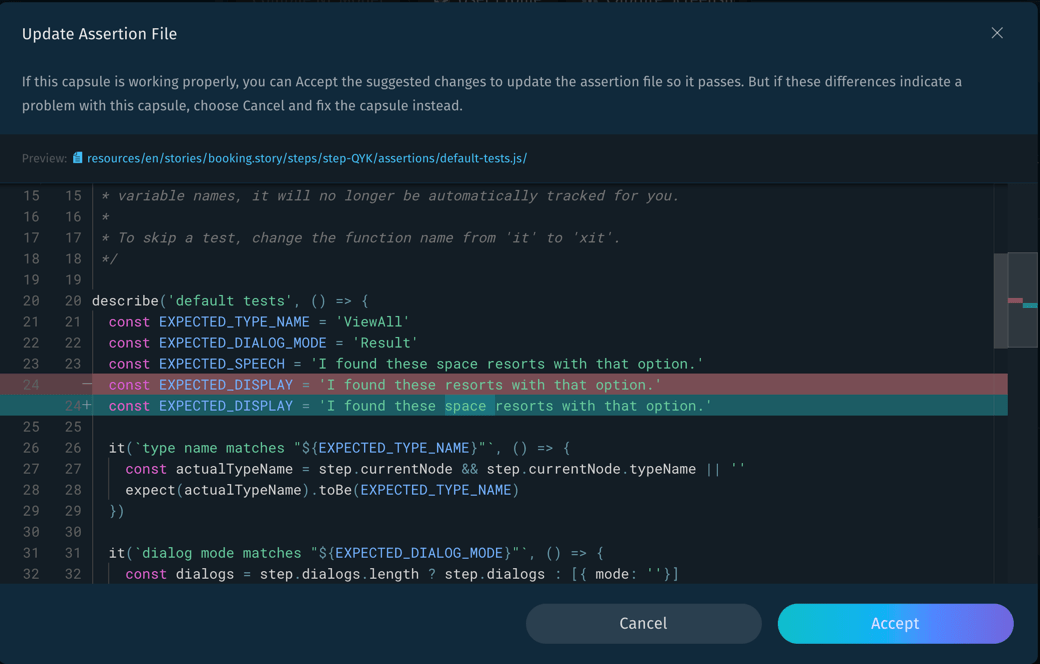
If you accept them, the assertion will pass on its next run. You should only make these changes if the step should pass with the currently returned values.
If the story has found a genuine error or Bixby Studio cannot offer suggested changes, you should resolve the error manually by fixing your input and annotations, changing your assertions, or updating your models accordingly.
You should try to anticipate errors by throwing exceptions or implementing error handling. Remember that if Bixby cannot get an HTTP response from a server during an API call, that will also produce an error, but the issue might be on the server's side. Additionally, a step fails if an assertion within that step throws a fatal error, even if the step would otherwise complete.
When a story step fails, you can open the Debug Console at that step by selecting the failed step and clicking the Debug button at the top of the story editor. Problems will be highlighted in red in the Debug Console.
Note that if there are steps after the failed step, they will be considered Unreachable Steps, as seen in their Preview Response.

Assertions
Assertions enable you to test all the aspects of your capsule, including the layouts and dialogs. It uses a combination of the Mocha JavaScript test framework and the Jest expectations module. While stories give you an idea of the execution graph that the planner will use and the final results, assertions give you a more granular view of the execution graph by checking the individual nodes and their values against what you expected.
Assertions are run using an embedded Node.js engine. If you need to import a module, use the CommonJS module style: require for importing and module.exports for exporting.
Develop an Assertion Model
To create an assertion model, do the following:
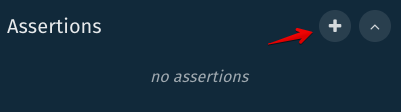
Select a step in your story to bring up the step pane.
In the Assertions section of the pane, click the Add (+) button to create a new assertion.
A Create New File window will pop up.
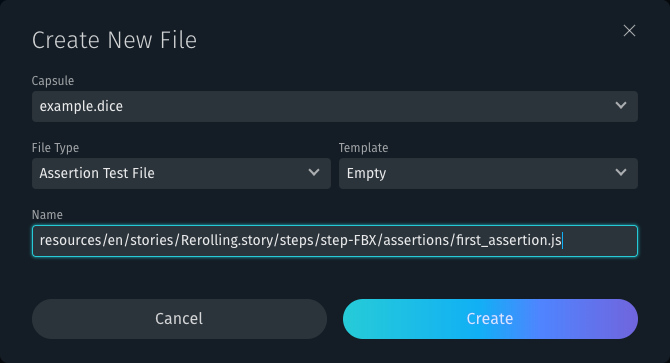
Name your assertion file, choose the Template type you want, and click Create.
The editor creates a new tab with the assertion file, populated with the chosen template.
Update the assertion file as needed.
If you use one of the templates, there are directions at the top of each file. Otherwise, you can create your own assertions with the provided API.
Save your assertion file.
Click on your story panel tab and rerun your story.
Each assertion will be run per step.
Check the assertion status in the step’s right-side panel if your assertions passed. If an assertion fails, the step will fail and cause all subsequent steps to be unreachable.
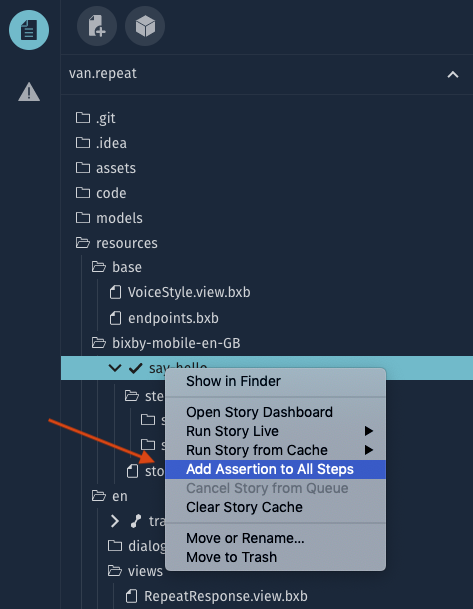
Add Default Test Assertions to All Steps
Instead of creating assertions for each story step as described above, you can right-click a story in the Files sidebar and choose "Add Assertion to All Steps" in the context menu. This will add the assertions generated by the Default Tests template to each step.
Also, when you export a story from the Simulator, Bixby Studio can automatically add the Default Tests assertion file to all of the steps in the exported story when you check the "Add default test assertion to all steps" checkbox.
Assertion Status
After you've added your assertion, it is added to the Assertions section in the right-side panel. When you've rerun the story, each assertion you've added will have an indicator to the left of it. It turns green if passed or red if failed.
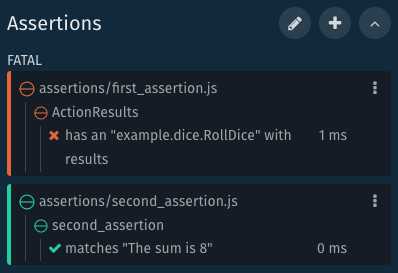
Click the plus (+) symbols to the left of each assertion to show or hide more information. You can drill down your assertion to find exactly which statement caused a failure.
You can also turn assertions off to help narrow down errors by editing the assertion settings.
About Assertion Models
The following is the basic setup of your assertion model:
describe('%assertion-description%', () => {
  it('%text-to-display%', () => {
    const { %node-or-node-property% } = step
    expect(%node-or-node-property%).%method%()
  })
})
The describe block can contain multiple it blocks and nested describe blocks, which execute in the order they’re written. The it block can then contain several expect statements for your step, to test against your expectations.
The list of available parameters and methods you can use to access different points in your execution graph is in the assertion reference documentation.
The list of expect statements you can use can be found in the Methods section of the Jest Expect website.
Assertions, like stories, can be as simple or as complicated as you would like to make them. For example, you can have several assertion files, which each check a different function's results. Or, you can have a single assertion file which checks an action result by checking values, while simultaneously ensuring that the dialog is as expected.
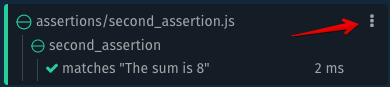
Assertion Settings
When you add an assertion, certain properties are automatically set. Each assertion is enabled and set to Fatal by default. You can click the settings menu in the upper right corner of each assertion to adjust these settings:
You should then see this pop-up window:
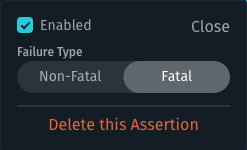
You can toggle whether this assertion is Enabled, change the Failure Type, and choose to Delete this Assertion in this window. When you're done changing the settings, click Close. Alternatively, you can choose to edit all your assertions in the assertions.yaml file, which you can access by clicking on the pencil icon in the upper right corner of the Assertions panel.
You need to rerun the story to make your changes take effect.
If you'd like to make further changes to an assertion file itself, click on the assertion file name to open it up in the editor.
Assertion Templates
We provide several templates, which you can use all or part of as you need. You can include these templates either by creating a New File and selecting a template in the Template menu option or copying the corresponding template listed below.
Each template includes additional information about what to replace in your assertion with expected results. The default descriptive text for the main describe block uses the file name.
Default Tests
This template is dynamically generated from the current story step. When you choose it, Bixby will create an assertion that tests the current step, setting the expected values of the test to the values returned by the step in its current state. When a step succeeds, you can use the Default Tests template to ensure its output remains the same in future tests.
Type and Mode
This dynamically generated template is a variant on the Default Tests template, which tests the current steps against expected values and tests the goal and dialog note types without testing speech or display text. This is useful as an alternative to Default Tests for steps that have varying dialog output.
Empty Template
Template that has a sparse
describeblock with an emptyitblock inside./**
* Step assertions documentation
* https://developer.viv-labs.com/dev/docs/reference/assertions_api/step
*/
describe('empty', () => {
it('', () => {})
})Dialog Text
Basic dialog template to compare the text of the specified dialog with your
expectstatement. For more information on dialogs in the assertion model, seeDialogin the Assertion API reference./**
* Step assertions documentation
* https://developer.viv-labs.com/dev/docs/reference/assertions_api/step
*
* TODO: Replace `__TEXT__` with step dialog output
*/
describe('Dialog', () => {
const dialogText = '__TEXT__'
it(`matches "${dialogText}"`, () => {
// get the dialog from the `step` global
// this gets all dialogs from execution
// not just for the `currentNode`
const { dialogs } = step
expect(dialogs.length).toBeGreaterThan(0)
const [{ text }] = step.dialogs.slice(-1)
expect(text).toBe(dialogText)
})
})Dialog (Advanced)
A more complex dialog template to check the text of the specified dialog, as well as the dialog mode. If you have a dialog template that generates dialog text, this assertion template enables you to check the generated text against this file.
/**
 * Step assertions documentation
 * https://developer.viv-labs.com/dev/docs/reference/assertions_api/step
 *
 * TODO: Replace __TEXT__, __FILE_BASE_NAME__, & __MODE__ with contextual values
 * - __TEXT__ is the dialog text to match
 * - __MODE__ is the dialog mode, such as Selection, Result, etc.
 * - __FILE_BASE_NAME__ is the dialog template file that generated the text
 */

describe('AdvDialog', () => {
  const dialogText = '__TEXT__'
  const dialogMode = '__MODE__'

  it(`found a ${dialogMode} dialog and file template`, () => {
    // get the dialogs from the current node
    const { dialogs } = step.currentNode
    expect(dialogs.length).toBeGreaterThan(0)
    // get the text, mode, and components from
    // the last (most recent) dialog for the current node
    const [{ text, mode, components }] = step.dialogs.slice(-1)
    expect(text).toBe(dialogText)
    expect(mode).toBe(dialogMode)
    const paths = Array.from(getAllDialogComponentFilePaths(components))
    // expect a specific dialog template was used to render the dialog
    const expected = [expect.stringMatching(/__FILE_BASE_NAME__$/)]
    expect(paths).toEqual(expect.arrayContaining(expected))
  })
})

export function* getAllDialogComponentFilePaths(components) {
  for (const component of components) {
    if (component.filePath) {
      yield component.filePath
    }
    if (component.components && component.components.length > 0) {
      yield* getAllDialogComponentFilePaths(component.components)
    }
  }
}
Layout
Template to compare the components of your generated layout with expectations, such as checking the layout mode and whether a specific layout file was used. For more information on layouts in the assertion model, see
Layoutin the Assertion API reference./**
* Step assertions documentation
* https://developer.viv-labs.com/dev/docs/reference/assertions_api/step
*
* TODO: Replace __LAYOUT_MODE__ & __FILE_BASE_NAME__ with contextual values
* - __LAYOUT_MODE__ is details, summary, input, etc
* - __FILE_BASE_NAME__ is the filename of the template, for example, ConceptName_Detail.layout.bxb
*/
describe('Layout', () => {
const layoutMode = '__LAYOUT_MODE__'
it(`uses the ${layoutMode} layout template for the result`, () => {
const { layouts } = step.currentNode
// there should be at least one layout
expect(layouts.length).toBeGreaterThan(0)
const [{ mode, layout }] = layouts
expect(mode).toBe(layoutMode)
expect(layout).toBeTruthy()
expect(layout.origin).toBeTruthy()
// make sure that the layout template used a specific template
expect(layout.origin.path).toMatch(/__FILE_BASE_NAME__$/)
})
})Function Results
Template to check if a certain function is being called and that the result of the function is creating the expected object in return. You can add further expectations on the function results. For more information on functions in the assertion model, see
Function./**
* Step assertions documentation
* https://bixbydevelopers.com/dev/docs/reference/assertions_api/step
*
* TODO: Replace __ACTION_QUALIFIED_TYPE__ with contextual values
* - __ACTION_QUALIFIED_TYPE__ is the fully qualified action type, for example, "version-namespace.capsule.ActionName"
*/
describe('FunctionResults', () => {
const actionQualifiedType = '__ACTION_QUALIFIED_TYPE__'
it(`has an "${actionQualifiedType}" with function results`, () => {
const action = getActionByQualifiedType(step.currentNode, actionQualifiedType)
// this action should have results
expect(action.resultsPending).toBe(false)
// get the first function result, there could be more than one
expect(action.functions.length).toBeGreaterThan(0)
const [{ result }] = action.functions
// functions output an array of values
expect(result.values.length).toBeGreaterThan(0)
expect(result.values).toMatchObject([
// TODO: assert on the function results
])
})
})
/**
* Finds a single action in any direction from the currentNode matching a specific qualifiedType.
* @param {PlanNode} currentNode
* @param {string} qualifiedType
*/
const getActionByQualifiedType = (currentNode, qualifiedType) => {
expect(currentNode).toBeTruthy()
// find all nodes matching `qualifiedType` string
const nodes = currentNode.getAllNodesByTypeId(qualifiedType)
expect(nodes.length).toBe(1)
const [node] = nodes
// node types are either "action" or "concept"
expect(node.type).toBe('action')
return node
}Action Results
Template to check if a certain action is being called and that the action output returns the array of concepts that are expected. You can add further expectations on the action results.
/**
 * Step assertions documentation
 * https://bixbydevelopers.com/dev/docs/reference/assertions_api/step
 *
 * TODO: Replace __ACTION_QUALIFIED_TYPE__ with contextual values
 * - __ACTION_QUALIFIED_TYPE__ is the fully qualified action type, for example,  "version-namespace.capsule.ActionName"
 */

describe('ActionResults', () => {
  const actionQualifiedType = '__ACTION_QUALIFIED_TYPE__'

  it(`has an "${actionQualifiedType}" with results`, () => {
    const { results, resultsPending } = getActionByQualifiedType(
      step.currentNode,
      actionQualifiedType,
    )

    // this action should have results
    expect(resultsPending).toBe(false)
    expect(results.length).toBeGreaterThan(0)
    // actions output an array of concept values
    expect(results).toMatchObject([
      // TODO: assert on the function results
    ])
  })
})

/**
 * Finds a single action in any direction from the currentNode matching a specific qualifiedType.
 * @param {PlanNode} currentNode
 * @param {string} qualifiedType
 */
const getActionByQualifiedType = (currentNode, qualifiedType) => {
  expect(currentNode).toBeTruthy()
  // find all nodes matching `qualifiedType` string
  const nodes = currentNode.getAllNodesByTypeId(qualifiedType)
  expect(nodes).toHaveProperty('length', 1)
  const [node] = nodes
  // node types are either "action" or "concept"
  expect(node.type).toBe('action')
  return node
}
Selection Prompt
Template to check if a selection prompt was generated with multiple results. You can add additional expectations on the selection prompt results.
/**
 * Step assertions documentation
 * https://developer.viv-labs.com/dev/docs/reference/assertions_api/step
 *
 * TODO: Replace __QUALIFIED_TYPE__ & __CONCEPT_NAME__ with contextual values
 * - __QUALIFIED_TYPE__ is the fully qualified concept type, for example, "namespace.capsule.ConceptName"
 * - __CONCEPT_NAME__ is the concept name
 */

describe('SelectionPrompt', () => {
  const qualifiedType = '__QUALIFIED_TYPE__'

  it(`prompts user to select a "${qualifiedType}"`, () => {
    expect(step.isInterrupted).toBe(true)
    const { currentNode } = step
    expect(currentNode.type).toBe('concept')
    expect(currentNode.qualifiedType).toBe(qualifiedType)
    // selection prompts should have multiple results to choose from
    expect(currentNode.results.length).toBeGreaterThan(1)
  })

  it(`uses the summary layout template for "${qualifiedType}"`, () => {
    const { currentNode } = step
    // the selection prompt should have found multiple candidates to choose from
    expect(currentNode.layouts.length).toBeGreaterThan(1)
    // expecting a homogenous list, just assert on the first layout list item
    const [firstLayout] = currentNode.layouts
    expect(firstLayout.mode).toBe('summary')
    expect(firstLayout.layout.origin.path).toMatch(/__CONCEPT_NAME___Summary.layout.bxb$/)
  })
})
Value Prompt
Template to check if an action is interrupted to give user a prompt for an input, then checks the input value against expectations. Also checks that a specified layout is being used to create this prompt.
/**
 * Step assertions documentation
 * https://developer.viv-labs.com/dev/docs/reference/assertions_api/step
 *
 * TODO: Replace __QUALIFIED_TYPE__ & __CONCEPT_NAME__ with contextual values
 * - __QUALIFIED_TYPE__ is the fully qualified concept type, for example,  "namespace.capsule.ConceptName"
 * - __CONCEPT_NAME__ is the concept name
 */

describe('ValuePrompt', () => {
  const qualifiedType = '__QUALIFIED_TYPE__'

  it(`prompts user for a "${qualifiedType}"`, () => {
    expect(step.isInterrupted).toBe(true)
    const { currentNode } = step
    expect(currentNode.type).toBe('concept')
    expect(currentNode.qualifiedType).toBe(qualifiedType)
    // value prompt node shouldn't have any results yet
    expect(currentNode.resultsPending).toBe(true)
  })

  it(`uses the input layout template for "${qualifiedType}"`, () => {
    const { currentNode } = step
    // the value prompt should have produced one input layout
    expect(currentNode.layouts.length).toBe(1)
    const [firstLayout] = currentNode.layouts
    expect(firstLayout.mode).toBe('input')
    expect(firstLayout.layout.origin.path).toMatch(/__CONCEPT_NAME___Input.layout.bxb$/)
  })
})
Best Practices
You probably want to write a variety of stories to cover as many use cases as possible. Ultimately, though, how you use stories and assertions is up to you! It is unreasonable to try and catch every single use case, value, and situation that could possibly arise.
Assertions are specifically useful for catching bugs. For example, let's say a bug was introduced to your capsule because the platform changed something, which in turn affected one of your dialogs. You can write an assertion, either checking that your dialog is properly being passed or that the changed (incorrect) dialog is not being executed. In the future, if the platform or another capsule that your capsule depends on changes, you can easily assess if that capsule's dialog was affected.