
Using Bixby Developer Studio
Bixby Developer Studio Installation
Bixby Developer Studio (Bixby Studio) is available for macOS and Windows. Download the installer from the link below and run it to install Bixby Studio.
Bixby Developer Studio has the following minimum hardware recommendations:
- 1.6 GHz or faster CPU
- 1 GB or more of RAM
- Screen resolution of 1280×800
Bixby Developer Studio requires the following minimum OS versions:
- Windows 8
- macOS (OS X) 10.9
- Linux:
- Debian-based: Ubuntu Desktop 14.04, Debian 7
- Red Hat-based: RHEL 7, CentOS 7, Fedora 23
After installation, you'll need to set up Bixby Studio.
Launch Bixby Studio. On first launch, you will be asked to log in to the Bixby Developer Center.
Before logging in, check the "Server" URL in the lower-left corner of the startup screen. You should see
https://bixbydevelopers.com.Click Log In. Your browser will open and be directed to the Samsung Account login page.
Enter your Samsung Account username and password.
After logging in, the browser displays a "Login Successful" screen. Click Launch Bixby Studio. If your browser asks if you want to allow the page to launch Bixby Studio, click Allow.
Bixby Studio then connects to the Bixby server and sets up your workspace.
Bixby Studio requires an internet connection for operation. There is no offline mode.
To connect properly, all traffic to and from these domains must pass freely over SSL (port 443):
https://bixbydevelopers.comhttps://ces.bixbydevelopers.comhttps://bixbydevelopers.zendesk.comhttps://d215tfnc26u50d.cloudfront.net(Bixby Studio 7.13 and older versions)https://bixby-client.aibixby.com(Bixby Studio 7.14 and newer versions)
Bixby Developer Studio Tour
When you first start Bixby Studio or when no files are open, you'll see the welcome screen. You can also return to this screen by clicking the Home icon in the top right corner.
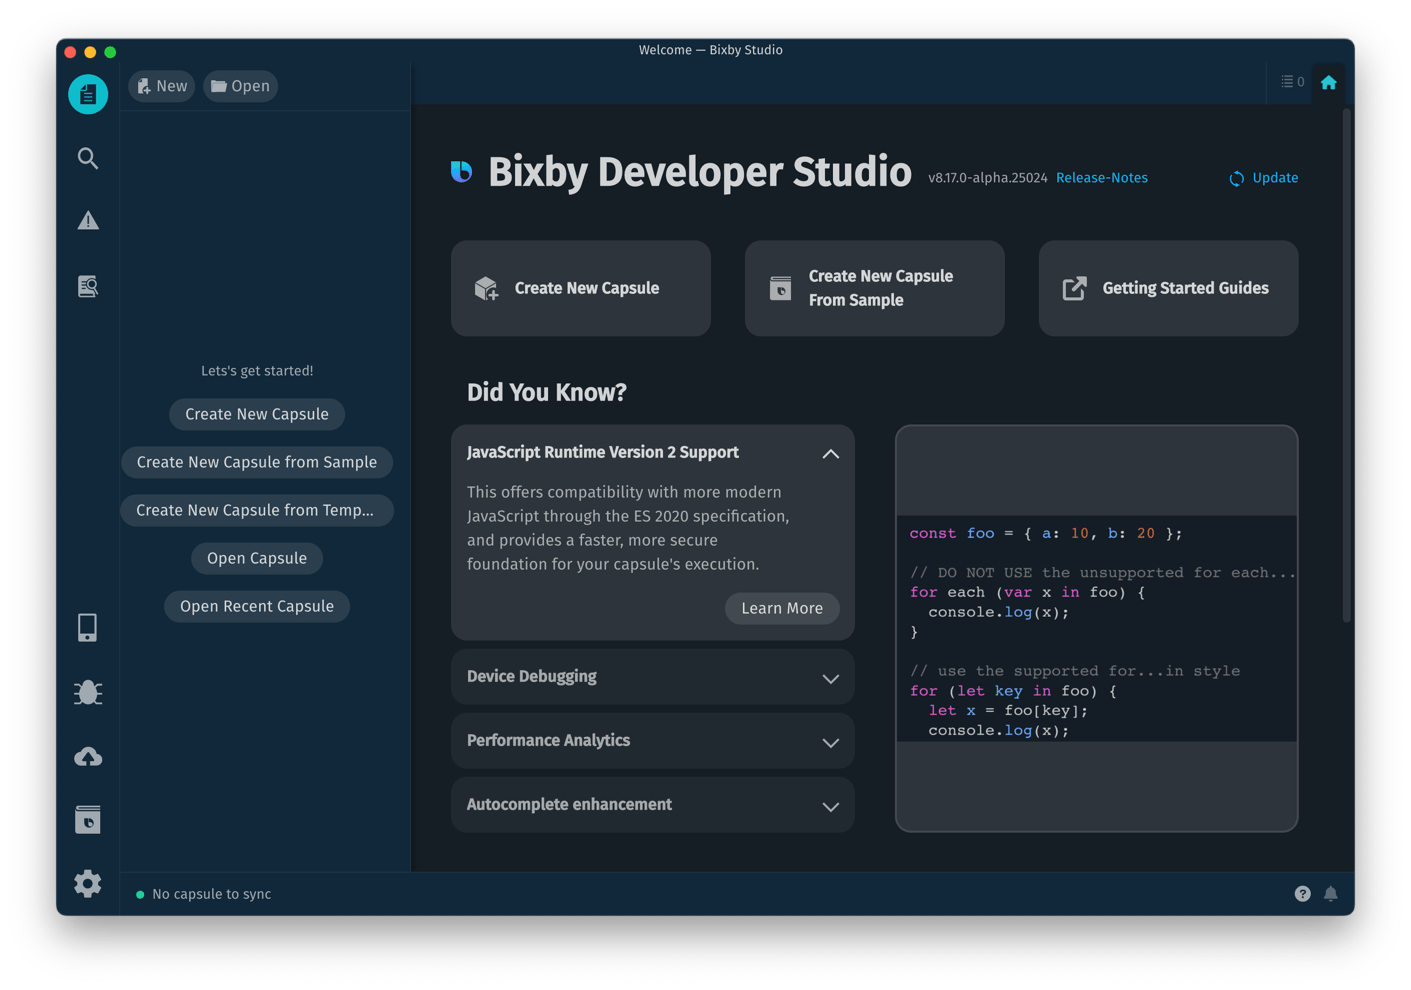
The welcome screen gives you options for creating capsules, and provides information about new or interesting features. You can also quickly access current release notes and a selection of video tutorials.
Bixby Developer Studio might occasionally give you notifications about new features, upgrades, or other important information. If you have notifications waiting, the bell in the lower right corner will have a red "unread" dot on it. You can click on the bell to view these unread notifications. Notifications will also automatically be displayed when the IDE starts.
When you're working on a capsule, Bixby Studio follows design patterns you'll likely be familiar with if you've used other integrated development environments or code editors: a sidebar on the left, usually displaying a file/resource tree for your project, and a larger tabbed editor window to the right.
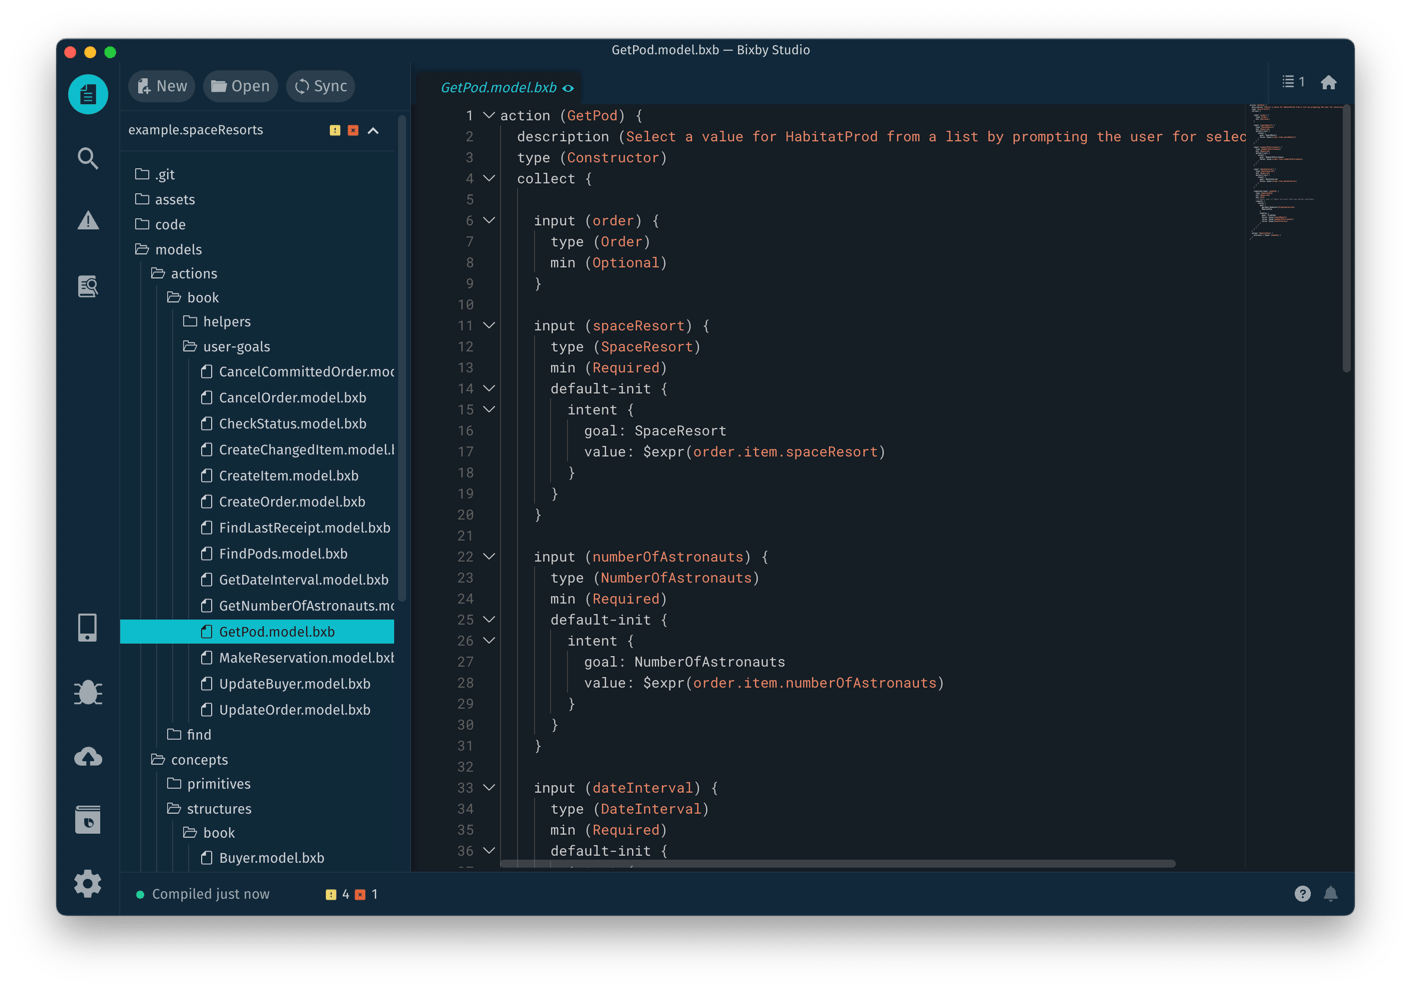
There are four areas of Bixby Studio's main window:
- Activity Bar: vertical, along the leftmost edge of the sidebar
- Files Sidebar: the left-hand side of the window
- Editor: the main area of the window
- Status Bar: horizontal, along the bottom of the window
Activity Bar
Bixby Studio's left margin displays nine icons, four at the top and five at the bottom. These Activity Bar icons switch between various tasks used in Bixby capsule development:
- Toggling the Files Sidebar
- Search Within Capsules
- Warnings & Errors
- Documentation Search
- The Simulator
- The Debug Console
- Submissions
- The Developer Center (opens in your browser)
- Settings
Keyboard Shortcuts
Nearly all tasks in Bixby Studio can be accomplished through keyboard shortcuts rather than using the mouse and menus. Bixby Studio generally follows standard platform conventions for keyboard navigation, selection, and clipboard (cut/copy/paste).
For a full list of Bixby Studio keyboard shortcuts, refer to the Keyboard Shortcuts cheatsheet.
Files
The Files sidebar displays your list of open capsules and all the associated files within the capsules, containing source code, assets, training, and other resources. This is the currently selected view in this screenshot. This is much like the project or explorer view in other IDEs. Click on any file to preview it within the editor, and double-click it to open it. (The Settings tab allows you to change this behavior to opening files with a single-click.) Toggle the Files sidebar by clicking its activity icon or using Ctrl+1 (Windows/Linux) or Cmd+1 (Mac).
All of your currently open capsules will be displayed in the sidebar; click the disclosure triangle to the right of the capsule name to see the file trees within the capsule. For synced capsules, icons will appear by the capsule name to indicate the presence of warnings or errors; the icons will also appear by individual files that contain warnings or errors. If a capsule is not synced, its name will be dimmed and an "unsynced" icon will appear to the right of its name.
Buttons at the top of the Files sidebar allow you to create files and capsules in your workspace and to manage currently open capsules.

New has options for adding capsules, folders, and files to the workspace:
- Create a Capsule
- Create a Capsule from a Sample
- Create a Capsule from a Template
- Create Folder (within the currently open capsule)
- Create File (within the currently open capsule)
Open has options for opening existing capsules and recently used capsules.
These commands are also available from the File menu:
- New File (Ctrl+N/Cmd+N)
- New Capsule (Shift+Ctrl+N/Shift+Cmd+N)
- New Capsule from Sample
- New Capsule from Template (Alt+Shift+Ctrl+N/Opt+Shift+Cmd+N)
- Open Capsule (Shift+Ctrl+O/Shift+Cmd+O)
- Open Recent
Sync lets you manage the capsules currently open in the workspace:
- Check or uncheck the checkbox to the left of each capsule to sync or unsync that capsule, respectively.
- Click X to remove the capsule from your workspace. (This will not delete the capsule on disk.)
- Click Recompile to recompile all currently synced capsules.
Search Within Capsules
Bixby Studio supports searching for and replacing text references and symbols across either the current capsule or all open capsules. In addition to clicking the search activity icon, you can use keyboard shortcuts to open these views:
- To search within files across capsules, select Edit > Find in Files or press Shift+Ctrl+F or Shift+Cmd+F.
- To search and replace within files across capsules, select Edit > Replace in Files or press Shift+Ctrl+R or Shift+Cmd+R.
You can set the following options for find and replace:
- Case-sensitive or case-insensitive (the default)
- Regular expressions or plain text (the default)
- Whole words or within words (the default)
- Symbol or text (the default)
Bixby Studio's regular expression engine is PCRE-compatible.
When you find or replace within files, the search/replace window will appear in the bottom pane of the editor window.
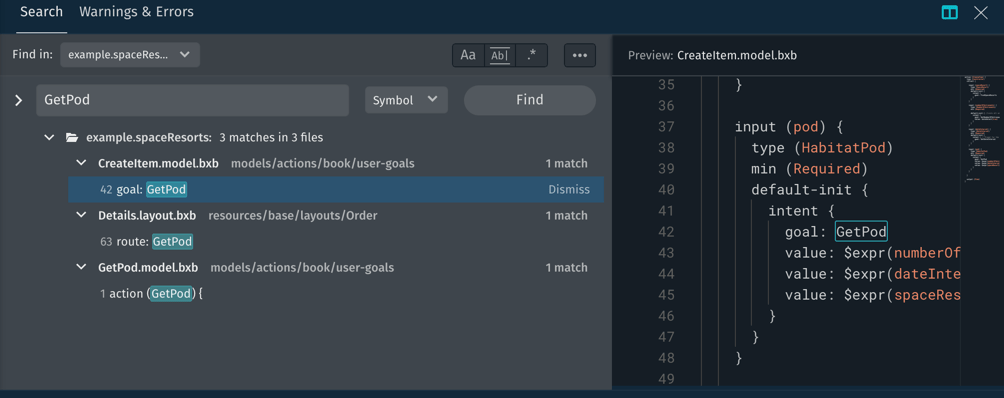
From this pane, you can find how many matches are found in which files, and get a preview of the matches in context by single-clicking on a line in the result pane. Double-click a line in the result pane to open that file in the editor at the selected line.
You can choose whether to find matching files in all capsules or a specific capsule. To further refine folders and files to search through, click the More button (•••) to expand the search fields.
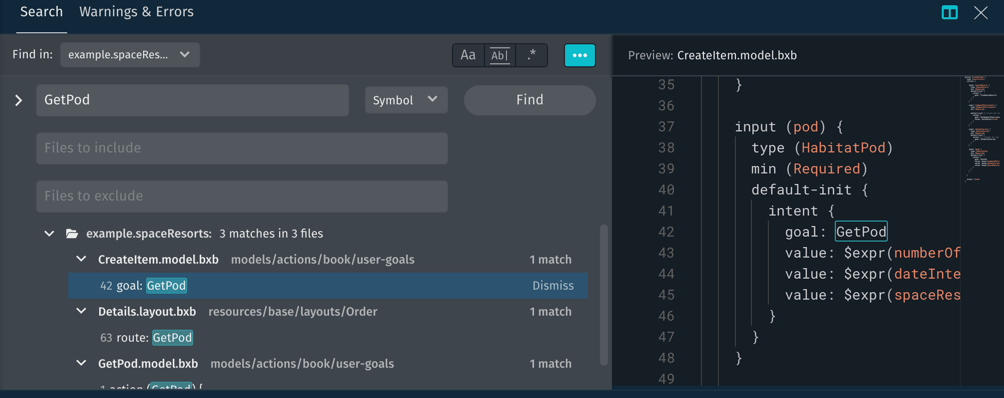
In the additional fields, you can specify one or more folders or files to include in the search, and/or one or more folders or files to exclude. These fields are always case-sensitive and always match partial words (that is, "apple" will match "apple", "apples" and "pineapple"). Folder and filenames can be matched with glob patterns:
- A
*character matches everything except slashes - A
**sequence matches everything including slashes - A
?character matches any single character except a slash
Example:
Foo*.bxbwill match any file that ends with.bxband starts withFoo:Food.model.bxb,FoodOrder.dialog.bxb, and so on.models/**/*.bxbwill match any file that ends with.bxband is in a subfolder ofmodels/.trainingwill match any file in thetrainingfolder.
The fields can be combined. Entering *.bxb in the "Files to include" field and training in the "Files to exclude" field will search through all files ending in .bxb, excluding files in the training folder.
Warnings & Errors
This view opens a pane at the bottom of the editing window that shows problems Bixby Studio has found in the currently open capsules, listed by file. Open the Warnings & Errors view by clicking its activity icon or using Ctrl+3 or Cmd+3.
Open any file listed here in the editor by clicking on it to reveal a list of errors, warnings, and deprecations within that file. Click on a line number to be taken directly to that line in the file.
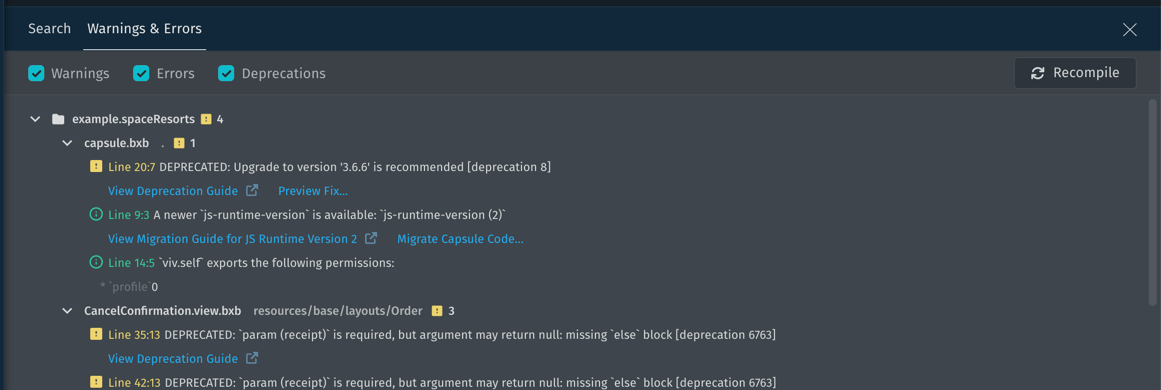
The Warnings & Errors pane might provide a link to documentation that goes into more detail about a specific problem, or offer to fix the error for you. Read Quick Fix for more information.
You can choose which kinds of messages to show by checking or unchecking the boxes by Warnings, Errors, and Deprecations. Click the Recompile button to recompile all capsules and re-check them for problems.
The Warnings & Errors pane and Search pane are two tabs within the same pane. When either one is open, you can switch between them by clicking their respective activity icons, clicking the tabs themselves, or using keyboard shortcuts.
Documentation Search
This sidebar lets you search through Bixby's developer documentation. Simply start typing a term, and relevant reference keys, guides, and documentation sections will be displayed. Open this sidebar by clicking the documentation search activity icon.
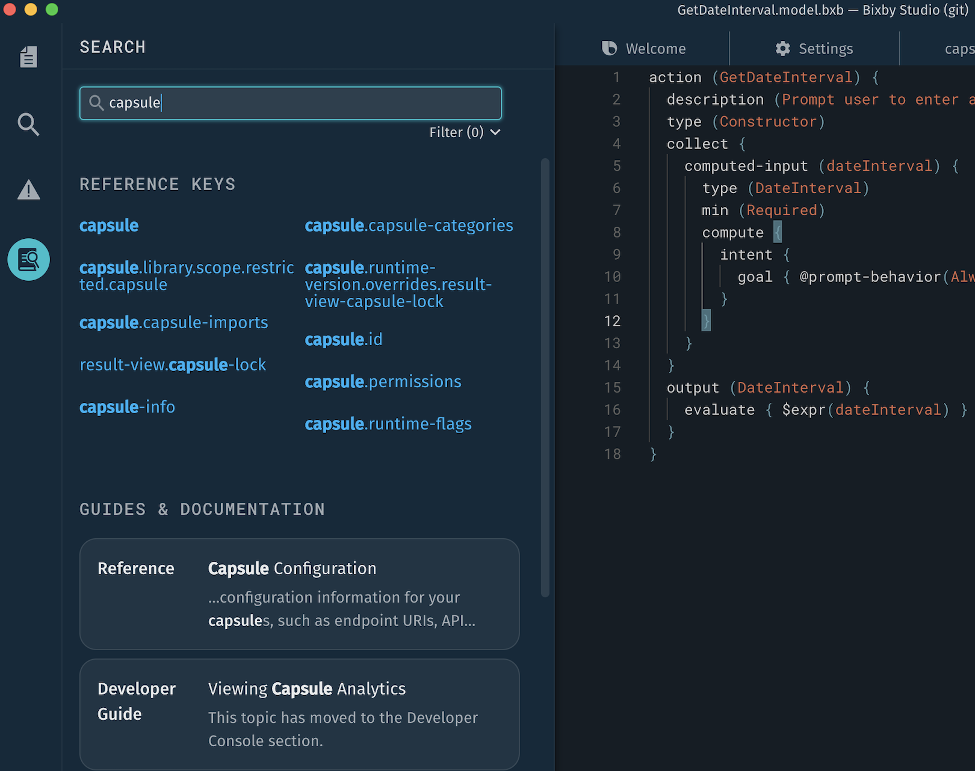
You can use the Filter menu to refine your results. Uncheck sections of the documentation you want to exclude from searching.
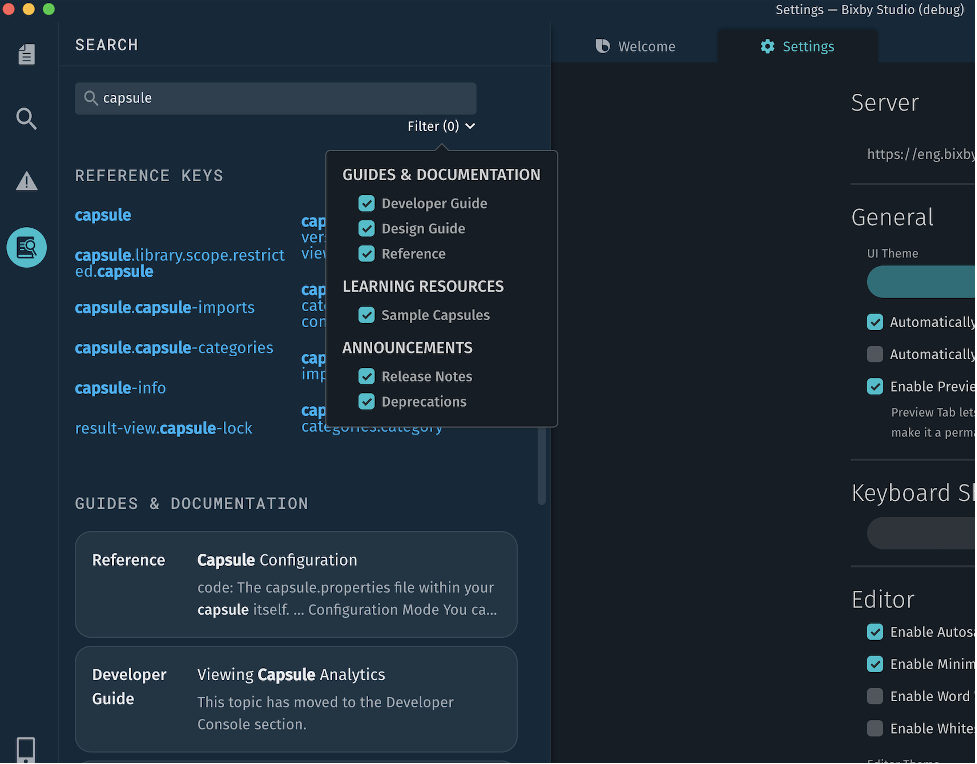
If you click the Open Documentation Site button, the Developer Center will open in your web browser.
Simulator
Clicking this activity icon opens the Device Simulator in a separate window. You can also open the Simulator with Ctrl+7 or Cmd+7.
Debug Console
Clicking this activity icon opens the Debug Console in a separate window. You can also open the Debug Console with Cmd+Shift+D or Ctrl+Shift+D.
Submissions
Display the status of your submissions to the Bixby Developer Center in a new editor tab by clicking the Submissions activity icon or using Ctrl+8 or Cmd+8.
- Click on any of the submissions to see information about that submission and view logs. Submission information opens as a new tab in the editor (area 3).
- Use the search field to search through your submission history. You can search for text in both titles and descriptions.
- Create new submissions with the Create New Submission button, which will also open a new tab in the editor.
Developer Center
This button is a shortcut to opening the Bixby Developer Center in your browser, which gives you full access to documentation as well as the tools for managing your capsule and setting up dynamic configuration and secrets.
Editor
The editor allows you to create and edit your capsule's resources. When source code is open, as in the screen shot above, the editor behaves like other code editors you might have used. Bixby Studio provides syntax highlighting for Bixby Language and JavaScript, along with automatic indenting and other helpful editing features. Bixby Studio will also show you errors and warnings in your code in real time.
The editor can have more than one file open at a time. Similar to web browsers, multiple files open in tabs along the top of the window showing the filename (or other informational view, such as training or a submission). The top right corner of the editor displays the number of open tabs; you can click in that corner to get a list of all open tabs. This lets you easily navigate between tabs, even when there are more open than can fit along the top of the editor window.
Training for your capsule opens as a tab in the editor. Other views, such as Settings and Submissions, also open in separate editor tabs.
Command Palette
Nearly all of Bixby Studio's functionality is accessible from the keyboard, even for commands that have no keyboard shortcut, via the Command Palette. Use Shift+Cmd+P or Shift+Ctrl+P to bring the Palette up, and start typing the command you're looking for.
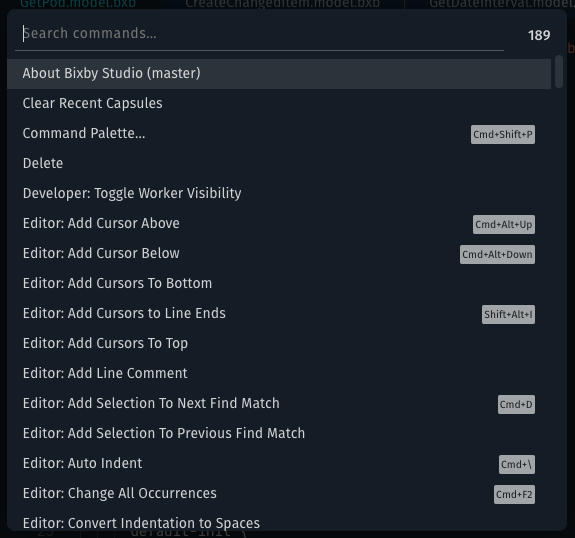
The Palette displays the keyboard shortcut for any command if one is assigned. Nearly all commands available in the Palette can have keyboard shortcuts assigned to them in the Keyboard Shortcut Editor.
Recent Capsule History
You can call up the history of recently opened capsules from the workspace and capsule management buttons, from the Command Palette with "Open Recent Capsules", and from File > Open Recent > More….
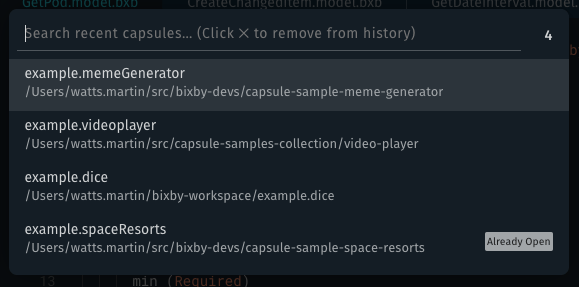
The history list is searchable. Individual items can be removed from the list with the × icon. The entire list can be cleared by selecting File > Open Recent > Clear Recent Capsules or executing "Clear Recent Capsules" in the Command Palette.
Status Bar

The bottom of the window displays, from left to right, the following content:
- The status of the connection to the Bixby server
- How recently the current capsule was compiled
- Any errors and warnings in the current capsule
- The "Quick Help" menu, which links you to release notes, documentation, tips and tutorials, and support pages
- The notification indicator
Capsule Creation
You can either create a new capsule from scratch, or start with a template. When you select either creation method, Bixby Studio will create your capsule's folder structure and initialize required files for you. When you start with a template for a specific kind of capsule, Bixby Studio will help you create models and code to jumpstart your development.
In addition, Bixby Developer Studio can create a new capsule based on a sample capsule to help you learn the Bixby platform.
Start With an Empty Capsule
To create a new capsule, do one of the following:
- Click Create New Capsule on the welcome screen, or in the sidebar if no capsules are open.
- Click the ➕ icon in the Manage Capsules menu.
- Select Create Capsule in the Add to Workspace menu.
- Select File > New Capsule… in the menu bar.
- Type Shift+Ctrl+N or Shift+Cmd+N.
You will be prompted for a folder to save the capsule in and a capsule ID.
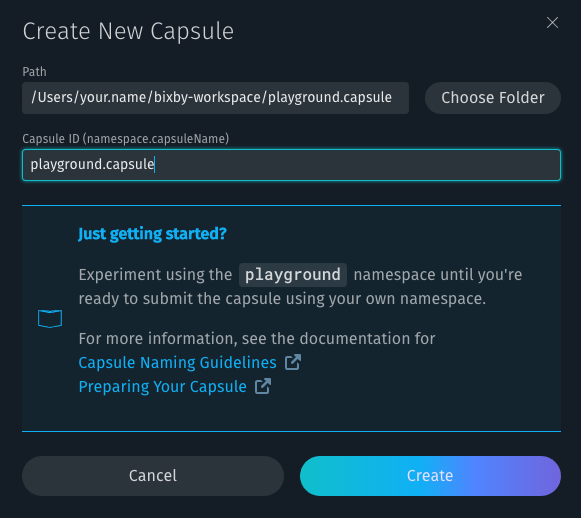
Bixby Studio creates a base project folder layout for you, with folders for assets, code, models, and resources, along with default capsule.bxb and endpoints.bxb files.
Start From a Template
By starting from a capsule template, Bixby Studio creates basic code for you that matches your capsule's domain—a search-based capsule, for instance, or a store capsule. This can streamline your development by cutting down on the amount of boilerplate you need to create to get your capsule going.
To create a new capsule from a template, do one of the following:
- Click Create New Capsule from Template on the welcome screen, or in the sidebar if no capsules are open.
- Select Create Capsule from Template in the Add to Workspace menu.
- Select File > New Capsule from Template… in the menu bar.
- Type Opt+Shift+Ctrl+N or Alt+Shift+Cmd+N.
You're asked to select a template.

Templates are stored on Bixby's server, which always gives you the current list of available templates. You can read more about some of the included templates in the Templates documentation.
After you choose a template, you'll be prompted to configure the capsule's language. The available languages are dependent on what's available in the template; all templates will support English as the default language. Once you've selected a language, click Next Step.
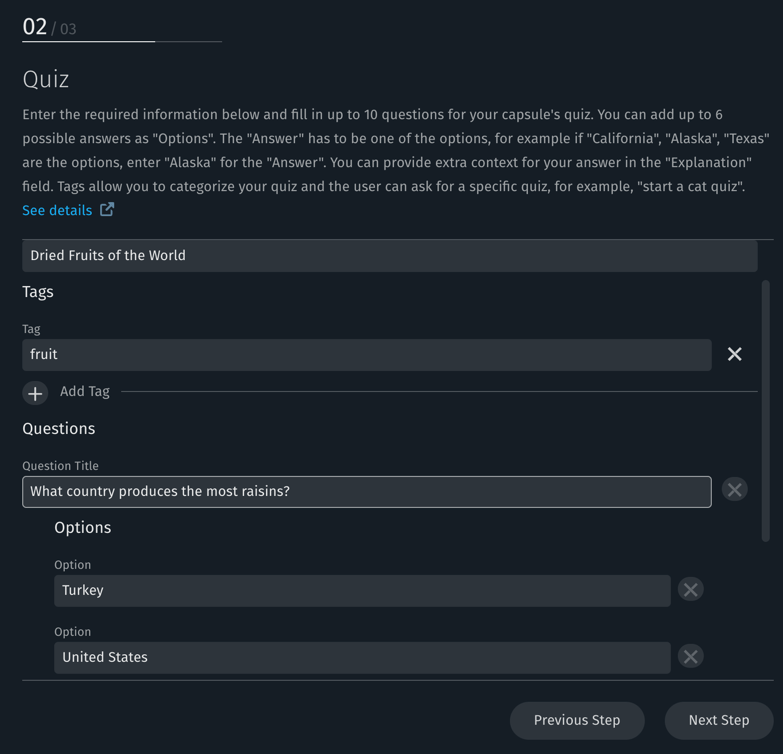
On the next screen, you'll be prompted to fill in more information specific to that template. The quiz capsule template, for example, prompts you for the quiz title and individual questions and answers, with buttons to add as many new questions as you need.
Click Next Step to advance. The final step in template creation prompts you for a folder to save the capsule in and a capsule ID. Fill in that information, and click Generate Capsule:
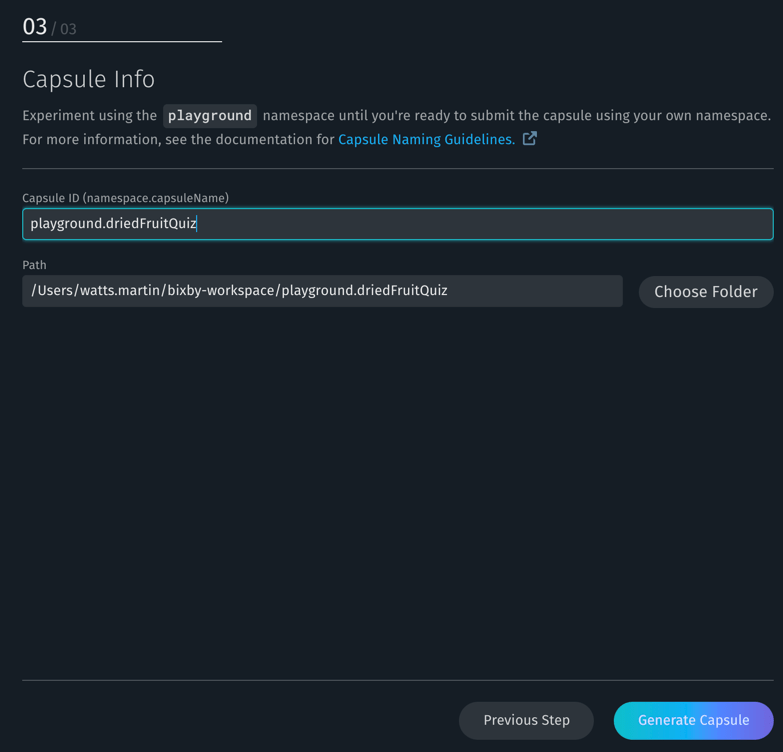
Bixby Studio creates a base project folder layout for you, with capsule.bxb and endpoints.bxb files tailored to your capsule. Depending on the template you've based your project on, basic models, resources, and other assets are already created.
Your new capsule will be opened and synced in Bixby Studio. Check the README.md file for more detailed information on your new capsule, including documentation on the models, code, and next steps you can take to further customize its behavior and appearance, add training, and prepare it for submission to the Marketplace. Also, check for any warnings or errors, and go over the generated models, code, and resources.
Start From a Sample
Bixby Studio can automatically check out sample capsules and add them to a workspace for you.
To create a new capsule from a sample, do one of the following:
- Click Create New Capsule from Sample on the welcome screen or in the sidebar if no capsules are open.
- Select Create Capsule from Sample in the Add to Workspace menu.
- Select File > New Capsule from Sample… in the menu bar.
Bixby Studio will present a list of preselected sample capsules for you to choose from.
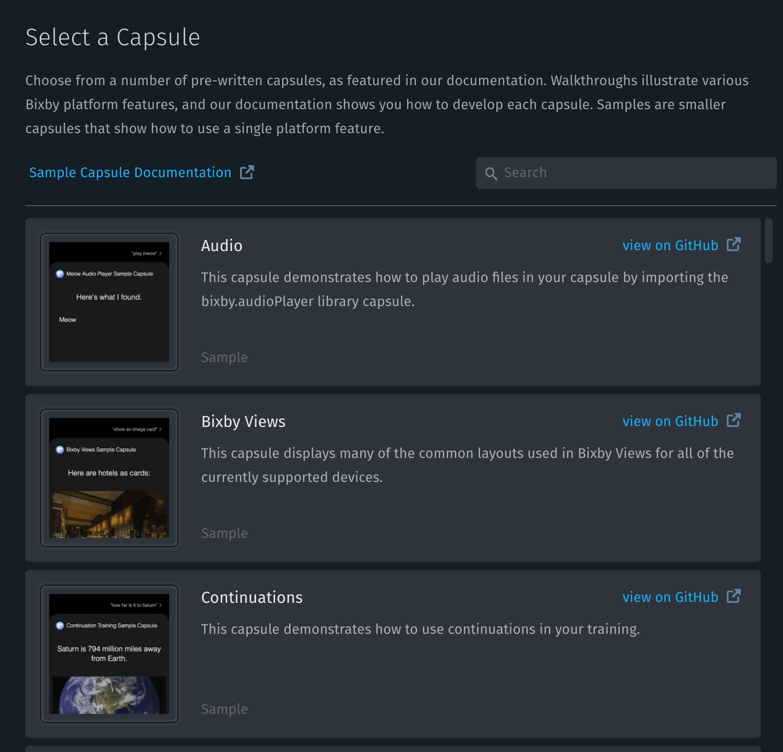
Choose a capsule name and a path for your new capsule, and then click Create Local Copy.
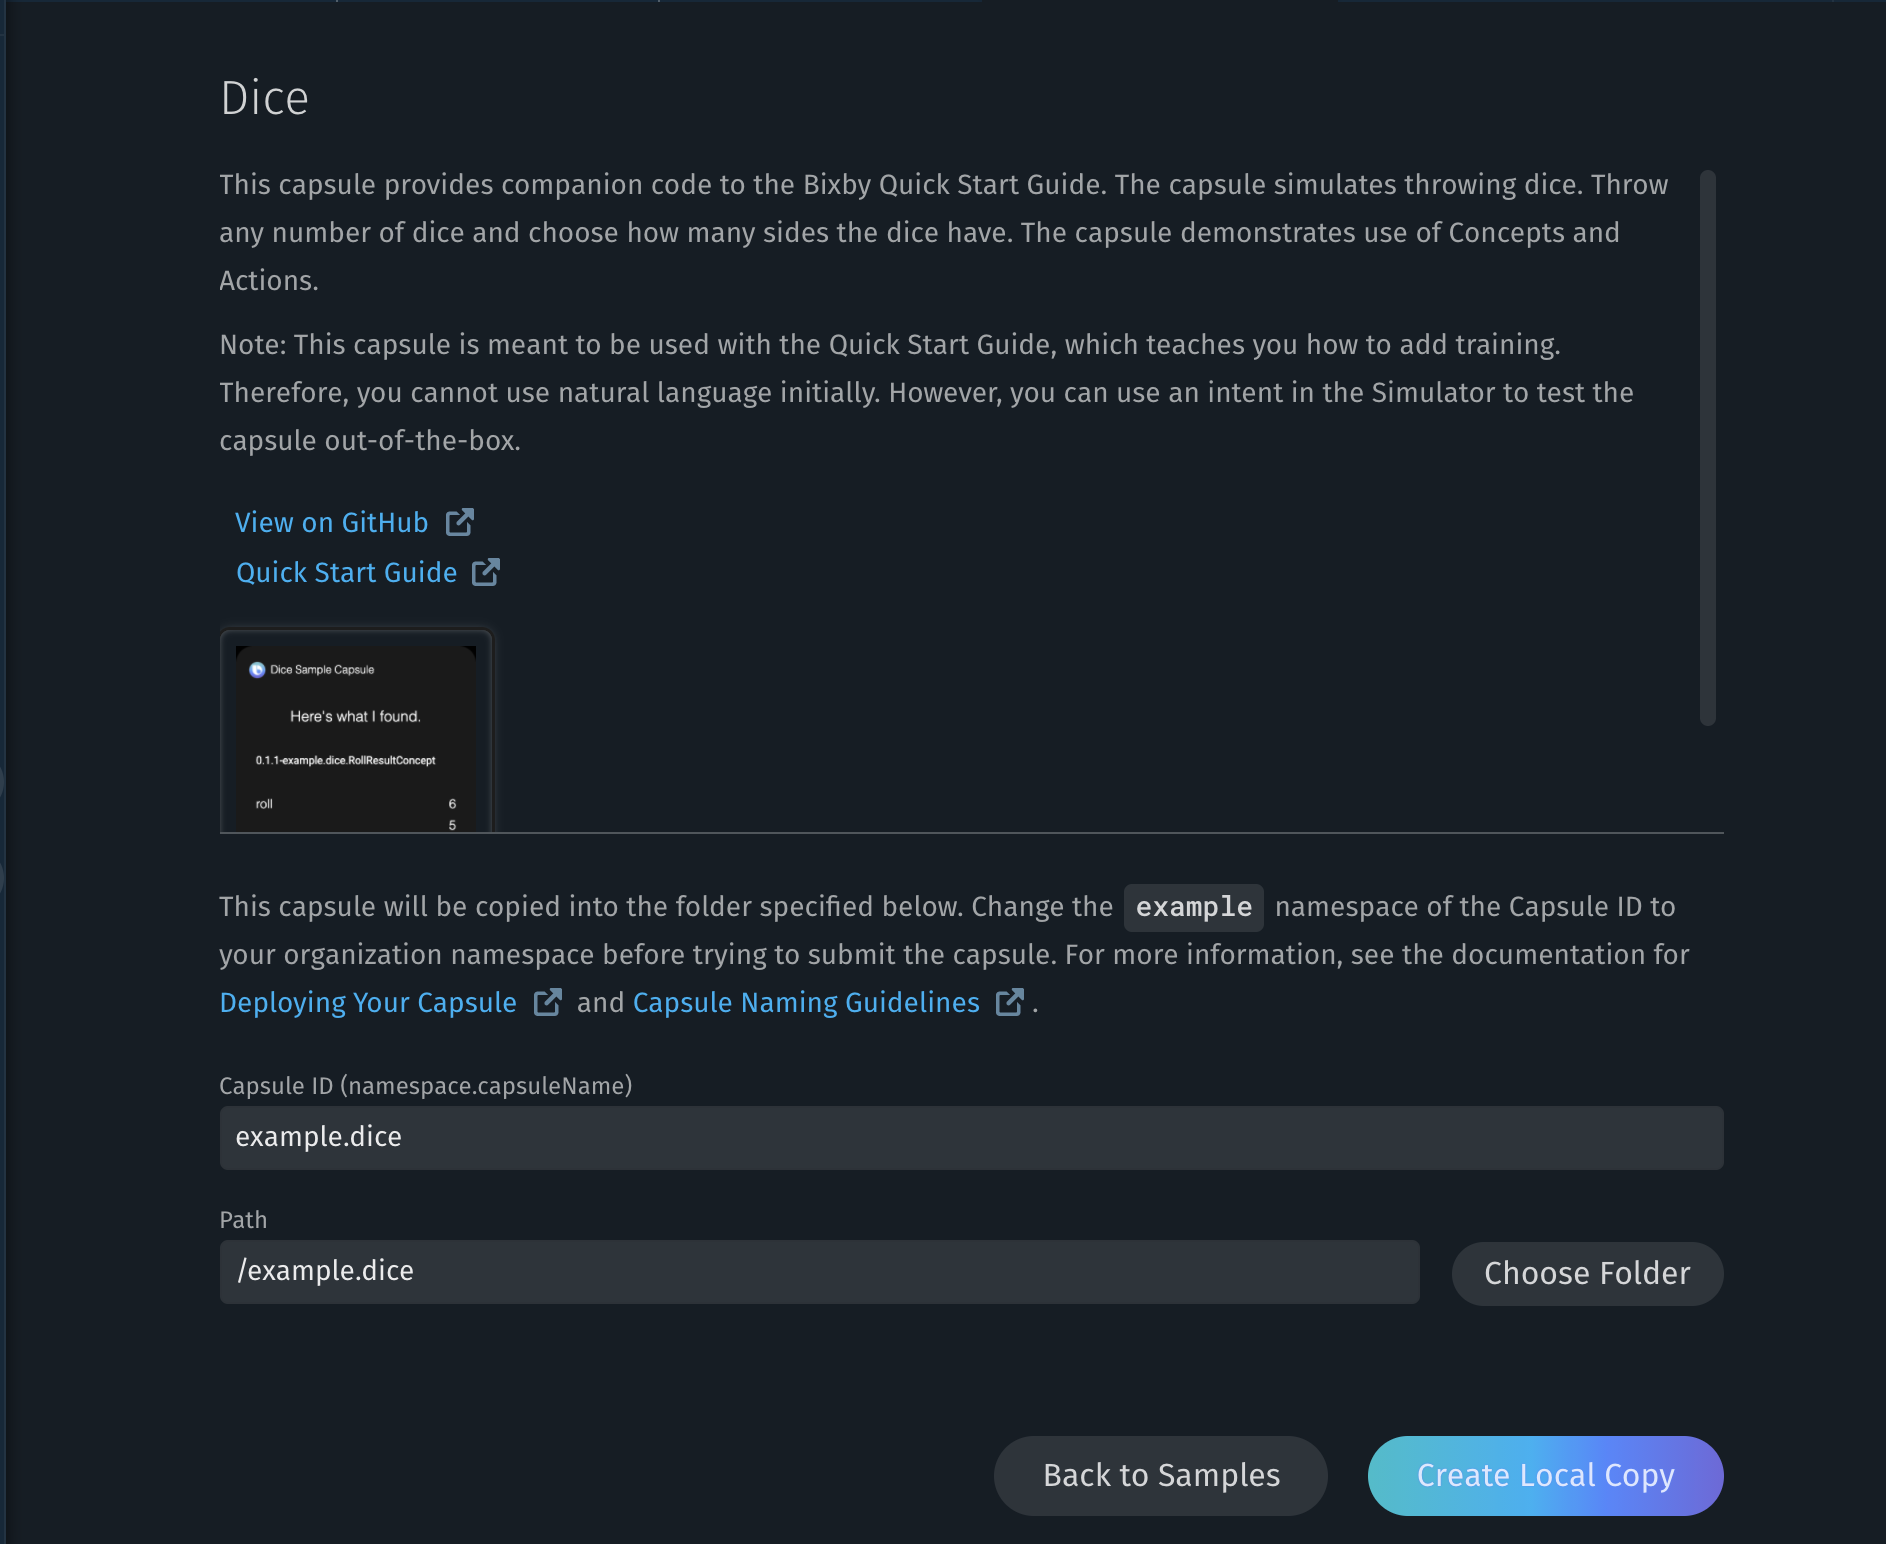
Bixby Studio will check out and open the sample capsule from the Bixby Developers GitHub repository.
Some sample capsules available on the Bixby Developers GitHub repository might not be available through the New Capsule from Sample function. However, you can still check out sample code directly yourself and open it within Bixby Studio.
Editing
Bixby Studio provides a full set of IDE-style features for code editing, including syntax highlighting, smart indenting, autocompletion, multiple selection, navigating through editor history (including both cursor location and current tab selection), and realtime code error-checking. The editor also has customization settings, including dark and light themes.
In addition to Bixby's modeling language and Expression Language, Bixby Studio includes highlighting and editing features for JavaScript and Markdown.
For a full list of keyboard shortcuts you can use during editing, refer to the Keyboard Shortcuts cheatsheet.
In addition to menus, you can use the Command Palette to find and execute commands, including commands that do not have shortcuts assigned to them. Bring up the command palette with Shift+Ctrl+P or Shift+Cmd+P. You can search for commands in the palette using fuzzy rather than exact matching: commands will be searched for as you type, and "Check for updates..." could be matched with "check", "upd", or "cfu".
Autocompletion and Hover Information
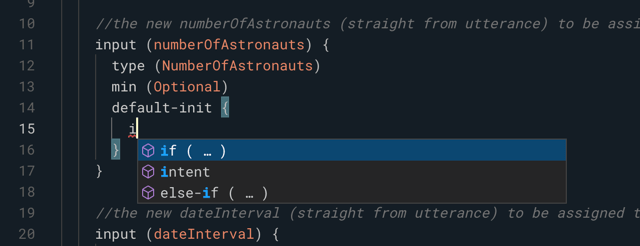
Bixby Studio includes context-aware autocompletion of JavaScript keywords and Bixby Language keys, suggesting completions for valid keys at the current point in the file. You can trigger autocompletion with Ctrl+Space at any point.
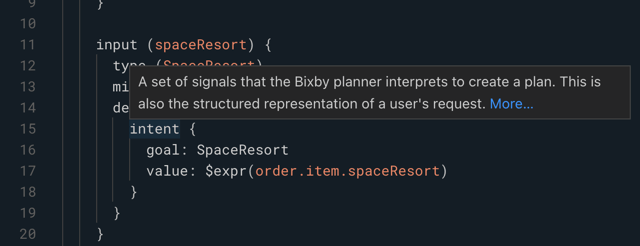
In addition, in Bixby Language Files, hovering the pointer over a key will display a brief description of the key from the Bixby Language Reference Guide, with a link to more documentation when appropriate.
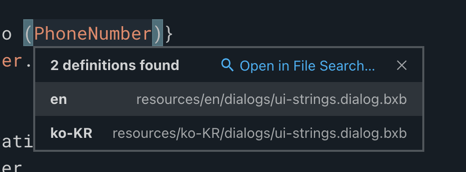
Hovering over a macro or a macro parameter reference will allow you to jump to the macro definition by clicking on it while holding down Cmd (Mac) or Ctrl (PC). A popup will show all definitions for the macro and let you select one or open the file search pane for the symbol.
When editing a view, the autocompletion feature can also be used to insert code from the Component Gallery. Read the documentation on the Component Gallery in the Creating Bixby Views section for more information.
Creating Files
You can create new files within a capsule by clicking Add to Workspace and Create File, or by using the New File... command (Ctrl+N or Cmd+N) in the File menu. The Create New File dialog box lets you specify the kind of file you're creating and its location. For certain kinds of files, it also provides starter templates to make file creation easier.
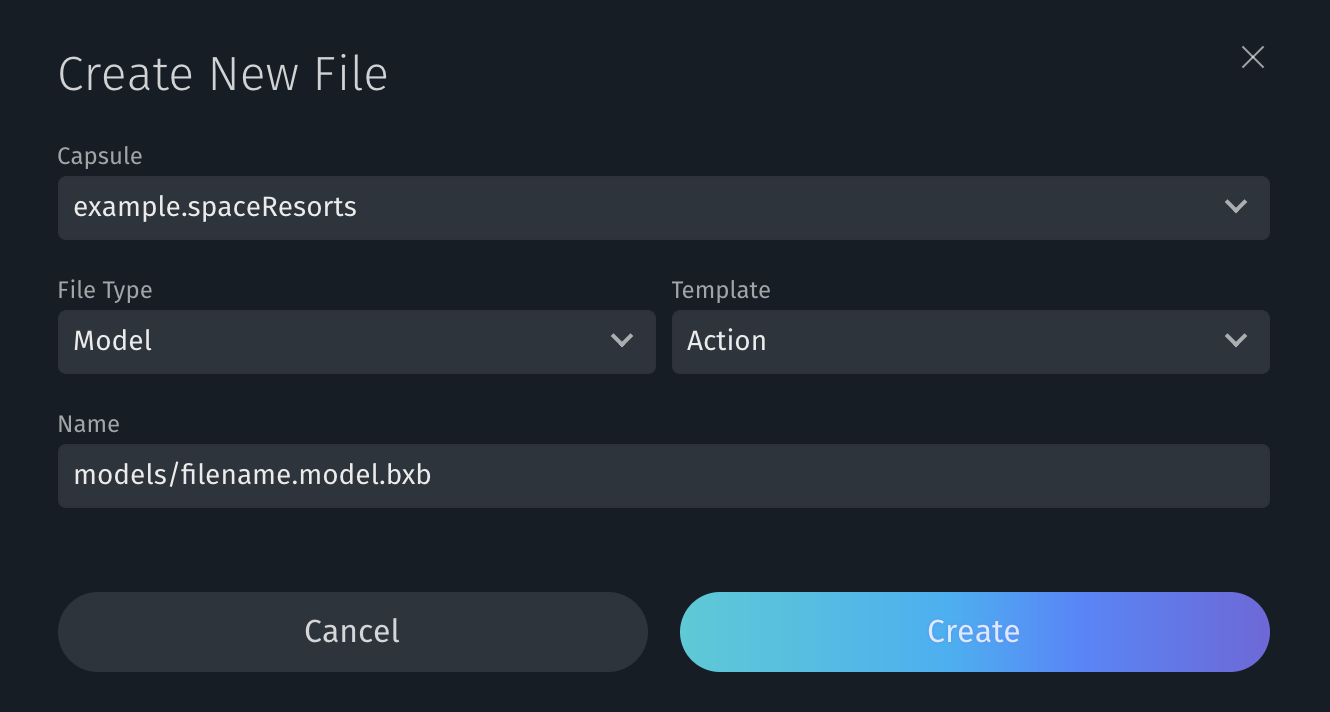
Use the File Type drop-down to specify the kind of file you're creating. Bixby Studio will fill in the "Name" field with the suggested directory to use within your capsule. Different items become available depending on the file type you select; for instance, if you select "Training," you can select the device and language, and Bixby Studio will set the filename correctly based on your selections.
For certain kinds of files, such as models and macros, you can select a Template (such as Action, Structure, or a primitive Concept type for models, or Dialog or Layout for macros). When you select a template, Bixby Studio will create the file with appropriate starter content. For instance, if you select a file type of Model, a template of Action, and change the filename to CreateWidget.model.bxb, you'll get the following template:
action (CreateWidget) {
  description (__DESCRIPTION__)
  collect {
    input (__INPUT_NAME__) {
      type (__INPUT_TYPE__)
      min (Optional) max (One)
    }
  }
  output (__OUTPUT__)
}
Opening and Saving Files
You can open files by clicking them in the file view or by opening them by name. Use Ctrl+P or Cmd+P to find any file in the currently opened capsule with fuzzy matching.
To save the current file, use Ctrl+S or Cmd+S; to save all modified files, use Ctrl+Alt+S or Cmd+Option+S. (You can also use the corresponding commands in the File menu.) Bixby Studio can be set to automatically save as you work, compiling modified files in your capsule in the background; for this feature, select Enable Autosave in the editor's settings.
When you quit Bixby Studio, it saves its current state. When you restart, it will open the same capsules and editor tabs.
Navigating Files
Bixby Studio offers multiple methods for navigating between files:
- Use the File Navigator to select files directly.
- Use the Go to File... command (Ctrl+P or Cmd+P) to jump to a file by name, in any currently open capsule.
- Use Edit > Find in Files (Shift+Ctrl+F or Shift+Cmd+F) to jump to specified text within the same file or different files.
- Use View > Navigate Back (Shift+Ctrl+9 or Shift+Cmd+9) and View > Navigate Forward (Shift+Ctrl+0 or Shift+Cmd+0) to navigate through editor history. For example, after jumping to a different location using Find in Files, you could Navigate Back to your previous editing location. The editor history saves both cursor locations and tabs, so it can jump between files.
- Use Go To Definition (F12) to jump to the definitions of symbols, such as concepts, actions, and macros. This command appears in the right-click context menu when you click the symbol you'd like to find the definition for.
- Use Find All References (Shift+F2) to bring up a search list of all lines across a capsule that refer to the selected symbol. This command appears in the right-click context menu when you click the symbol you'd like to find references for.
Splitting the Editor View
Bixby Studio can display more than one file at a time. You can split the editor view vertically into two columns for a side-by-side display, horizontally into two rows, or into a two-by-two grid to display four files simultaneously.
To choose a different layout, use the View > Layout command to select one of the four available splits: single (the default), rows, columns, or grid.
When the view is split, choose which area to open a file in by clicking on that area to select it. You can move opened files between areas by dragging the file tab from one area to another.
Search and Replace
Bixby Studio supports searching for and replacing text references and symbols (such as model names) both within a currently open file and in files across all open capsules.
- To search or replace within the current file, press Ctrl+F or Cmd+F.
- To search within files across capsules, select Edit > Find in Files or press Shift+Ctrl+F or Shift+Cmd+F.
- To search and replace within files across capsules, select Edit > Replace in Files or press Shift+Ctrl+R or Shift+Cmd+R.
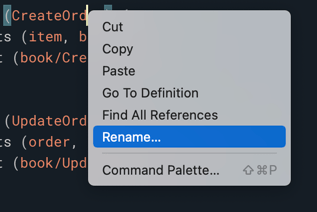
You can also quickly rename symbols by right-clicking on a symbol and selecting Rename… from the context menu. This will open the search and replace pane in Bixby Studio with the symbol pre-selected; enter the new name into the Replace field.
For more information about searching across capsules, read the Search Within Capsules section.
Reformatting Files
Bixby Studio can reformat the current file you're working on, or reformat all the *.bxb files in your capsule or a subdirectory of your capsule.
- Reformat a single file: Use the Reformat command by typing Cmd+Opt+L or Ctrl+Alt+L or using the Command Palette.
- Reformat multiple *.bxb files: Select Edit > Reformat bxb Files…, use the Command Palette, or right-click a folder. In the pop-up, choose the path to the directory with the files to reformat, then click Reformat.
Quick Fix
When a warning or error is found in your code, Bixby Studio will highlight it with a squiggly underline. Hovering your mouse pointer over the highlighted text will show an explanation of the problem and, depending on the error or warning, a link to more information.
For certain errors, Bixby Studio can offer to actually fix the error for you. Fixes that Bixby Studio can apply include but are not limited to the following:
- Library capsule version upgrades
- Updating your capsule to new JavaScript Runtime versions
- Some deprecation fixes
- Converting from old to new macro styles
Problems that Bixby Studio knows how to fix are highlighted in the editor's gutter with a lightbulb icon, and the hover explanation will include options to apply a fix.
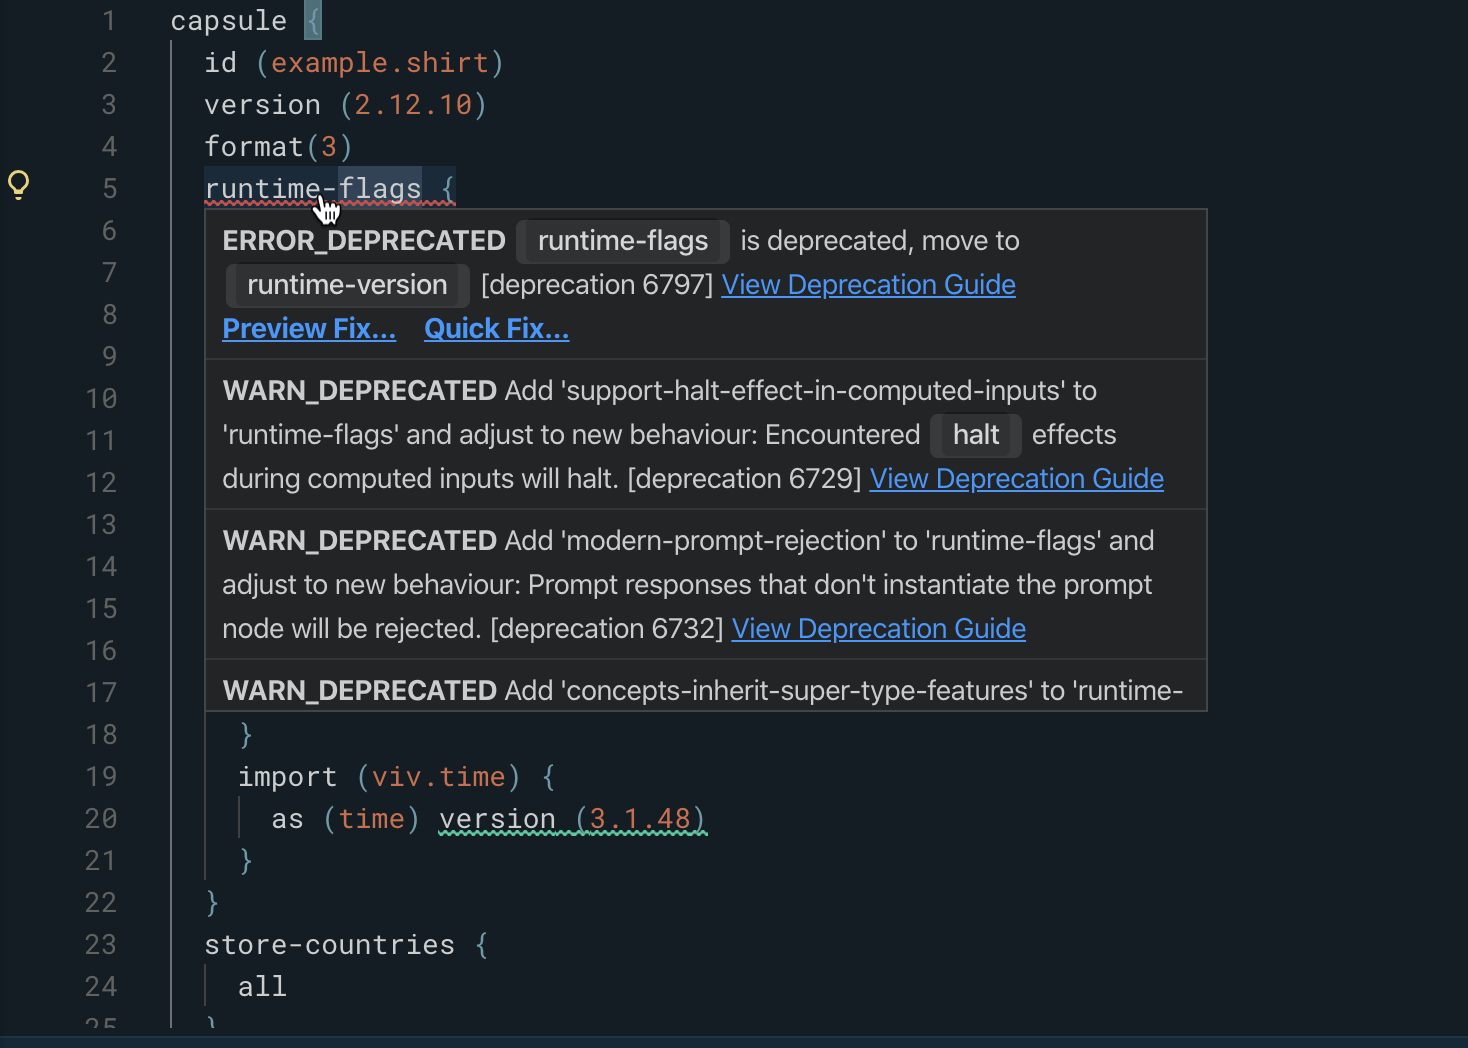
Click on Preview Fix… to see the change that Bixby Studio is suggesting, or Quick Fix… to apply the change without previewing it first. The preview will show up as a diff, highlighting lines to remove and add.
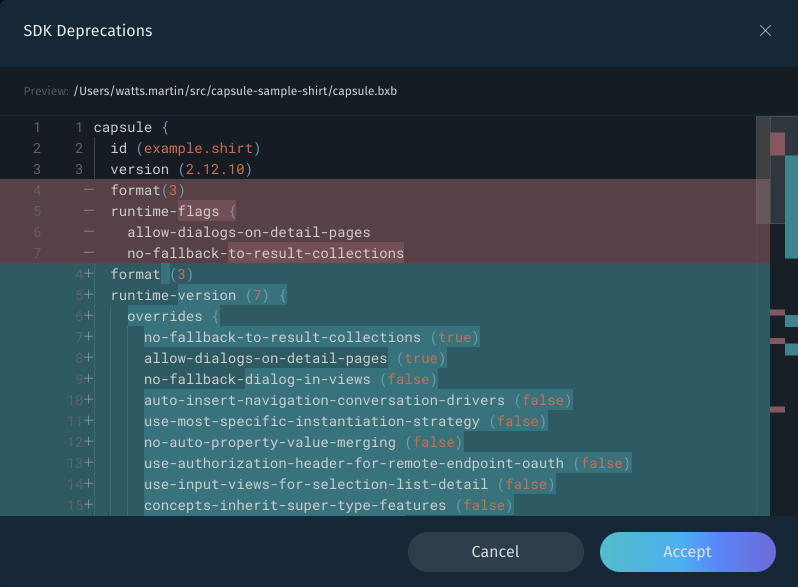
Click Accept to apply Bixby Studio's suggestions one by one, Accept All to accept all of the proposed changes if there are more than one and the changes do not have conflicts, or Cancel to abort.
You can also click the lightbulb icon in the gutter to apply a Quick Fix.
Settings
Clicking the Settings icon at the bottom of the activity bar (or using the Preferences… menu command or Ctrl+, or Cmd+, keyboard shortcut) will open Bixby Studio's settings in a new tab in the editor. This lets you configure the following options:
- Server: Unless instructed otherwise, leave this set to
https://bixbydevelopers.com. - General
- UI Theme: Choose between dark and light UI theming. (This is separate from the theming of the editor pane; see below.)
- Automatically adjust editor layout when closing the last tab in a group: If selected, and you are using a column, row, or grid layout, the editor automatically adjusts the layout as you close one or more tabs.
- Automatically reveal selected tab in File Navigator: If selected, the File Navigator highlights the current tab you are viewing.
- Enable Preview Tab: Control click behavior in the file list. If Preview Tabs are enabled, single-clicking a file previews it in a new tab and double-clicking it opens it for editing. If Preview Tabs are disabled, single-clicking a file opens it for editing.
- Keyboard Shortcuts: opens the keyboard shortcut editor.
- Editor
- Enable Autosave: If selected, the editor will automatically save changes in files in the background.
- Enable Minimap: If selected, a "map" of the current file will appear in the upper right corner of the editor.
- Enable Word Wrap: If selected, long lines in editor will wrap at the right-hand side of the editing pane. If this is not selected, lines will not wrap, and the editor will scroll horizontally to show lines that cannot fit in the pane.
- Enable Whitespace: If selected, the editor shows spaces as dots and tab characters as arrows.
- Editor Theme: Allows you to switch between dark and light editor themes. (This is separate from the theming of the surrounding UI; see above.)
- Font: Lets you choose the font for code editing. You can use Bixby Studio's built-in default, your system's default, or specify a custom font.
- Font Size: Lets you set the font size for code editing in pixels. Sizes can be set from 4 to 72px; the default is 14px.
Keyboard Shortcut Editor
Most of the default keyboard shortcuts in Bixby Studio can be customized in the keyboard shortcut editor.
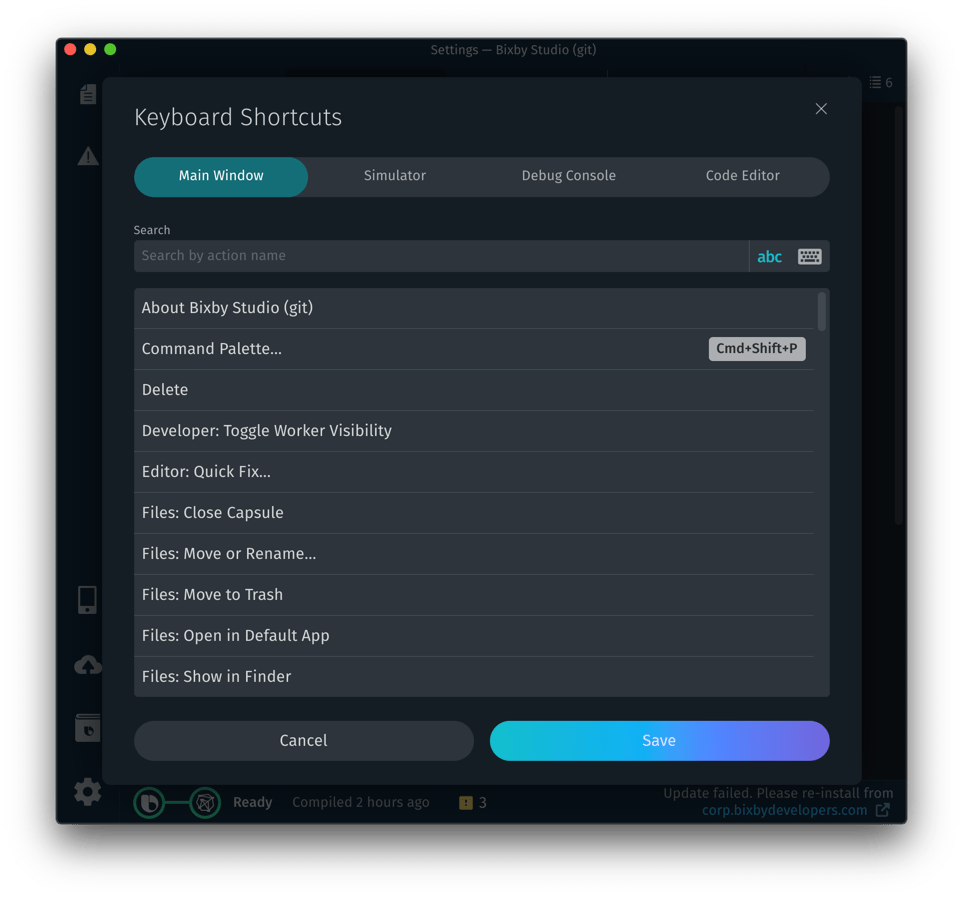
Shortcuts are categorized by window:
- Main Window (all functions within the main Bixby Studio window other than the code editor)
- Simulator
- Debug Console
- Code Editor
To change the shortcut for any function, click on the shortcut in the window to bring up the key combination pop-up.

Type the new keyboard combination you wish to assign as a shortcut. Click the circled X to delete the current combination and the counter-clockwise arrow to restore it to its default. Bixby Studio will warn you if you try to re-assign a shortcut that is already in use; if you go ahead and save the shortcut, it will be removed from its previous function.
You can search for a function in one of two ways:
- Search by action name: type the name of an action you wish to assign a shortcut to. The search results will narrow as you type. Click the abc in the search field for this search type.
- Search by shortcut: type a shortcut to see which, if any, action that shortcut is assigned to. Click the keyboard icon in the search field for this search type.
You can restore all shortcuts to their defaults by clicking the double-headed counter-clockwise arrow (![]() ) at the top of the shortcut editing window.
) at the top of the shortcut editing window.
Testing
In addition to editing, Bixby Studio has tools designed to help you test your capsule. Read about them in their own sections:
Troubleshooting
If you have any issues with capsule development while in Bixby Studio, you can check the FAQ section of the Bixby Developers Support website.
If your issue is not addressed with one of the FAQ articles, you can send a diagnostics report and file an issue with our support team:
- Click Help at the top main navigation bar.
- Click Contact Support in the menu. This opens up the Contact Bixby Developer Support page in a new tab in the editor.
- Fill in the form with the appropriate information as necessary, including steps to reproduce the issue and any screenshots that might be useful.
- Click the Send Report button.
Once the report is sent, a new Zendesk ticket will be created, and an email will be sent to the address you inputted.
If possible, you should send a report while the issue is occurring!
If you've filed the report and are still seeing issues, you can try some of the troubleshooting steps below. We highly encourage that you send a report before trying these steps.
- If the issue is reproducible, you can take another diagnostics report and attach it to the Zendesk ticket that was filed for you. Click Help > Create Diagnostics Report and attach the created zip file to the Zendesk ticket.
- If you're still seeing issues, try the refresh button to see in the Warnings & Errors panel.
- If the issue is still occurring after refreshing, try reloading your workspace in Bixby Studio with Ctrl+R on Windows or Cmd+R on MacOS.
- If you're still experiencing issues after both refreshing and reloading, try quitting and restarting Bixby Studio.