
Simple One-Step Transactional Capsule
About This Capsule
This sample capsule uses transactional features to simulate a simple, one-step method for transferring money. In addition, it demonstrates using an OAuth server for authorization.
The capsule contains three action types:
Searchto help the user find an accountBeginTransactionto start a transferCommitto complete the transfer
Here are a few training entries that are included with the capsule:
- "Transfer $10": Annotation for prefix symbol and currency value.
- "Transfer $1000 from my checking account to my savings account": Annotations for prefix symbol, currency value, and account type.
- "Transfer from my Money Market account": Adds a continuation using account type.
Along with training, the capsule includes vocabulary for account types. This capsule also includes custom layouts to display information such as account summary, transfer details, transfer confirmation, and receipt details, as well as custom input views for user input.
Because you cannot submit a capsule with the example namespace, in order to test a sample capsule on a device, you must change the id in the capsule.bxb file from example to your organization's namespace before making a private submission.
For example, if your namespace is acme, change example.bank to acme.bank.
Files Included in the Sample Capsule
The following folders and files are included in the sample capsule. More information about what these files do and how they interact with each other are explained further in the walkthrough.
README.md- File that includes the latest updates to the sample capsule files.authorization.bxb- File that specifies OAuth details.capsule.bxb- File that contains the metadata Bixby needs to interpret capsule contents.code- Folder of JavaScript files that actually execute the search and transactions modeled in the actions.models- Folder holding the different model types:actionsandconcepts.resources- Folder of resources.base- Base resources used in all targets.capsule.properties- File containing configuration information for your capsule.dialog- Folder of Dialog files that determine what Bixby tells the user.layout- Folder of Layout files that help determine what the user sees.views- Folder of Views files that help determine the user experience per each moment during the conversation.input- Folder ofinput-viewfiles that allow users to input responses.
en-US- Folder containing files for the US-English locale.training- Folder of training files that help Bixby learn to generalize within this capsule. You do not edit these files directly but interact with training via Bixby Developer Studio.vocab- Folder ofVocabularyfiles that helps Bixby recognize different account transaction terms.endpoints.bxb- File that specifies which JavaScript functions map to each action models.nlg-strings.macro.bxbandui-strings.macro.bxb- Dialogmacro-deffiles that contain reusable strings for the transaction and UI.
viv-bank-server- Folder with a preconfigured OAuth server you'll need to run in order to fully test this capsule.
Sample Capsule Goals
The example.bank sample capsule and this guide highlights and explains the implementation of the following features:
- Configuring your capsule's secret
- Confirming a user request for a transaction
- Updating a transaction through the confirmation page
- Displaying a receipt page after a transaction completes
- Implementing OAuth
- Training with open-text matching
Running the Server
The viv-bank-server folder contains an OAuth server you can run on your local development machine (the same one running Bixby Developer Studio) to use with the bank capsule. In order to run this, you'll need to have Node and NPM installed on your local machine. If they aren't installed, go to the Node download page and install the appropriate version for your operating system, or use a package manager such as Homebrew for macOS.
Once Node is installed, open a terminal console window and navigate to the viv-bank-folder, then use npm to install the server's dependencies and start the server running using the following commands:
npm install
npm startWhen the server starts, it will continue running until you press Ctrl-C to end it and return to the command prompt or close that terminal window. The server will not run in the background by default.
To use the server with Bixby, you'll also need to install Localtunnel to share the web server. Install it with the following command:
npm install -g LocaltunnelNow, you can start the server with the following command:
lt --port 8080This command will generate a URL for your tunnel such as this:
your url is: https://famous-hounds-cry.local.ltYou will use this URL in configuring the capsule in the next step.
Configuring This Capsule
In order for you to test this capsule, you will need to do some additional set-up steps. This also serves to get you familiar with configuring secrets on the Bixby Developer Center. In this case, a secret key for the password needs to be set whose value is ssh-password, matching the password hard-coded into the sample server.
- If you haven't already, create or join a team in the Developer Console.
- Change the
idin thecapsule.bxbfile to match your organization namespace. For example, if your namespace isacme, changeexample.banktoacme.bank. - Update the
authorization.bxbfile to use the URL that Localtunnel returned in theauthorization-endpointandtoken-endpointkeys. If the URL washttps://famous-hounds-cry.local.lt, you would edit the file to read:authorization {
user {
oauth2-authorization-code ("Mock Bank") {
authorize-endpoint ("https://famous-hounds-cry.loca.lt/dialog/authorize")
client-id ("xyz123")
client-secret-key (ssh-key)
scope ("transfer_money")
token-endpoint ("https://famous-hounds-cry.loca.lt/oauth/token")
}
}
} - Register this capsule as
bankin the Developer Console. - In the Configuration & Secrets tab of your capsule's settings page in the Developer Console, add a new secret under Dev that matches the key name given given as the
client-secret-keyin the authorization file:- Name: ssh-key
- Value: ssh-password
- Save and apply the key.
After you've properly set up your client-secret-key, you should be able to test this sample capsule both in the Simulator and on a device.
Sample Capsule Walkthrough
This capsule demonstrates how users can transfer funds between their own accounts. If users don't include one of the required inputs in their query, Bixby prompts for them to provide that information. Once Bixby has all the prerequisites, Bixby displays a confirmation page with editable elements, so users can make changes to the transfer. After users confirm the transfer, Bixby sends a secure request to the server to make the transfer, using OAuth. When the transfer is completed, Bixby creates and displays a receipt.
Initialization of Transaction
Users can initiate a transfer by simply saying "I need to transfer money to my savings account" or by giving all the pertinent information to Bixby, such as "Transfer $100 from my checking to my savings account for my college fund!" Since this is a transaction use-case, the goal is an action for all of these utterances. Transaction use-cases require actions namely because the user is expecting an action to be done, and Bixby needs to make sure an action is taken.
Specifically, the goal for these utterances is the action model CommitTransfer.
CommitTransfer is an action of type Commit. Note that this action model is not a Constructor type, even though its output is a structure concept. CreateTransfer requires a Transfer model to continue and triggers the CreateTransfer action model.
The CreateTransfer model is of type BeginTransaction, which indicates to the platform that this workflow is transactional. If this action, the subsequent actions, and associated structures aren't tagged appropriately, the platform can't continue the workflow.
CreateTransfer has three required inputs (toAccount, fromAccount, and transferAmount) and one optional input (note).
- The
toAccountandfromAccountare of typeToAccountandFromAccount, respectively.- Both
ToAccountandFromAccounthave arole-oftheAccountstructure, meaning they are bothAccounttypes with all the same properties. Accounthas a single property:accountType. This is the enumAccountType, which can beChecking,Savings, orMoneyMarket.- Both inputs have defined a
default-initwith anintentset toFindAccount. Withdefault-init, if the user provides no input, Bixby will look for all available accounts and prompt the user to choose one.
- Both
- The
transferAmountproperty type is theTransferAmountstructure.TransferAmounthas the role ofviv.money.Currency. Theexample.bankcapsule importsviv.moneyin thecapsule.bxbfile in order to use this structure.
- The
noteis of typeTextand is an optional way for the user to provide a purpose of the transfer. For example, "Transfer $1000 from my checking to my savings for my college fund!", thenoteis "my college fund".
The output for CreateTransfer is the structure concept Transfer. After the user initializes the transaction, Bixby needs to prepare this Transfer.
Preparing the Transfer
The planner takes the inputs from CreateTransfer during initialization and creates a Transfer structure. Note that Transfer is flagged with the transaction concept feature. Since CreateTransfer is of type BeginTransaction, its resulting output must be in the transaction state. This marks the structure as needing to be tracked throughout the transactional workflow.
This Transfer structure has these properties that were determined by the provided inputs from CreateTransfer:
transferAmount[Required]toAccount[Required]fromAccount[Required]note[Optional]
The planner has to ensure that there are values for all required inputs, namely by determining the transfer amount and finding accounts.
After it has the transfer properties set, Bixby creates a transfer confirmation page, letting the user update the transfer properties.
Determining Transfer Amount
If the user specifies an amount such as "Transfer $1000 from checking to savings", Bixby can process "$1000" as a transferAmount. Since the transferAmount has the role-of money.Currency, it takes in the dollar sign ($) to figure out which currency to use, and it processes the number (1000) as the Value. Bixby then understands that it is transferring $1000.
The viv.Money capsule also considers the request origin and smartly chooses the currency. In this case, because this capsule was run in the US, Bixby chose US dollars instead of Australian or Canadian dollars.
![]()
You might need to toggle the Show Import Executions option under the Plan View menu in the debugger to see this level of detail in the plan graph.
If the utterance is something like "I need to transfer money to my savings account from my checking", the transferAmount is empty, and Bixby needs an input to continue. This calls the TransferAmount_Input.view.bxb file, which creates an input-view. In this case, Bixby creates a simple form where the user can specify a TransferAmount.
![]()
This form has a template message, asking the user How much do you want to transfer? with the HowMuch template macro. The form also has a single number-input text field. The value inputted in the number-input text field passes back to Bixby as the TransferAmount, as defined in the form's on-submit intent:
The number-input also has a prefix parameter to indicate the money being transferred is in dollars ($) and a label to indicate to the user that the field is for the transfer amount.
Finding Accounts
For both the toAccount and fromAccount, Bixby needs to access the bank server and find the account in question, while using OAuth. In order to implement OAuth, the capsule.properties and the endpoints.bxb files need to be set up properly.
capsule.propertiesfile - Enables Bixby to reach the local server as an OAuth endpoint by default. Set theconfig.default.endpointproperty to your endpoint URL, which you determine from your client provider.endpoints.bxbfile - Sets the OAuth permissions for variousaction-endpointsfound in theauthorization.bxbfile.authorization.bxbfile - Sets OAuth information and enables authorization. Theauthorizationkey needs several child keys to be populated.
Here is the authorization file:
These are the various action endpoints, with the authorization set to user:
If users are not logged into the bank, a button with "Log in to Mock Bank 123" appears. Click on it and a separate browser window opens, which lets users log in with the given username and password on the web page. This button and the mechanics to log into the mock bank are handled by the platform automatically, if your capsule.properties and endpoints.bxb files are set up properly.
After users log in, Bixby has the authorization to find accounts, using the FindAccounts action. While it is searching, Bixby gives users a status update, telling them something like Finding accounts.... There is no dialog or template macro for this message since it is handled by the platform automatically.
The FindAccounts action is set up similarly to the Simple Search Sample Capsule. The biggest difference, however, is that in the corresponding FindAccounts JavaScript file, instead of searching a local JSON file, it makes an http.oauthGetUrl call and makes the search on the server for the accountType specified. If found, FindAccount returns the account.
Note the following about this process:
The same process is used to find both the
toAccountandfromAccount.There is no restriction on the
toAccountandfromAccountbeing the same.If users don't specify one of these accounts, the
default-initvalue callsFindAccountand prompts the user to choose one of the accounts found. There are also appropriate dialog files created calledChooseFromAccountorChooseToAccount, which ask the user Which account do you want to transfer to? or Which account do you want to transfer from?, that are generated.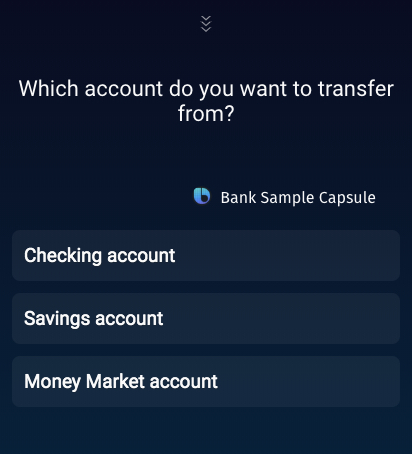
Both prompts are created by respective
input-viewfiles. Both these files use a Selection Picker (selection-of) Views component to list all of the available accounts. Note that there is noaccount.macro.bxbfile in the capsule. Bixby is using the platform-generated defaultSummarylayout foraccount.
For example, if you have an utterance like "Transfer $100 to my checking account", there is no AccountType for the fromAccount. Bixby calls FindAccount, which in turn generates the TransferFrom.view.bxb file for the user to choose an account. The TransferFrom.view.bxb file creates a layout for each account in the Selection Picker, as can be seen in the debug console.
![]()
This is the corresponding input view, which calls the default layout:
Confirming the Transaction
Once Bixby prepares the transfer, it prompts the user to confirm the transfer details. The CommitTransfer action, which is the ultimate goal of this transaction, has the confirm key declared, which is how this prompt is called. This means Bixby requires user confirmation before the transaction can go to the commit phase of the workflow.
Without this confirm key, the Confirmation view will not know what to match.
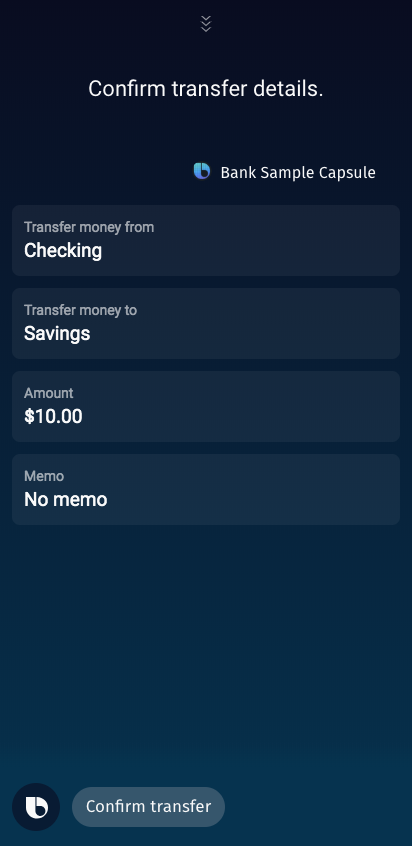
For this confirmation process, Bixby uses the CommitTransfer_Confirmation.view.bxb file, which customizes this Transfer model information and lets users update the transaction information as well as confirm the information before Bixby makes the transfer.
The CommitTransfer_Confirmation view uses several techniques to create this page. First, this confirmation layout uses Bixby Views components. This layout specifically uses the input-cell component for each property to display. This component formats each cell to be tappable automatically. Here's an example for the input-cell that asks the user to confirm from where they are sending money:
Within each input cell, there is a label, a value that the user needs to confirm, and an on-click with an intent.
The ui-strings.macro.bxb file defines a number of macro-def keys, which format text both in dialog and layouts. These macro keys are used in all of the layout files. For example, any time Bixby wants to indicate that this is an account, AccountLabel can be invoked to add the word "Account" in front of the accountType. If at any point that you want to change that text to something like "Account Name", you would only need to change it in the macro-def in ui-strings.macro.bxb.
In CommitTransfer_Confirmation, the intent elicits a prompt for the user to change the transfer property's value if tapped. For example, consider the following intent element:
This intent block sets up a subplan to find an account and passes this information back to the main goal of CreateTransfer, which is passed back to CommitTransfer. This prompts the user with a confirmation page.
![]()
Once users are satisfied with their choices, they must click "Confirm transfer" (whose text is set in the confirm-options label) to commit and make the transfer.
Updating the Transaction
If users want to change one of the inputs (such as adding a note or changing the account), they select one of the inputs, and Bixby brings up a value prompt. For example, if users tell Bixby "Transfer $50 from my checking to my savings", but then they decide to transfer from their Money Market account instead, they would select the box that says "Send money from Checking" to change the fromAccount.
Bixby calls the TransferFrom.view.bxb file. This does two things: it asks users Which account do you want to transfer from? using the WhichFrom template macro, and it displays the selection prompt with the available accounts to choose from.
![]()
Click one of the accounts to choose it. If the planner can find the account, it brings users back to the Confirmation Page with the updated choice.
If the user wants to edit the amount to transfer, the same TransferAmount_Input.view.bxb file is called, letting the user input a Transfer Amount, and consequently updates the Transfer structure.
If the user wants to add a note, similar to the Transfer Amount field, the Note_Input.view.bxb file generates a form with a multi-line text field using textarea. This inputted value is passed as the transfer's Note. The Transfer structure is also updated accordingly.
Committing the Transfer
After users tap Confirm Transfer, they have confirmed that the transaction can continue. Once the user taps this button, this transaction moves to the commit phase and the goal of CommitTransfer, which is of type Commit, is completed.
CommitTransfer takes in the Transfer structure in its transaction concept state from CreateTransfer and outputs a TransferReceipt. The corresponding CommitTransfer JavaScript file takes in the transfer information and calls http.oauthPostUrl, sending that information to the OAuth endpoint. It expects to get a postResult object in return, letting Bixby know if the transfer went through. If successful, the transferTime information is populated and the TransferReceipt can be outputted.
Getting a Receipt
After users commit the transfer and the transfer completes, Bixby creates and displays a receipt using the TransferReceipt model and TransferReceipt_Result view:
The TransferReceipt model has the following properties:
- A
transferstructure, which is the sameTransferobject that was inputted forCommitTransfer - A
transferTimeof typetime.DateTime, which lets the user know when the transfer was successful
The TransferReceipt_Result view does the following:
- In the
layout, it takes theTransferReceipt.transferstructure and uses separate layout macros for each property that needs to be displayed in thetransferstructure. - Also displays the transfer time in a separate
section, with the help of theTransferTimeLabeltemplate macro.
Additionally, Bixby uses the TransferCompleted template macro to let users know that the transfer was successful by saying Transfer completed.
The TransferReceipt_Result uses the sectioned content Bixby Views component, with several cell components to list out each of the transfer's properties.
![]()
Training Your Capsule
The example.bank capsule comes with 26 training entries that test several use cases. You can test each training entry with the Simulator using the Aligned NL, or compile the NL model and use the utterances provided. You can also view the resulting execution graph by clicking the down arrow in each training entry. This section goes into depth of four of these entries. It also includes information about how to use vocabulary in example.bank.
Training Entries Explained
The following training entries are not necessarily in the order found in the example.bank capsule, but they are referred to in the rest of this section as listed.
Training Entry 1: "Transfer $10"
[g:CommitTransfer] Transfer {[g:TransferAmount] ($)[v:viv.money.PrefixSymbol:$](10)[v:viv.money.CurrencyValue]}The first training entry goal is
CommitTransfer. It has the "$10" annotated as the transfer amount, specifically with the "$" as the prefix symbol and "10" as the currency value. Bixby prompts you twice for the accounts: once for the "To" account and again for the "From" account.It shows a confirmation page with this information, and you can choose to change the input values or add a note to the transfer.
Clicking "Confirm transfer" results in the receipt with transfer details that match the confirmation page.
Training Entry 2: "Transfer $1000 from my checking account to my savings account"
[g:CommitTransfer] Transfer {[g:TransferAmount] ($)[v:viv.money.PrefixSymbol:$](1000)[v:viv.money.CurrencyValue]} from my {[g:FromAccount] (checking)[v:AccountType:Checking]} account to my {[g:ToAccount] (savings)[v:AccountType:Savings]} accountThe second training entry has all the required inputs for the action
CreateTransfer: "$1000" fortransferAmount(with "$" for prefix symbol and "1000" for currency value), checking forfromAccount, and savings fortoAccount. This will create theTransferobject to pass back to the goal ofCommitTransfer. Even though the query has provided enough information to make the transfer, Bixby still creates a confirmation page with editable fields.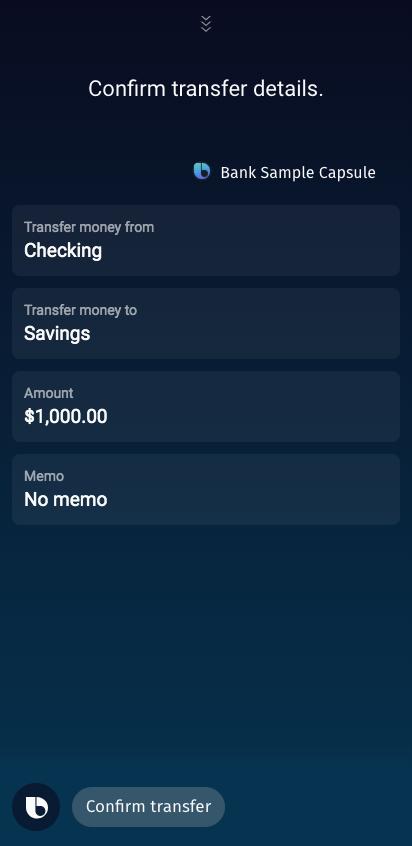
Training Entry 3: "Transfer from my Money Market account"
[g:CommitTransfer:continue:CreateTransfer] Transfer from my {[g:FromAccount] (Money Market)[v:AccountType:MoneyMarket]} accountThe third training entry is a
Continuation, since it continues off of an utterance. Therefore, the goal is still set toCommitTransfer, but the Specialization field is set to Continuation of and the Specialization node is set toexample.bank.CreateTransfer. For example, if a user says "Transfer $10", the planner triggers prompts for the To and From accounts for the user.The user could then follow-up with the utterance "Transfer from my Money Market account". This updates the
Transferstructure to have thefromAccountbe aMoneyMarketaccount type instead. Alternatively, if users start with an utterance like "Transfer $1000 from my checking account to my savings account", they can change their mind and tell Bixby "Transfer from my Money Market account" as a continuation, and the planner will update thefromAccountto beMoneyMarketaccordingly.Training Entry 4: "Transfer $10 from my savings account to my Money Market account for my college fund"
[g:CommitTransfer] Transfer {[g:TransferAmount] ($)[v:viv.money.PrefixSymbol:$](10)[v:viv.money.CurrencyValue]} from my {[g:FromAccount] (savings)[v:AccountType:Savings]} account to my {[g:ToAccount] (Money Market)[v:AccountType:MoneyMarket]} account for (my college fund)[v:Note]The final entry is essentially the same as the second training entry, but with a
note! This training entry uses open text matching, meaning that Bixby is not restricted to a certain set of values that thenotecan be. In this case, the entry annotates "my college fund" as the note. This is unliketransferAmount, where Bixby is specifically looking for a currency prefix symbol and value. This is also unlike either of the accounts, sinceAccountTypeis an enum with three specific allowable symbols:Checking,Savings, andMoneyMarket. When you run this utterance in the test console, a receipt is generated.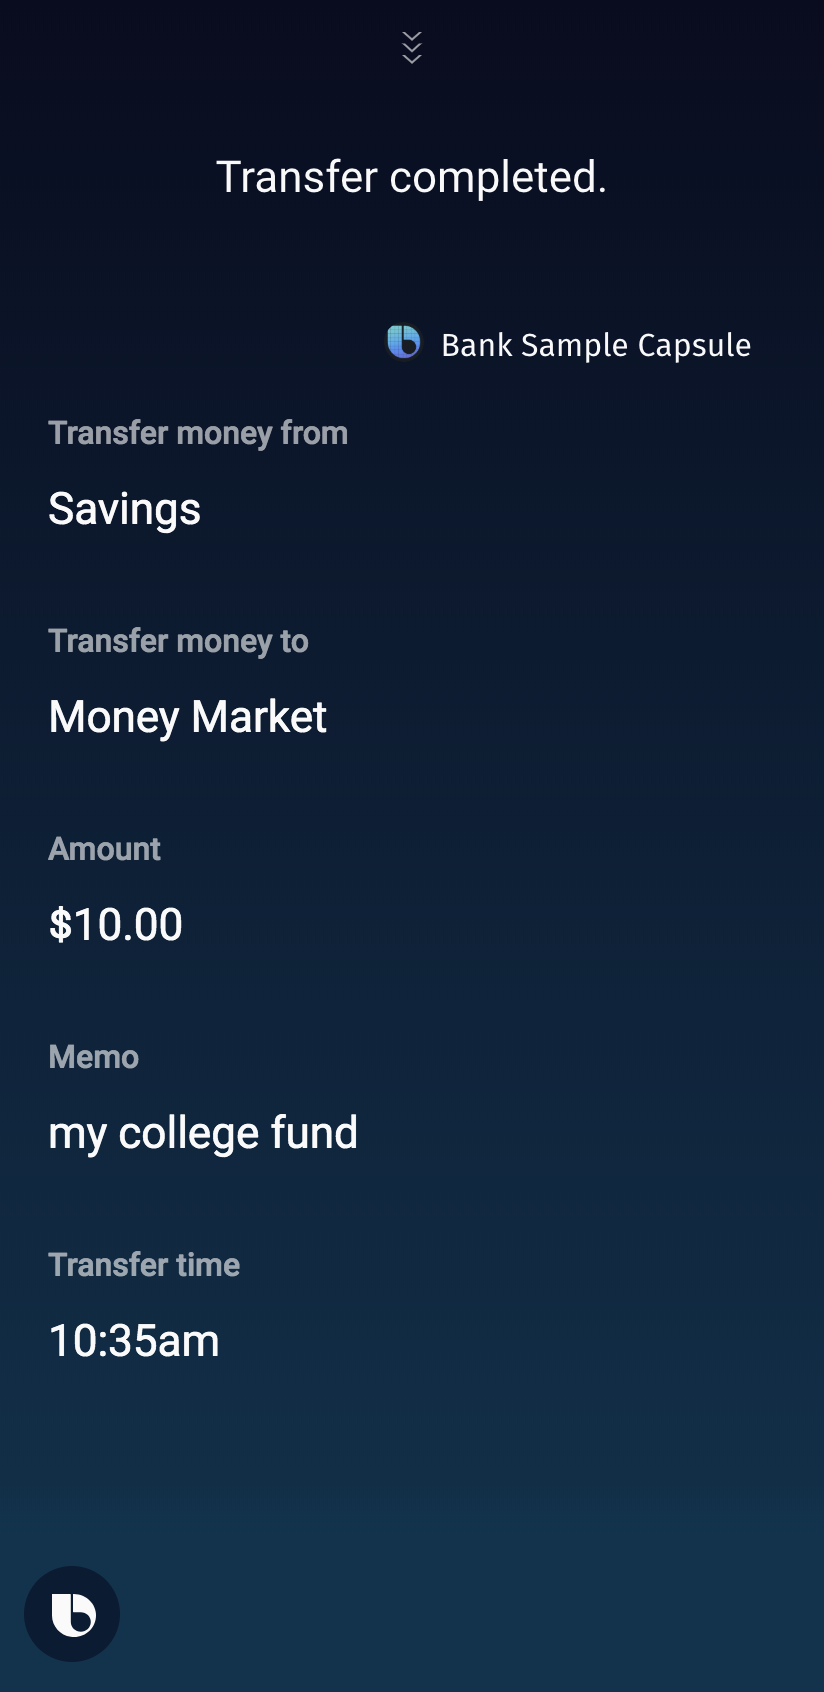
Some of the capsule's training entries are variations on a single use case. For example, "Transfer $10" and "Transfer $1000" operate similarly and follow the same design pattern, but only differs in the currency value ("10" versus "1000"). Similarly, "Transfer $10 to my savings from my checking account for my college fund" and "Transfer $10 from my savings account to my Money Market account for my college fund" have the same transferAmount ("$10") and note ("my college fund"), but they differ in which accounts are used. This variety of training enables Bixby to learn in general what to expect from user utterances and how to handle different situations. For more information on training best practices, see Training Best Practices.
Vocabulary
In addition to training, example.bank utilizes vocabulary to help Bixby understand utterances further. The vocab folder contains one vocabulary file:
AccountType: This vocab lists the various enum symbols and the variations of these accounts that a user might say or write.
Additional Notes About This Capsule
Notice also that there are two files with several macro-def keys defined. The ui-strings.macro.bxb handles all the UI strings, such as buttons or labels for prompts, as explained in Confirming the Transaction The nlg-strings.macro.bxb handles any dialog that Bixby gives to the user. This practice is recommended especially if you are planning to localize your docs.
Additionally, this capsule could be improved in the following ways:
- There is currently no mechanism to check if the "to" and "from" accounts are the same. You can
validatethe selected accounts withCreateTransferbefore continuing with the transfer to work around this. - Similarly, there is no way to handle the edge case of a user with a single account. Again, validating the inputs fixes this issue.
- If you need to log out of your OAuth session in the Simulator, you need to remove accounts under the OAuth section of the User tab.
Video Tutorial: Setting Up OAuth
The following video highlights using OAuth with the bank sample capsule.